8

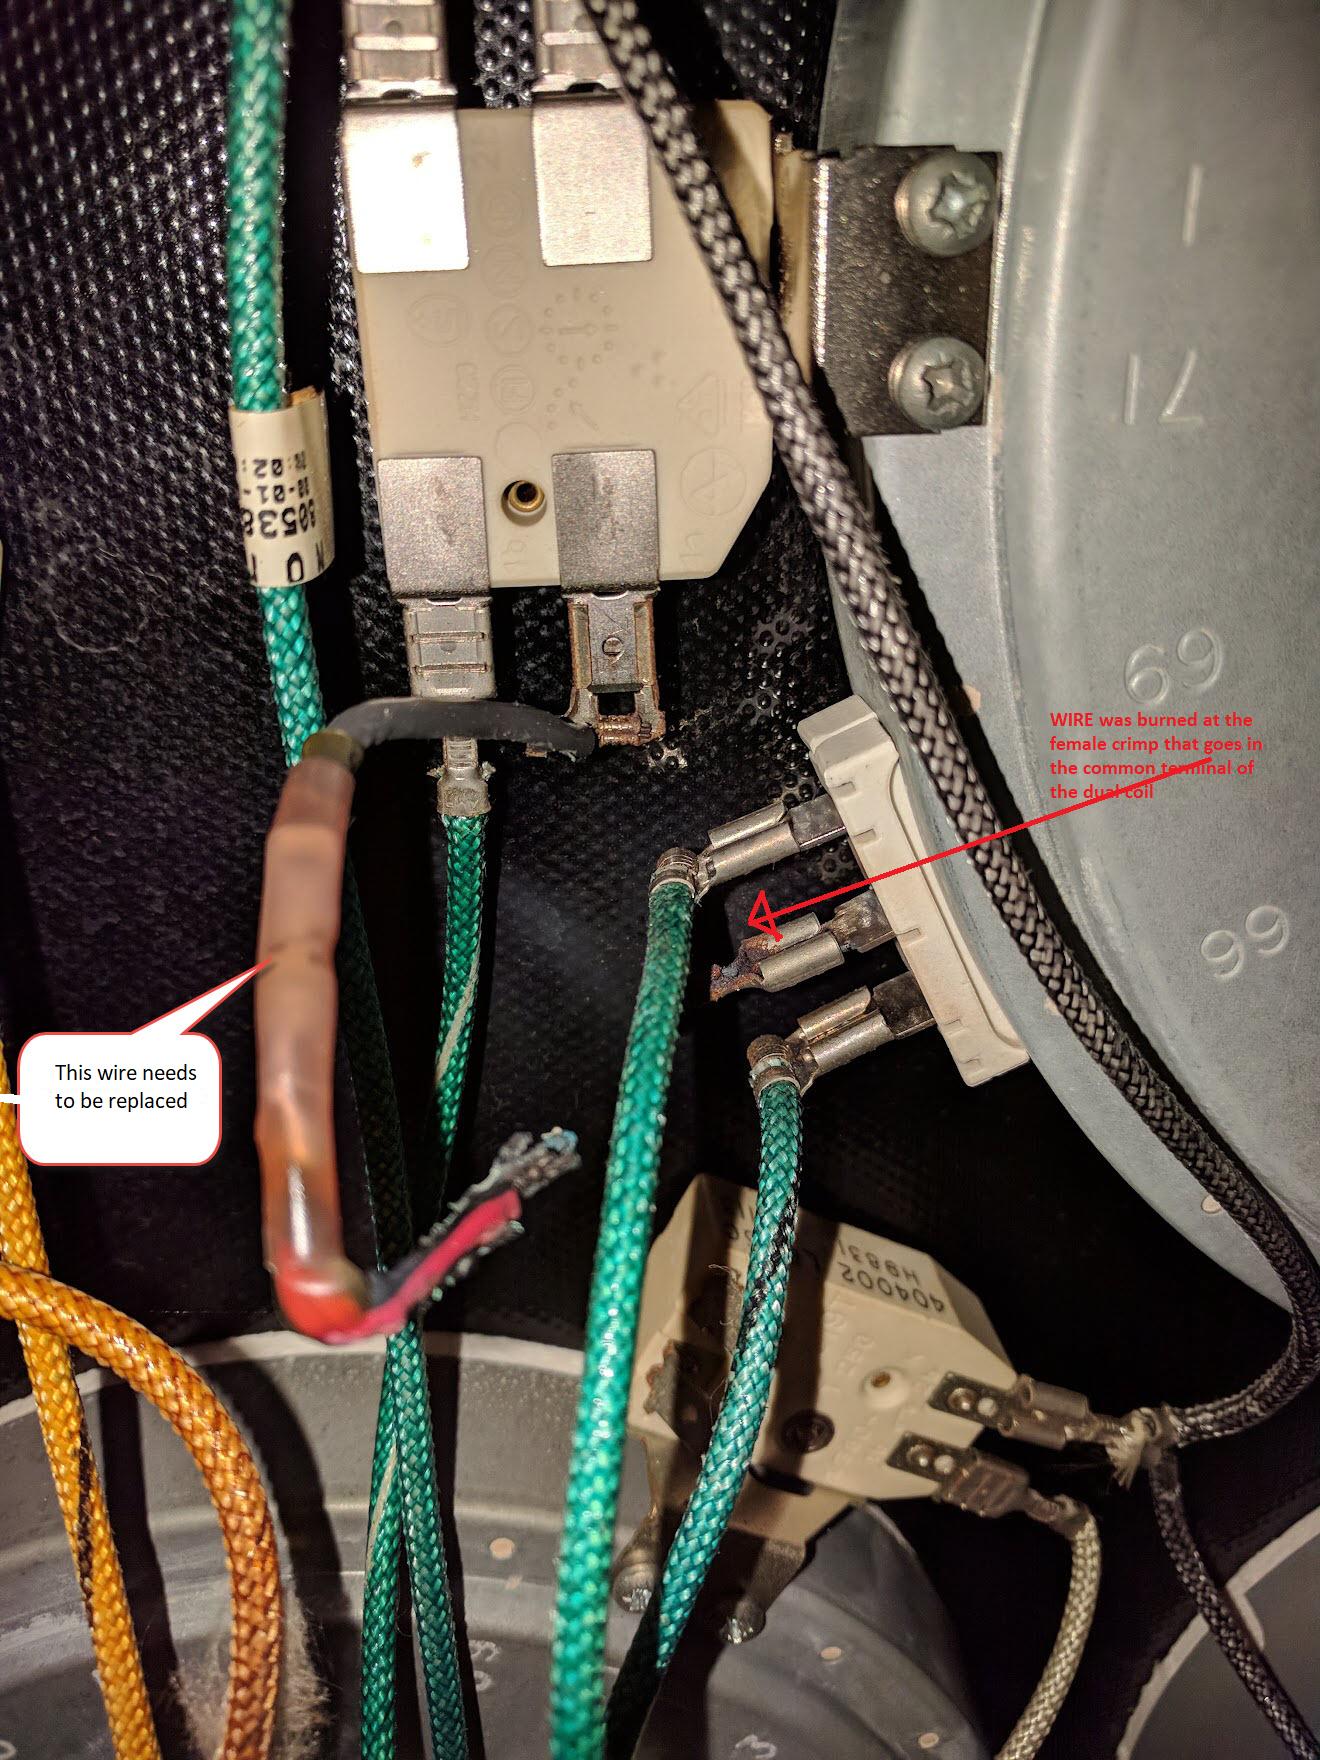
My Kenmore (Whirlpool) model# 66595775890 mid-90s electric range dual coil surface element is not working. Upon inspection, discovered that the wire connecting the coil common terminal to the 1A (heater circuit) terminal of the temperature limiter was burned at the joint with its female crimp connector that goes into the (male) dual coil surface element common terminal.

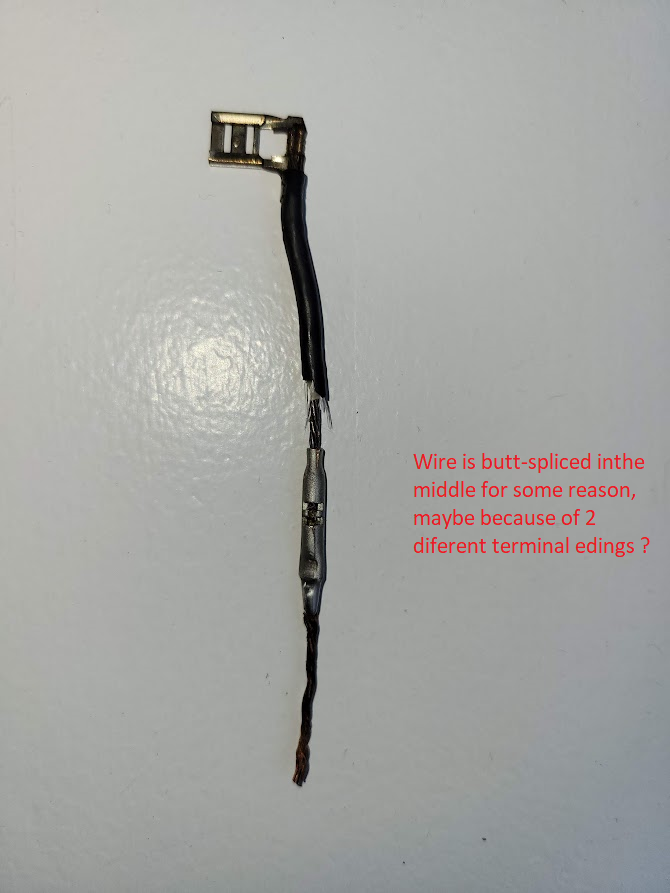
This wire was also butt-spliced in the middle for some reason. (maybe because the crimp female terminals are of different size? ). I have looked everywhere for this exact part, but have not been able to find it stand-alone. Can you please suggest the best option to do this repair myself? Should I buy pre-crimped wires with different size female terminals to match those of the limiter and dual coil and butt-splice them together, or better to just get a single wire and the 2 different size female crimp connectors separately and crimp them myself? In both cases, what are the ratings of the wire/insulator/crimp connectors I should look for? (AWG, heat limit tolerance, insulator etc) ? Any link on where to buy them is appreciated!

I would also like to know about any tips for cleaning the common male terminal of the surface element. Just using a metal file, or is there any cleaning product to get rid of any corrosion/burned surface?

The terminals that I need to mount to: enter image description here

The wire that has burned up and needs to be replaced: enter image description here

3 Answers 3

13

It looks like this has already been repaired once before. Note how your bad wire looks like it's "standard" PVC insulated electrical wiring instead of being high-temp wiring with a woven cloth insulation like everything else in your pic? That's a clue and may indicate why this has failed this time.

Those look to be simple, standard spade and lug connections. If you are able to make a solder joint or use a crimper, you shouldn't have any issues making up a jumper wire yourself.

  • You'll need to purchase some wire that's rated for high temperature stove/oven use.
  • You'll need to purchase the female lug connector ends that are the correct size.
    • It's hard to judge from your picture, but you might need to purchase two different sizes.
    • Pull the female connector off of the lug shown on the right of the first pic. (The one left behind by the burnt wire.)
    • The 2nd pic shows a double connector at a right angle. I don't think you'd need to exactly duplicate this connection style. A standard straight-on connector should work, you'll just have to route the wiring slightly differently.

Your local big-box home improvement store might have the high temp wire you'd need to make this repair, so I suppose it's worth looking there. However, I'd guess you'd be more likely to have to go to either an electrical supplier or possibly an appliance repair place (do those still exist?) to find the proper wire. Call the closest electrical supplier and ask them if they have wiring appropriate for use inside a stove/oven. If yes, head on down and buy some. They'll probably also have a large supply of spade connectors and are likely to have the correct size. You may end up having to buy many more than you'd like, but you'll have them on hand for future use.

If they say no, ask them if they can recommend anyone who might have it. Most likely, they'll be more than willing to make a recommendation if it's something they don't stock and can't order in. Local places tend to want to be helpful.

Once you've got all your parts:

  • Crimp one connector on
    • You could solder, but it may fail using home soldering techniques in the heat around the oven. Check your solder for its melting vs working temp range.
    • Crimp for a good mechanical connection then solder for a good electrical connection is probably even better.
  • Slide that connector onto one spade end
  • Make a nice run to the other connector to measure length.
    • You may have to reroute the wire to make a nice loop, especially if you use straight on connectors instead of the 90° connector shown.
  • Crimp the other connector on.
  • Push both female connectors onto their male counter parts.
  • Get to cooking.
6
  • 1
    Crimp then solder .. +1
    – JACK
    Commented Feb 8, 2023 at 13:38
  • 1
    I know of appliance repair places near me that still exist, but they do not sell parts. Commented Feb 8, 2023 at 15:55
  • 6
    @MichaelRichardson: On the flip side, there's a place near me whose storefront sign reads "APPLIANCE PARTS", from which I have bought [drum roll please] appliance parts.
    – supercat
    Commented Feb 8, 2023 at 16:09
  • 1
    @jack CRIMP only.
    – D Duck
    Commented Feb 8, 2023 at 22:13
  • 1
    @JACK Yes. Only crimp. Solder will make the connection less reliable. Use correct size of cable, correct type of lugs and correct tool.
    – ghellquist
    Commented Feb 8, 2023 at 22:28
5

Take all the pieces of the wire to your nearest used appliance place. They likely will have an appropriate part kicking around or can splice a new one up for you. Then replacement is trivial.

As to cleaning the terminals, I love Scotch-Brite or similar scouring pads for doing it. You can also use steel wool or a copper pot scrubber.

5
  • This feels like a "hire a pro" answer, which doesn't go over all that well at a DIY site. Granted, there are some instances where that really is necessary, but I don't think this is one. Debated making this comment for a while, decided to do so now that it's in the "Low Quality" review queue...
    – FreeMan
    Commented Feb 8, 2023 at 16:48
  • 2
    Fair enough. This seems like a straightforward part replacement job to me - no need for OP to learn crimping, get tools, perhaps do it wrong, maybe have to buy a larger chunk of wire or a whole bag of connectors, etc. I also appreciate the idea behind learning and getting all that stuff. If OP doesn't want to do that, finding the part is going to be the difficult task here, and I think it's reasonable to pick one up from a used appliance place. Installing it is trivial since they have already made it this far. There's also a great full DIY answer beside mine with a (deserved) higher score.
    – KMJ
    Commented Feb 8, 2023 at 18:13
  • Thanks for taking that the right way! Note, I did not vote to delete from review. This is a valid option, just not the DIY option.
    – FreeMan
    Commented Feb 8, 2023 at 18:20
  • 1
    @FreeMan There's a spectrum of DIY, and this answer is closer to the "not DIY" side, but it's still DIY. If installing parts you went out and bought in a device that most people would never want to take apart isn't DIY then practically nothing is DIY.
    – Logarr
    Commented Feb 9, 2023 at 5:39
  • Fair enough point, @Logarr. </discussion>
    – FreeMan
    Commented Feb 9, 2023 at 13:57
1

You won't find bits of wire and crimp terminals in the replacement parts catalog. At the average electrical supply house you'll find terminals, but IMHO it's pretty unlikely you'll find high-temp wire like this. Maybe if it's a supply house that serves industrial customers, rather than supplying only "average" commercial and residential jobs.

Find somebody who is giving away a junk range (or buy a cheap used one found in the local classifieds). Drag it home, tear off the covers, and look inside until you find the right kind of terminal crimped to a length of good high-temperature wire. Cut out the length you need. Give away or throw away what's left of the junk range.

Clean the damaged terminal with a scouring pad ("scotch-brite" or similar) or steel wool. Make sure that when you slide the new terminal on it takes plenty of force to do -- this indicates a good snug fit. You can put a little bend in either or both of the terminals to make the fit a little tighter if necessary.

Splice the salvage wire segment to a good part of the original conductor in your range. A butt crimp terminal should do. Make this splice some distance (say 6+ inches) away from the heating coil if you can.

1
  • 1
    There are also salvage yards that have piles of old appliances where you can pay a small fee to loot them for parts. Keep in mind a lot of what you see there will have been junked for good reasons, and will probably not have improved much from years of exposure to the elements since then, but it's possible to find usable parts this way. Commented Feb 8, 2023 at 20:46

Your Answer

By clicking “Post Your Answer”, you agree to our terms of service and acknowledge you have read our privacy policy.

Not the answer you're looking for? Browse other questions tagged or ask your own question.