1

I have the following tap / faucet:
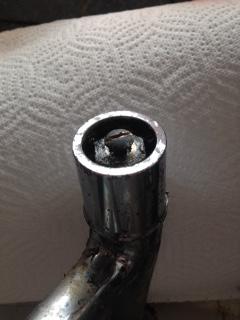
Broken Tap

As you can see, it's seen better days. The handle of it was composed of four plastic interlocking pieces which have, piece by piece, broken off.

We're due to get a new kitchen soon, so I don't want to spend any money on it at this stage. My initial thought was to replace the tap, but it's part of an enclosed unit where I physically can't get to the underside of it.

I visited a local DIY shop, and he suggested this:
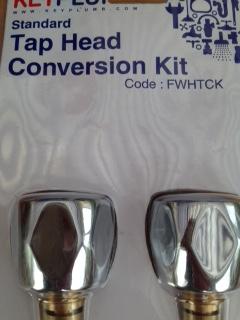
Conversion Kit

This sounded like a brilliant idea. Apparently the concept being that you simply unscrew the top of the tap, remove the cylinder and replace it with this. Having unscrewed the screw that is visible in the above picture, it appears to be effectively impossible to remove the top of this tap.

So, my question is broadly, how can I rectify this without changing the tap? Firstly, am I correct in assuming I should be able to simply slide to top section of this tap off once the screw is removed (I've tried WD40 and a good bit of force, but it's not coming)? Secondly, assuming that this isn't possible, is there such a thing as a "glove" that simply slides over the top (the tap works okay, it's just hard to turn off and on)?

1
  • You didn't get good answers because the photos are not very good. Anyway, go to a building material recycling center (where they sell used stuff) and get a temporary tap till you are ready for your permanent one with the new kitchen.
    – Ariel
    Commented Jan 6, 2015 at 11:22

3 Answers 3

1
+50

From my point of view (image is very small and poorly illuminated) you face a hexagonal ending of the shaft, when looking at the top of the tap. My first try was to get a wrench socket, which fits the hexagonal stub. It may be difficult to find a matching wrench socket small enough to fit into the housing of the tap, but you could take a cheap one and grind the outer diameter down until it fits. then you screw it down with a matching screw and insert a short t-handle. Alternatively you may fix a valve handle to it via a sqare axis reaching from your wrench socket into the handle.

Update there's another way to make place for a wrench socket (assuming there's a wrench socket fitting the hexagon, but not the inner diameter). You could saw off the upper rim of the tap surrounding the hexagonal stub of the shaft, so you can place the wrench socket on it, without having to grind its outer diameter down, which is undoubtedly the harder work to do. The wrench socket — again — can be fixated by a matching screw and some washers on the tap to prevent it from popping out.

3
  • Okay - A socket wrench does, indeed fit into that part of the tap. However, the nut looks like it's had its day. When I turn, it simply turns on the nut, smoothing its edges as it goes. Commented Jan 3, 2015 at 14:05
  • You should check the diameter of nut and socket with a caliper to be sure. But now I'm at my wits' end, I think. All further options I think of are way more complicated than replacing the whole tap.
    – Ariser
    Commented Jan 3, 2015 at 16:11
  • I think I might have a go at dismantling the containing cupboard. Thanks for your help. Commented Jan 3, 2015 at 16:13
0

Take a considerably better picture than that (with a ruler in the pictures so sizes can be judged accurately), and possibly a clay impression of the place the handle goes, and shop for a replacement tap handle.

I suspect the screw in your picture is just to hold the handle on.

0

I suspect the round outer part above the water spout turns. However, it may be impossible to remove.

Would probably be easier and less frustrating just to replace the tap. (Sorry.)

Your Answer

By clicking “Post Your Answer”, you agree to our terms of service and acknowledge you have read our privacy policy.

Not the answer you're looking for? Browse other questions tagged or ask your own question.