10

I have a Whirlpool AKP200/WH (https://manuall.co.uk/whirlpool-akp-200wh-oven/) and the main element stopped working. The grill element still works, and the oven lamp, etc.

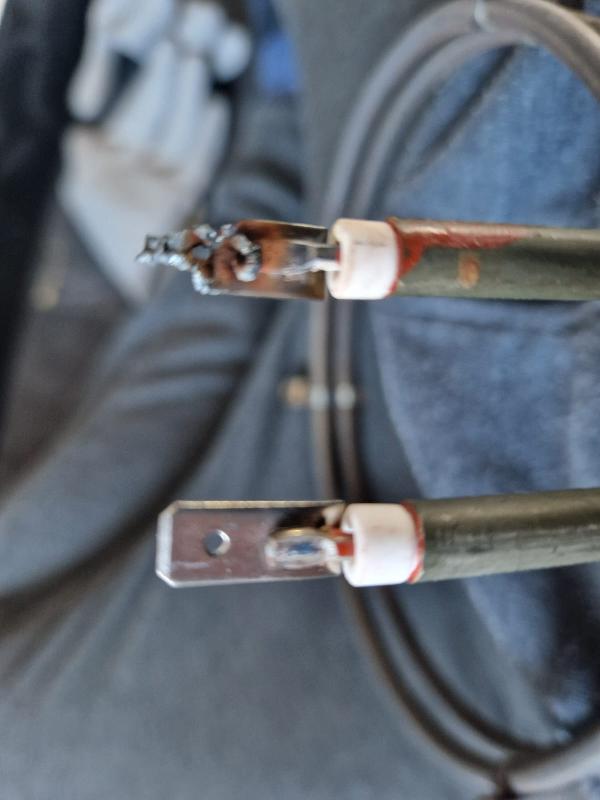
So I took the element out to have a look and found that one of its two male connectors was burnt up.

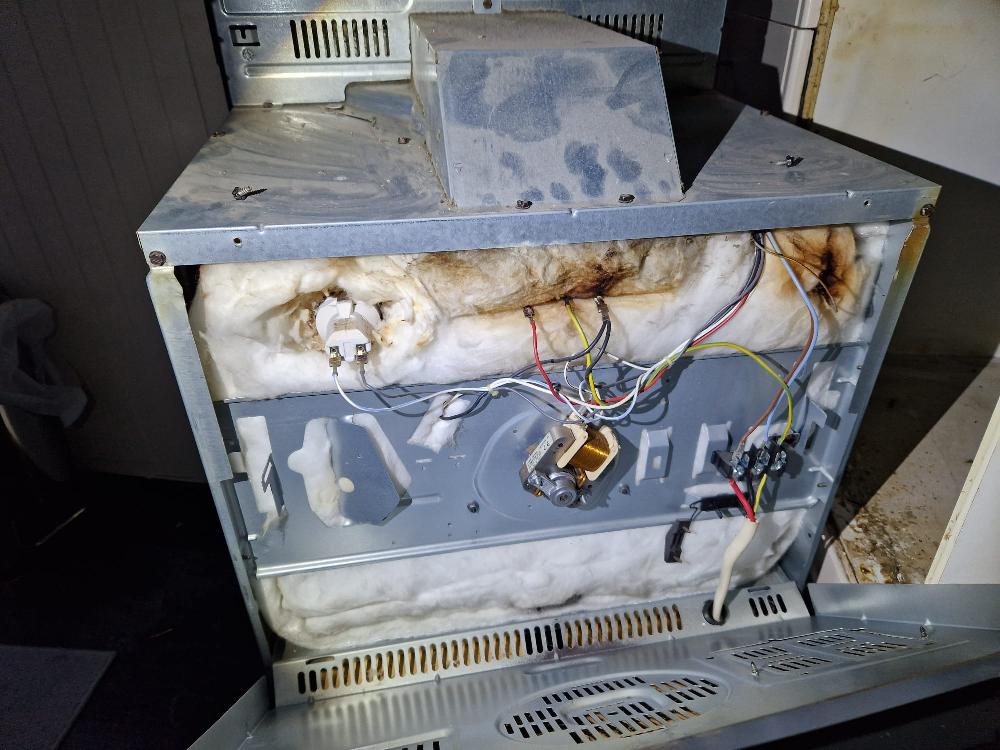
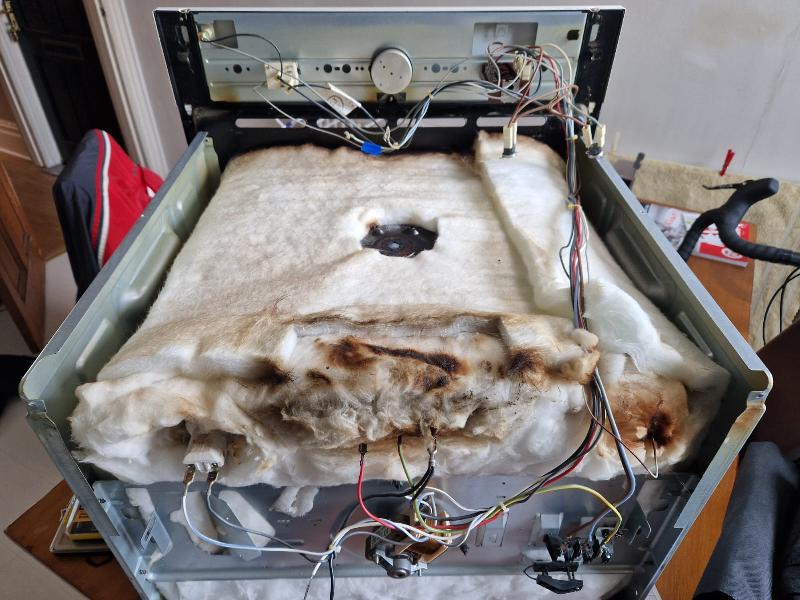
I then bought a replacement element hoping to fix, but as I explored further, I found that the wire had fallen through a hole in the insulation between the oven cavity and the back of the oven, and so I had to take the oven out to get it back.

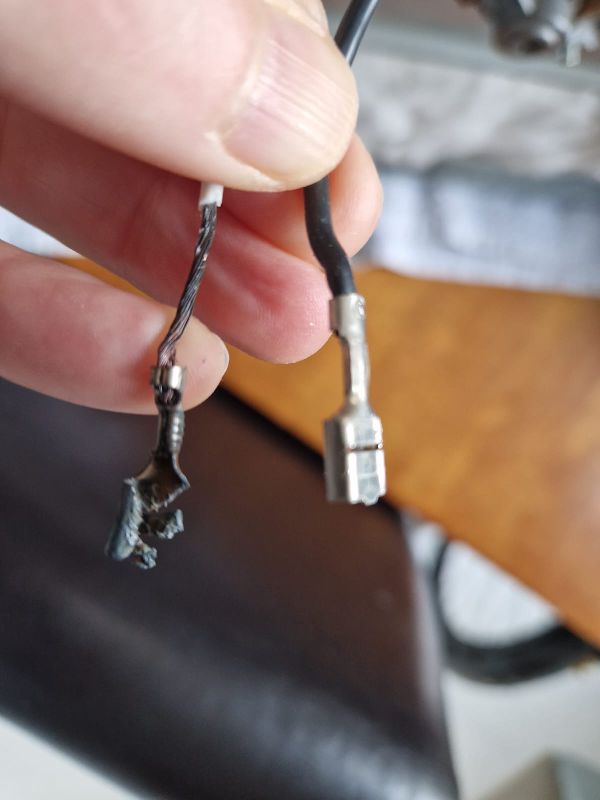
I then noticed that the female connector on this wire had burnt up too (the one connecting to the burnt up element connector). So not a simple element replacement as I'd hoped.

I guess I need to fit a new female connector to the wire. The oven is old and a bit crap, but it did the job fine. So I'm wondering whether it's worth pursuing a repair, given I've already bought the new element.

How easy a job is it to fit a new connector? I assume it would have to be a high-temperature tolerant one? Would a repair shop do this sort of job?

Male connector burnt up (part of element)

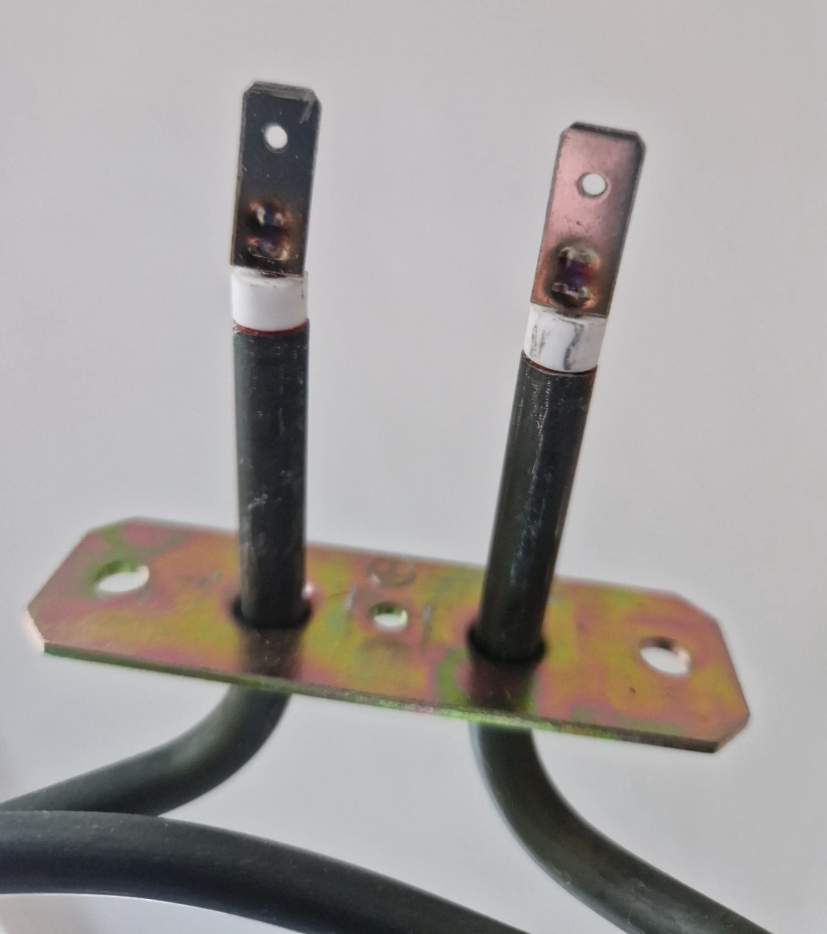
Good male connectors on new element

Female connector burnt up (part of wire)

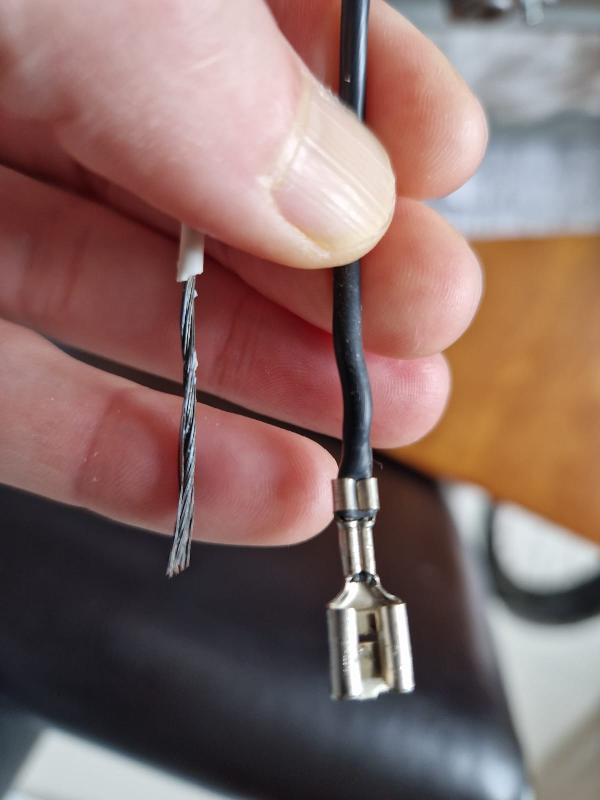
Stripped some wire to see if it was damaged

Oven from the rear.

Oven from the rear. Lid off.

Update

So my friendly neighbourhood oven repair shop gave me a wire with the right connectors, but it was too short. So I cut that wire (i.e. removing the bad half with the burnt out connector) and crimped it together with the 'good half' of the wire I had using a butt connector, so I had enough wire to reach.

So far so good!

4 Answers 4

7

Good photos!

This is a common mode of connection failure, and is easily fixed.

  • Test the old element -- it may very well be OK.

    • Resistance between the two QC lugs should be, roughly, in the range of 20 to 40 Ω.
    • Resistance from either lug to the bare (scraped free of oxide) metal tube should be infinite (blinking, on many digital meters).
    • If those values are OK, the element is likely good to reuse.
  • If the end of the male lug on the heating element needs to be cleaned up, carefully use a fine file or rotary grinding tool, while holding the base of the lug, to prevent the filing from wiggling the wire and shattering the ceramic insulator. It's acceptable if the lug is just a bit smaller than the other, when done.

    Clamp lug (from OP photo)

  • Cut back and strip the burnt wire until it is shiny copper (or tinned copper, silvery). If the burnt wire is now too short to reach the element lug with some slack remaining,

    • Use high-temperature wire (preferably glass-fiber insulated, such as this) to extend the burnt wire. A somewhat heavier-gauge wire might be helpful.
    • Use high-temperature ceramic wire connectors for that connection, such as this.
  • Use a high-temperature Quick Connect (QC), such as this, for the connection. Take extra care to ensure a tight crimp and a tight connection to the lug, again being careful of the ceramic insulator.

Examples are for illustration only, and may differ from the specific size or other requirement needed.

Why is this failure mode so common?

  • Manufacturers use the smallest wires size that carries the current, when parts are new.
  • Repeated heating/cooling cycles cause the connector to loosen on the lug, increasing resistance.
  • When two resistors are in series, i.e., the heating element and the QC connection, raising the QC resistance causes more heat to be dissipated in that connection. The maximum would be half that of the circuit. With an element designed for 1,500 W, for example, 375 W would be turned to heat in that tiny connector. No surprise that it went up in smoke!

(On occasion, I've crimped a short bit of copper tubing around the connected lug, acting as a heat sink and reinforcing the connection -- being very careful that there is nothing the connection can contact.)

2
  • The photo is of the male connectors of the old element. I'll add pics of the new element for comparison...
    – Paul Grime
    Commented Jan 22 at 10:52
  • A picture of one that cleaned up male end "just a bit shorter" might be nice here. Good idea I never thought of reusing the element, straight it up, sand it... :)
    – rogerdpack
    Commented Aug 23 at 17:50
5

Speaking as somebody with a moderate amount of professional experience with crimped (spade etc.) connectors: this is just about the worst kind of repair imaginable.

You will need the /correct/ type of crimping tool, sized to the wire. Expect to pay several tens of pounds.

You will need to splice the new wire in with a crimped butt joint, forget about soldering. You should ideally go to somebody reputable like Farnell and look for something with a good temperature rating, and expect there to be a minimum order quantity.

You will need to cut the damaged wire back a /long/ way to get to a point where it's still copper coloured: any attempt to crimp onto it where it's still discoloured will fail. The connector will again obviously need to have a good rating, and again expect there to be a minimum order quantity.

In short, you can expect to pay a substantial amount for tooling and parts. You'd be far better off getting a spare wire from the manufacturer, or finding a local electrical company who could make one up and would guarantee their workpersonship.

You're obviously more than capable of fitting the replacement wire yourself.

18
  • 3
    1. A good crimp tool is just a few US$. Careful use of the tool is more important than price. 2. The old wire was discolored, damaged by oxidation at a very high temperature and by and contact with the poor-quality original insulation, which appears to be a PTFE derivative, not glass insulated (chlorinated and fluorinated plastics decomposes at high enough temp, attacking copper). It might have been tinned copper, which looks silvery, or plain copper, but now it's useless, up to the point where it's shiny metal again. Strip back insulation until you see shiny metal. Commented Jan 22 at 14:22
  • 2
    @PaulGrime yes, that's the characteristic colour of copper which has been oxidised by excessive heat. The heat almost certainly was caused by sparking as the spade connection degenerated, and once there is not easy to remove: at least without further weakening the copper conductors. This is something which I've tried to fix in the past: and failed, even with the correct crimp dies etc. Commented Jan 22 at 16:57
  • 3
    @Huesmann, that is an exceptionally bad idea. The point is to have a good electrical connection, using the full thickness of the wire, not to have a pretty connection. With so much corrosion, there is less copper left, the thinned wire would have high resistance, and would burn out again, quickly. One goes back far enough in the wire to find undamaged, full-diameter copper, or replaces the wire completely. Commented Jan 22 at 17:05
  • 1
    @DrMoishePippik I agree with your point about PTFE: interestingly, I have just fixed a problem in my 3D printer where a degraded PTFE insert (which had definitely never been above 250C) was starting to stick to absolutely anything. However the point I was trying to make about the tool was that it is definitely not the kind of thing one will pick up from Halfords or B&Q, and together with proper wire etc. (/not/ cheap stuff from eBay) a DIY repair is likely to be expensive. Commented Jan 22 at 17:23
  • 2
    @Huesmann No. The base material is compromised, and a simple chemical process will not help. Apart from anything else, if any significant amount of material is removed it will no longer be possible to get a decent (professionally referred to as "gas tight") crimp, and the problem will recur. Commented Jan 22 at 17:25
2

It's a straightforward repair, but you will need a crimping tool to match the terminal that you buy to replace this one.

What's in the other end of the wire? If it's another spade, etc, then you might find that the easiest solution is to take the broken wire to an appliance repair shop and have them make a new one to match.

5
  • Hi. Yes, there's another spade on the other end at the front of the oven, but I haven't been able to take the top of the oven off yet to trace the wires to the front of the oven. There's one stuck screw that I'm in danger of chewing up with a screwdriver.
    – Paul Grime
    Commented Jan 22 at 21:48
  • 1
    @PaulGrime Stuck screws that have been repeatedly heat-cycled can also shear. Penetrating oil (NOT WD-40) is your friend. Commented Jan 23 at 12:38
  • Thanks Mark. Do you have a recommended brand of penetrating oil?
    – Paul Grime
    Commented Jan 25 at 20:29
  • This worked for me diy.com/departments/3-in-1-multi-purpose-oil-200ml/…
    – Paul Grime
    Commented Jan 29 at 12:35
  • Oven lid now removed and I've taken out the damaged wire
    – Paul Grime
    Commented Jan 29 at 12:35
0

If there's enough reach on that "toast" wire (female side), you may be able to clean it up (sand it till you see copper metal--assuming its dark color is discoloration from the burn? couldn't tell exactly), then attach a new female disconnect. Just buy a disconnect that is rated for high temp and is the right size. I think 14 gauge worked for me recently. If you have extra "spare" wire on the toast female side you could strip back more insulation and attach the new disconnect to the wire that looks good without having to sand it (preferred method LOL). Or as the others say, add some more wire to extend it (high temp butt splice comes to mind, as you said). Some here might argue that sanding it is unstable, but might work fine. Also cut back the exposed wire so it is all insulated, before putting in the new disconnect end.

(normal electrical multi tool can also crimp FWIW)

Your Answer

By clicking “Post Your Answer”, you agree to our terms of service and acknowledge you have read our privacy policy.

Not the answer you're looking for? Browse other questions tagged or ask your own question.