2

I'm extremely new to home improvement and am seeking some input from people far more experienced than myself on the following project. In short, I want to install a punching bag in my garage. The bag (see here) itself will be attached to a Spider Mount (see here). And the mount will be attached to three or so pieces of lumber (that I'll need to purchase) that will be nailed between two ceiling joists/ties (not sure of the terminology) in the garage.

How do you suggest I go about installing the lumber between the two joists?

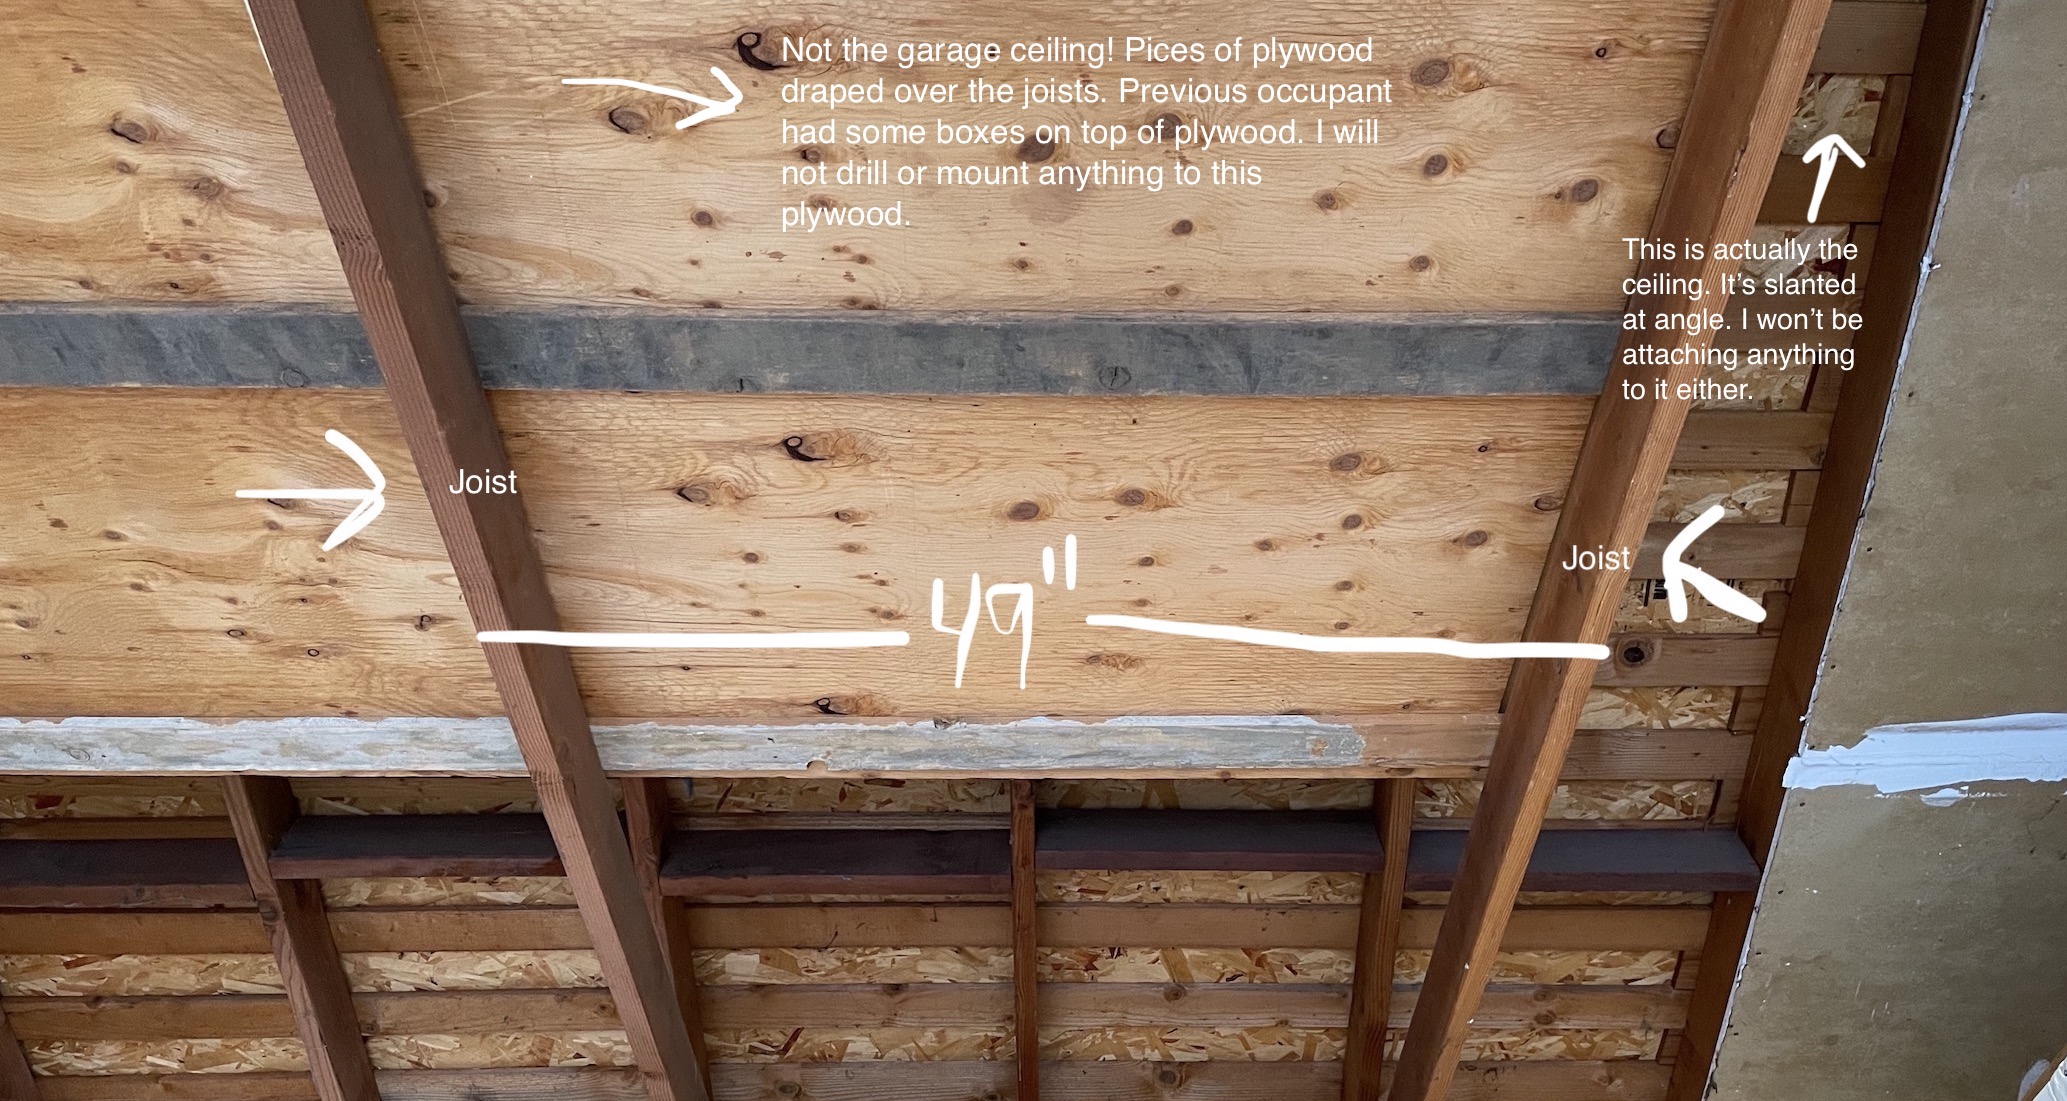
Here's a picture of the two ceiling joists in the garage where I'll hang the bag. The joists measure 1 1/2" thick and are 5 1/2" wide. The span from one joist to the other is 49". Please note the the covering over the joists is not the garage ceiling—it’s just plywood the previous occupant used for storage. I won’t be drilling into this plywood or the garage ceiling. I’ll only be adding to the two joists pictured.

enter image description here

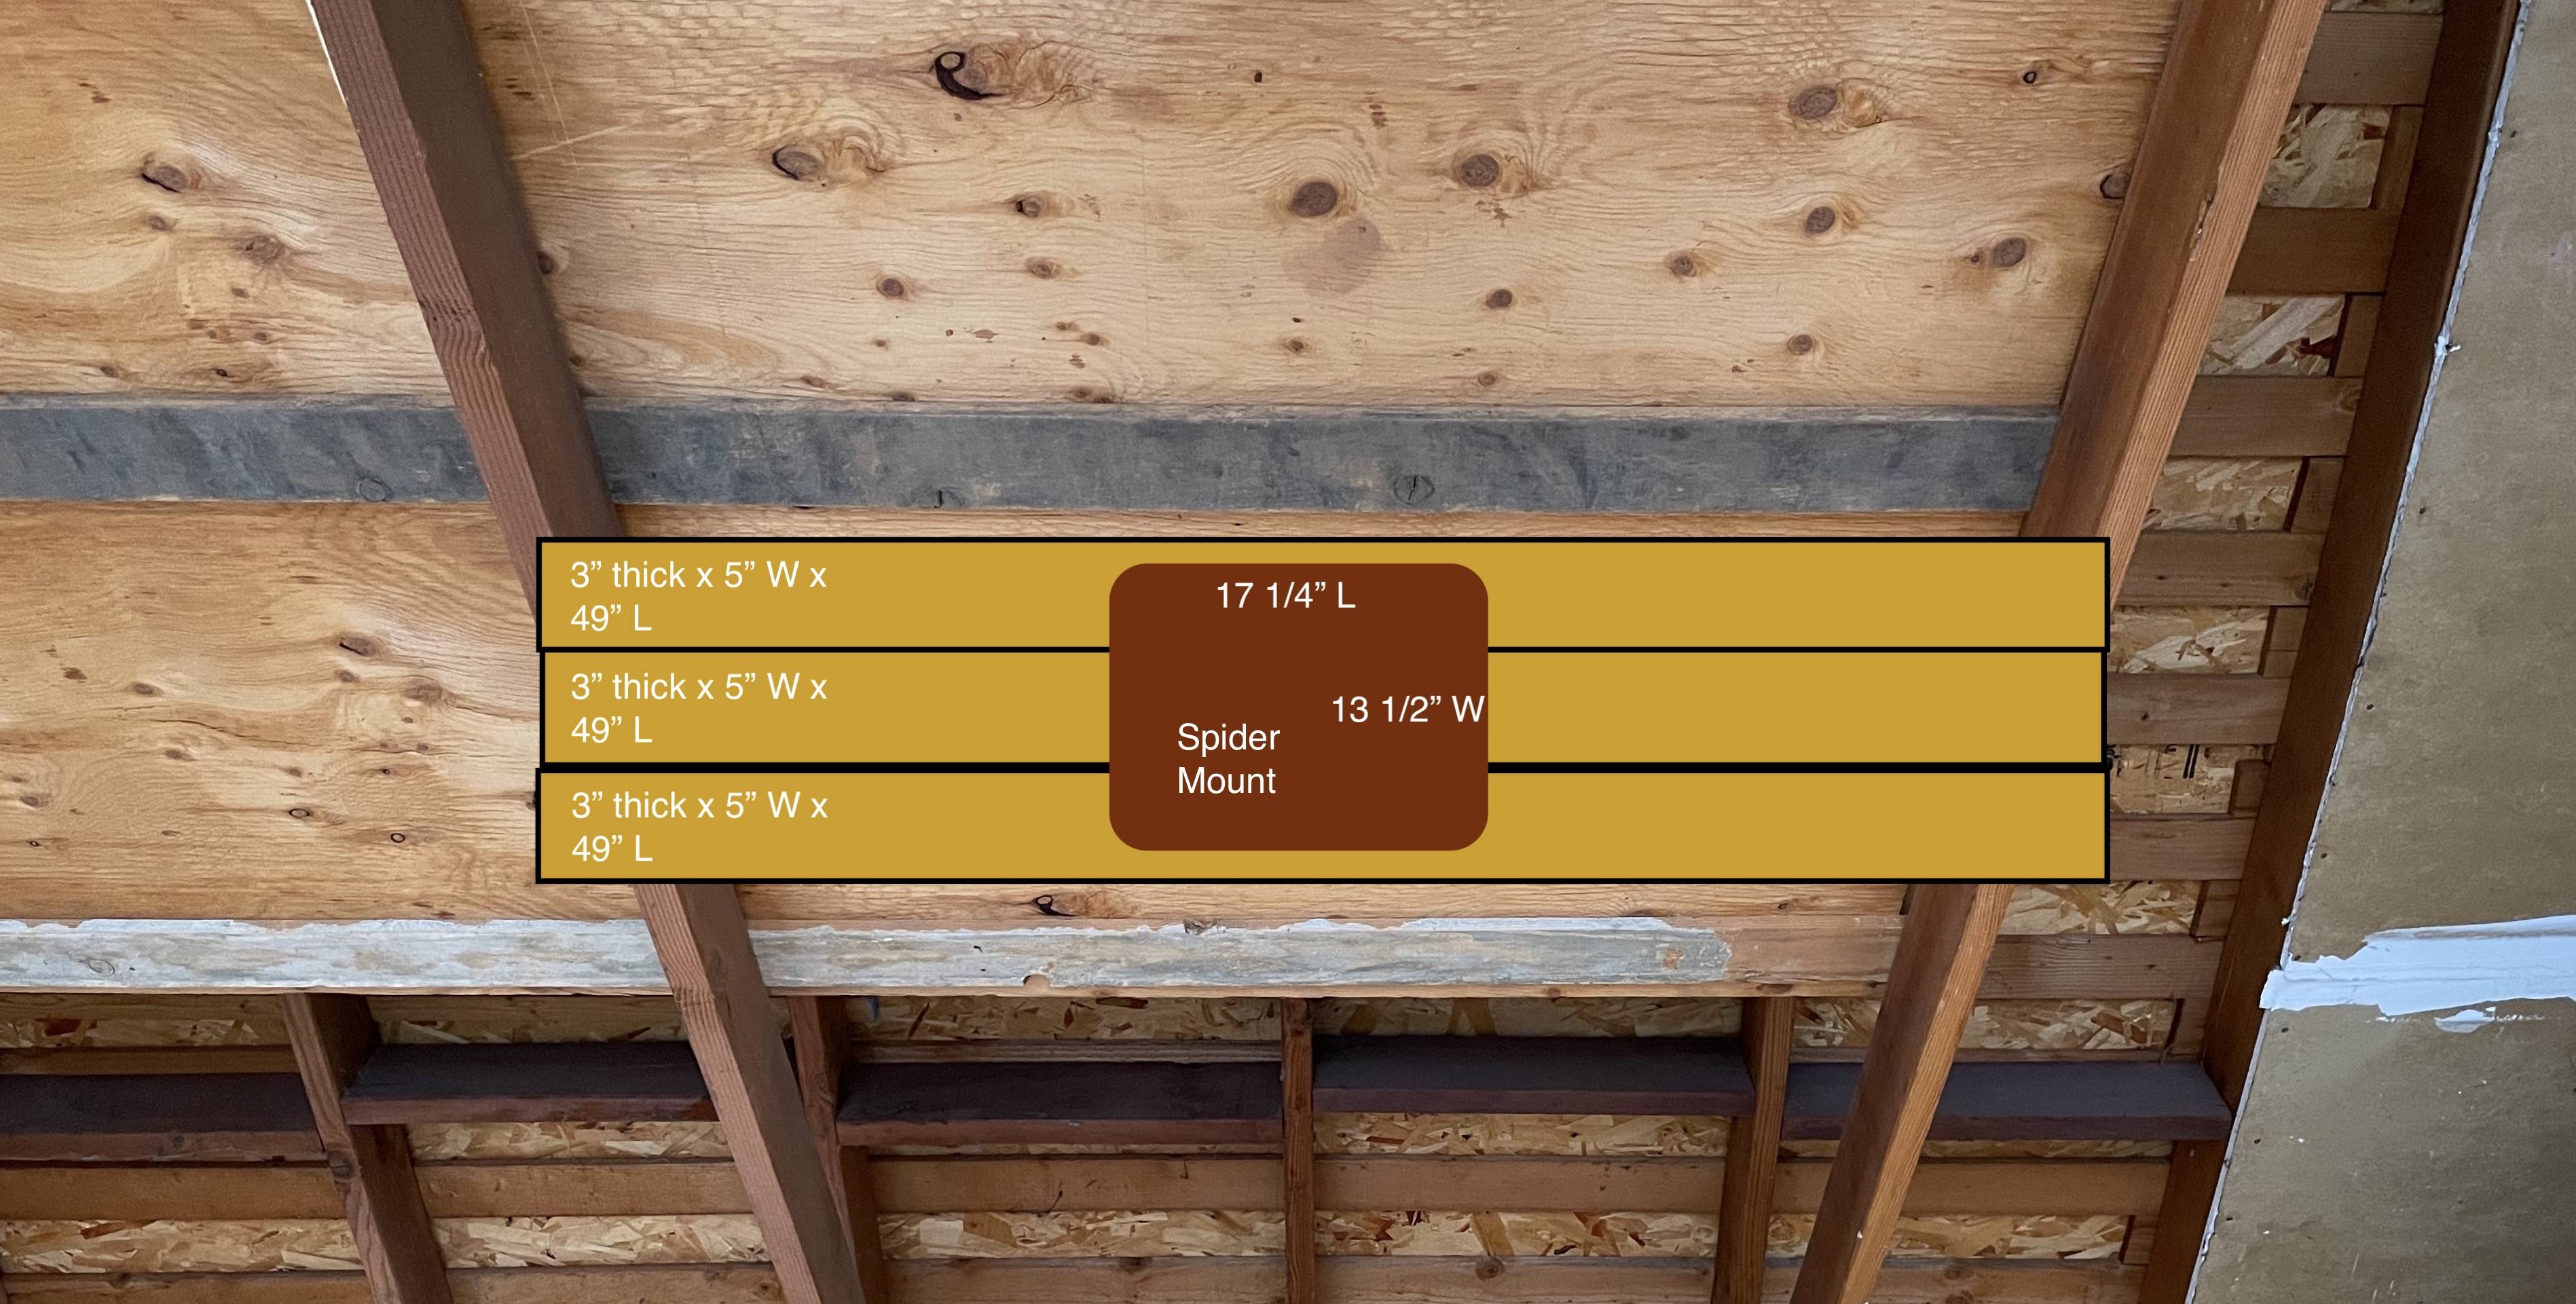
My inclination is to install three pieces of lumber in between the two joists. I’d then attach the Spider Mount in the center of the three pieces of lumber. I’m thinking that each of the lumber pieces would be 3” thick x 5” W x 49” L. I could get these cut for me at my local Ace’s lumber yard. The Spider Mount measures 13 1/2” W x 17 1/4” L. The unit comes with four 3/8” x 2.5” lag bolts for mounting, so I’m assuming the pieces of lumber need to be thick enough (such as 3”) to suit the lag bolts.

Here's a sketch of how this would look:

enter image description here

Once the lumber and Spider Mount are in place, I’d hook the 80-lb. bag to the mount.

So that's the general idea. My primary question to the forum is, "How should I install the pieces of lumber to the joists?"

Which wood should I use, and of which dimensions?

How to go about the drilling? Which size for the drill bits and screws?

Should I incorporate joist hangers to reinforce the lumber to the joist joists?

Clearly, I’m very new to this type of work so the more description people can offer the better. I appreciate it!

1
  • 3
    There is a reason that your bag manufacturer specifies that it be mounted "to at least 2 floor joists". Floor joists are designed/engineered for live loads, those garage ceiling joists are not. Your bag, when mounted on that springy spider deal, introduces a significant live load; the ability of those ceiling joists to adequately support it, to me is dubious. Can you look into reinforcing those joists up top; like transfer the load to the roof assembly? Commented Dec 20, 2020 at 23:04

2 Answers 2

1

You'd have to install some more supports to your framing in order to prevent damage to the existing framing members. I'd also suggest mounting the Heavy Bag as close to a wall as possible rather than mid-span. The ceiling joists will be carrying most of the weight and jolts. The ideal support would include a vertical supporting member under each joist and between the heavy bag. But this may not be convenient or appropriate. The (3) 2x6 boards in you picture should be installed to the joists 'on edge' and not on their 'face' (flat). They'll be able to hold greater stresses and weight.

The instructions don't mention this but it is shown in the web sites picture which shows it mounted to 2x10 joists.

I would think at a minimum you'd should sister in (2) new ceiling joists, one to each of the existing joists; spanning wall to wall. Than bridge between them with a doubled cross piece spaced for the size of your spider hanger. Also some single pieces of bridging spaced at appropriate intervals would be wise. Use 3x9 inch deck screws to join all lumber.

5
  • 1
    If adding joists (or are they really just collar ties?) add some to the set of rafters between, since we can see that the joists/ties are at double the space of the rafters.
    – Ecnerwal
    Commented Dec 21, 2020 at 0:18
  • Great response! I doubt I could pull off installing ceiling joists that run from one end of the garage to the other without some serious help. I looked at the end of the joists and can't even see how they're bolted into the walls. (I think they're on the other side of the garage paneling.) Could I attach "partial" joists underneath each one? When you say "sister in", would these joists be installed "edge on edge", and thus held together with some sort hanger/brace (I'm not sure what to use)? And could you elaborate on what a doubled cross piece is? Why doubled instead of a wider piece?
    – cjl5000
    Commented Dec 21, 2020 at 2:06
  • The bottoms of the joists sit on the walls top plate and nails hold it in place. When you attach a similar piece of lumber to a joist it's called "sistering". This can be done in sections (2 lengths instead), but won't be as strong as a full length). "doubled bridging" is (2) 2x6 fastened together on their 6" surface (face-side) to make them a 4x6. This allows the piece to carry more weight. the lumber dimesions should be the same as the existing joists 2x6 (?).
    – ojait
    Commented Dec 21, 2020 at 2:31
  • Encerwal also has a great idea of spanning several joists. That should be incorporated with whatever you decide to do.
    – ojait
    Commented Dec 21, 2020 at 2:34
  • It's important to know the length of the span before recommending sistering additional joists. It's likely what folks are referring to as a ceiling joist in the picture is actually a roof truss chord, which functions differently than a joist. If so, things aren't quite as simple as adding another piece of lumber -- the span could be 20 feet or more! More pictures of the existing garage would be helpful. Commented Dec 21, 2020 at 20:44
0

I would strongly suggest that you use a couple of LONG planks (or a long beam) that span at least 3 or 4 of your ceiling joists, set on top of them (since you don't indicate that you are using the space on top of the plywood for storage.)

That is a very lightly built structure - you'll want to load it as lightly as possible, and that means spreading the load out over a lot of the structure.

4
  • Thanks for the response. So would the idea be to screw these long beams into these 3-4 ceiling joists? And after doing so, cross (2) additional 2 x 6 "joists" underneath these beams? And finally attach the Spider Mount to these new "joists", which are themselves attached to the beams you've recommended I add?
    – cjl5000
    Commented Dec 21, 2020 at 3:10
  • Unless you need the mount lower, I'd set the beams on top of the plywood, on edge, attached to the joists, at a spacing suitable for placing the mount below the plywood (or just move the plywood aside if it's not fastened down and you don't want to drill holes in it) so you can screw into the edge of the beams. Only if you need the mount to be lower would I suggest getting into more complexity to move the mount point down (I think normally you just use a longer chain for a heavy bag, but no specific experience other than seeing a few.)
    – Ecnerwal
    Commented Dec 21, 2020 at 3:23
  • If I'm laying, say, a very long 2 x 4 beam on edge across the tops of these ceiling joists, how would I go about attaching them? If the beam is on edge, I wouldn't use a 4" screw to drill through the edge of the beam into the joist, would I? Would I use some sort of brace/joist hanger and smaller screws instead? Never done this before.
    – cjl5000
    Commented Dec 21, 2020 at 20:21
  • @cjl5000- thats precisely how it should be secured(toe nail or toe screw). Also acceptable would be framing brackets or hangers. Simpson makes a plethora of metal framing connectors.
    – ojait
    Commented Dec 21, 2020 at 22:05

Your Answer

By clicking “Post Your Answer”, you agree to our terms of service and acknowledge you have read our privacy policy.

Not the answer you're looking for? Browse other questions tagged or ask your own question.