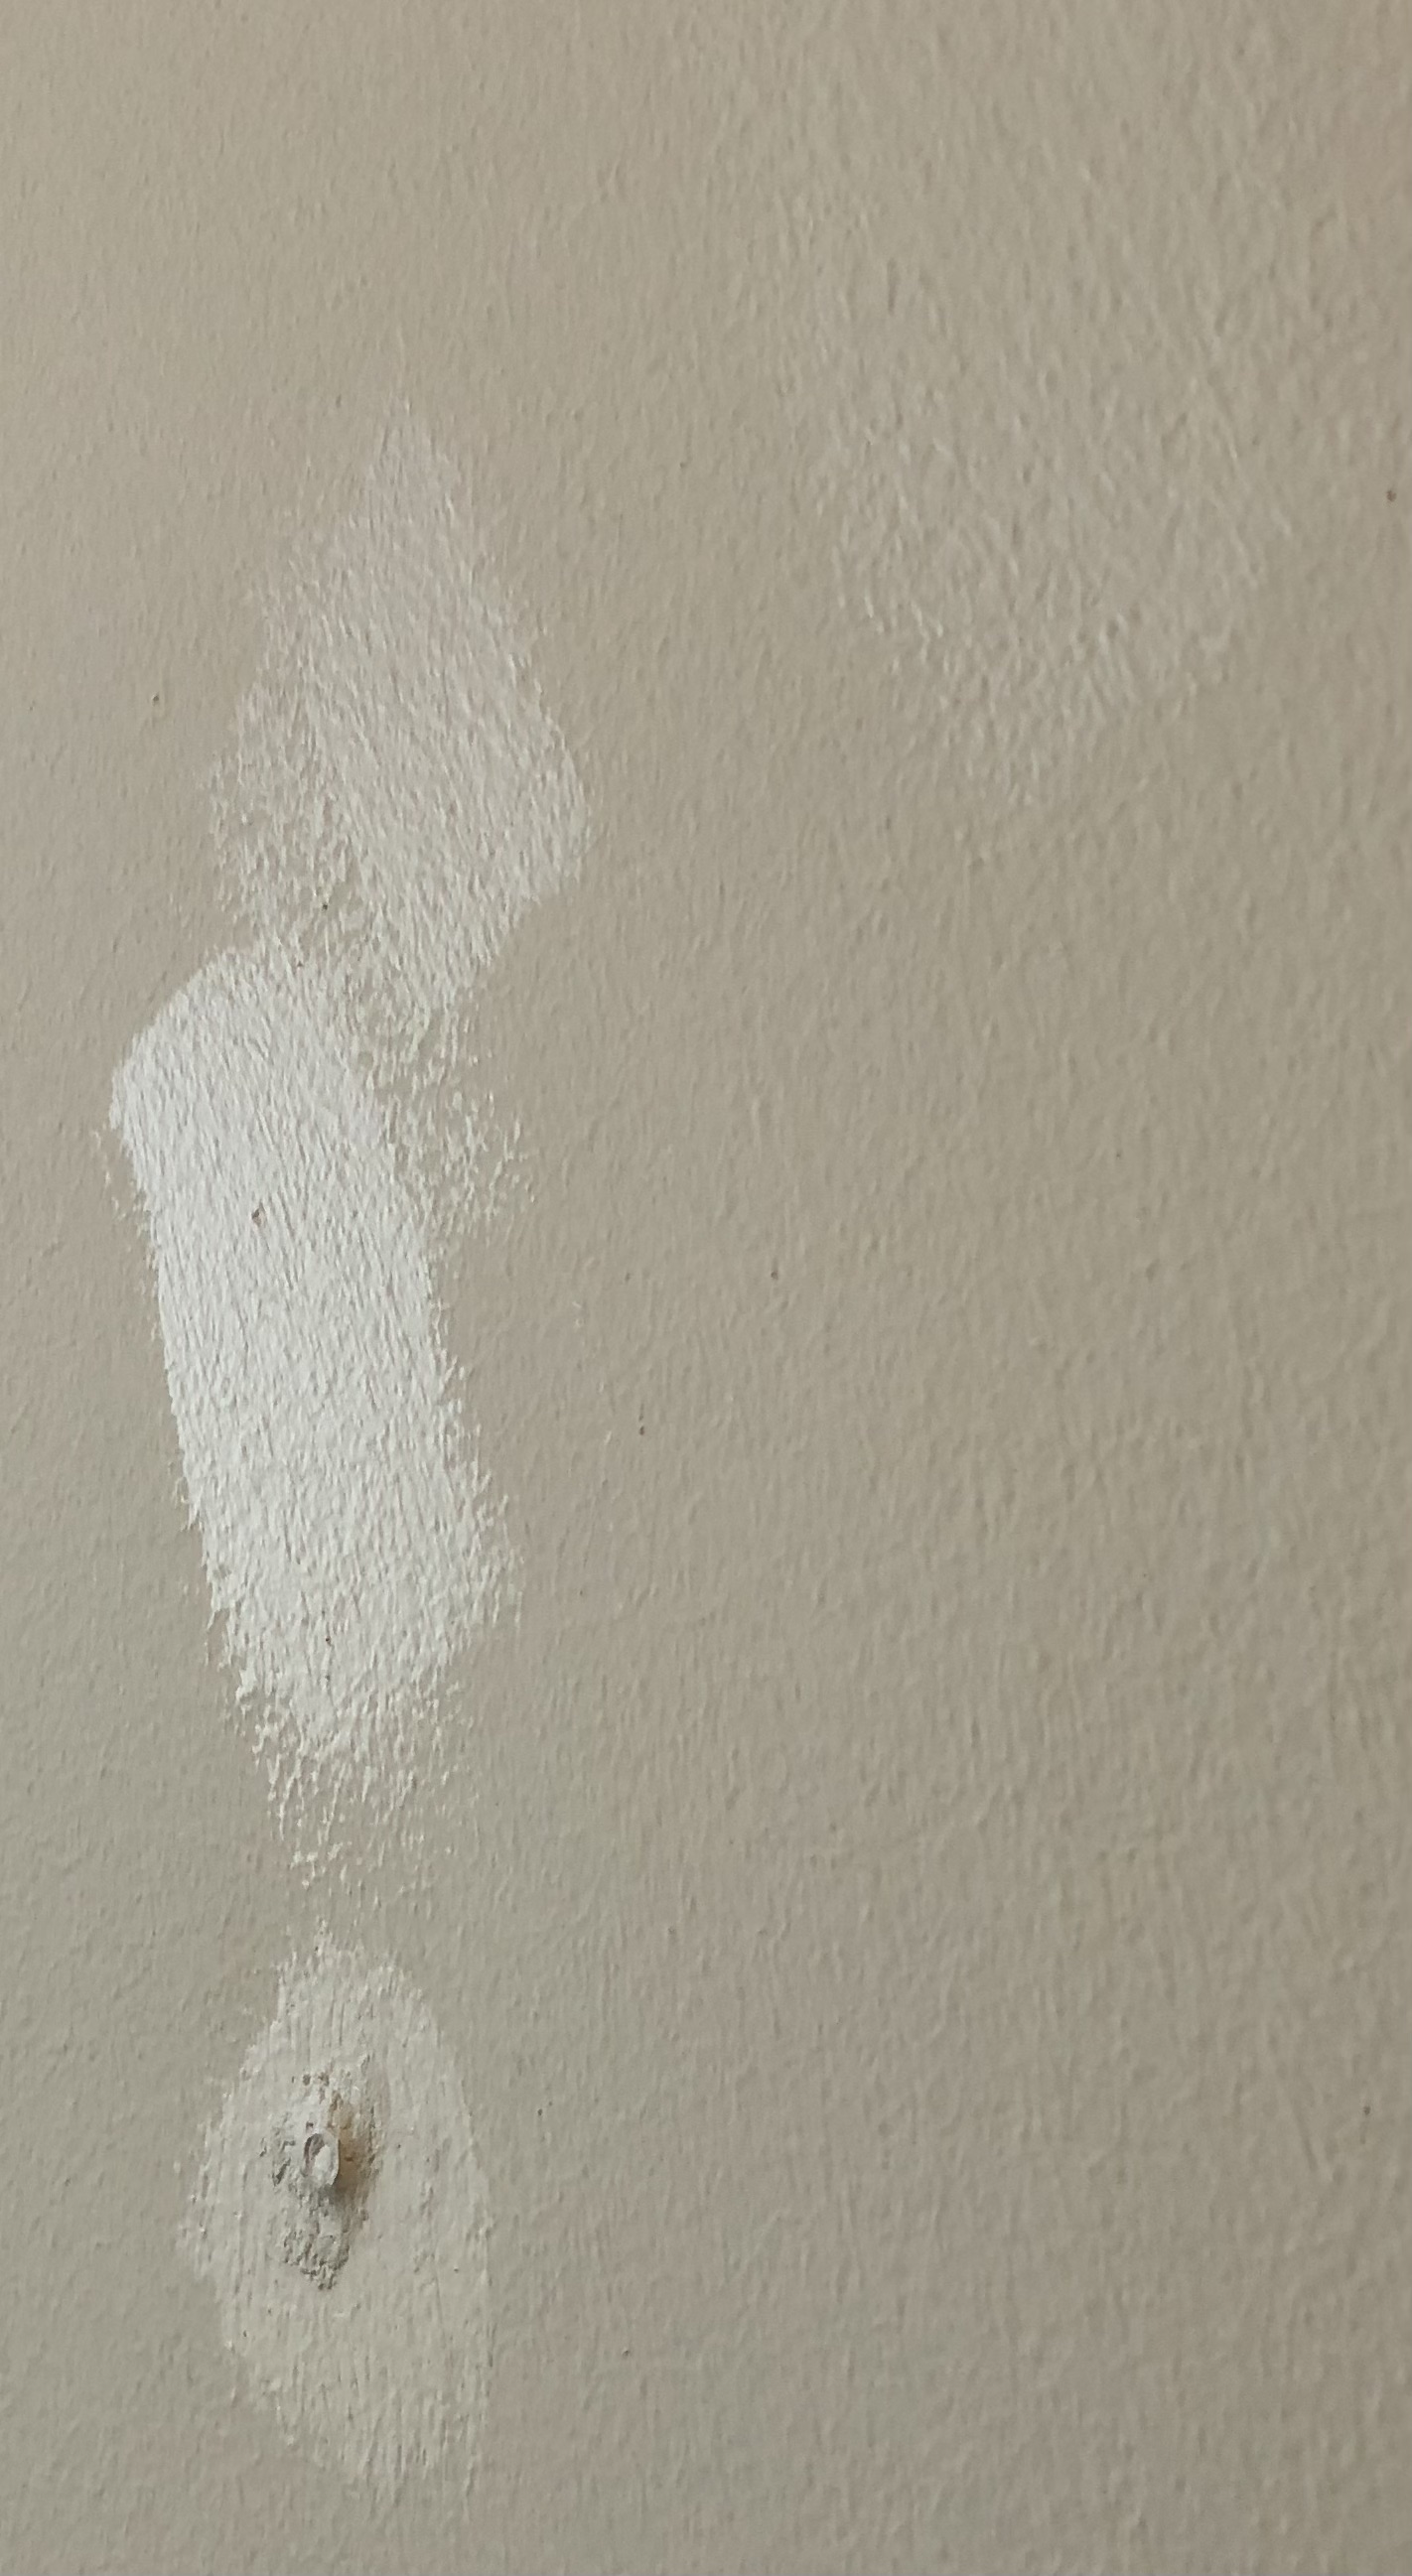
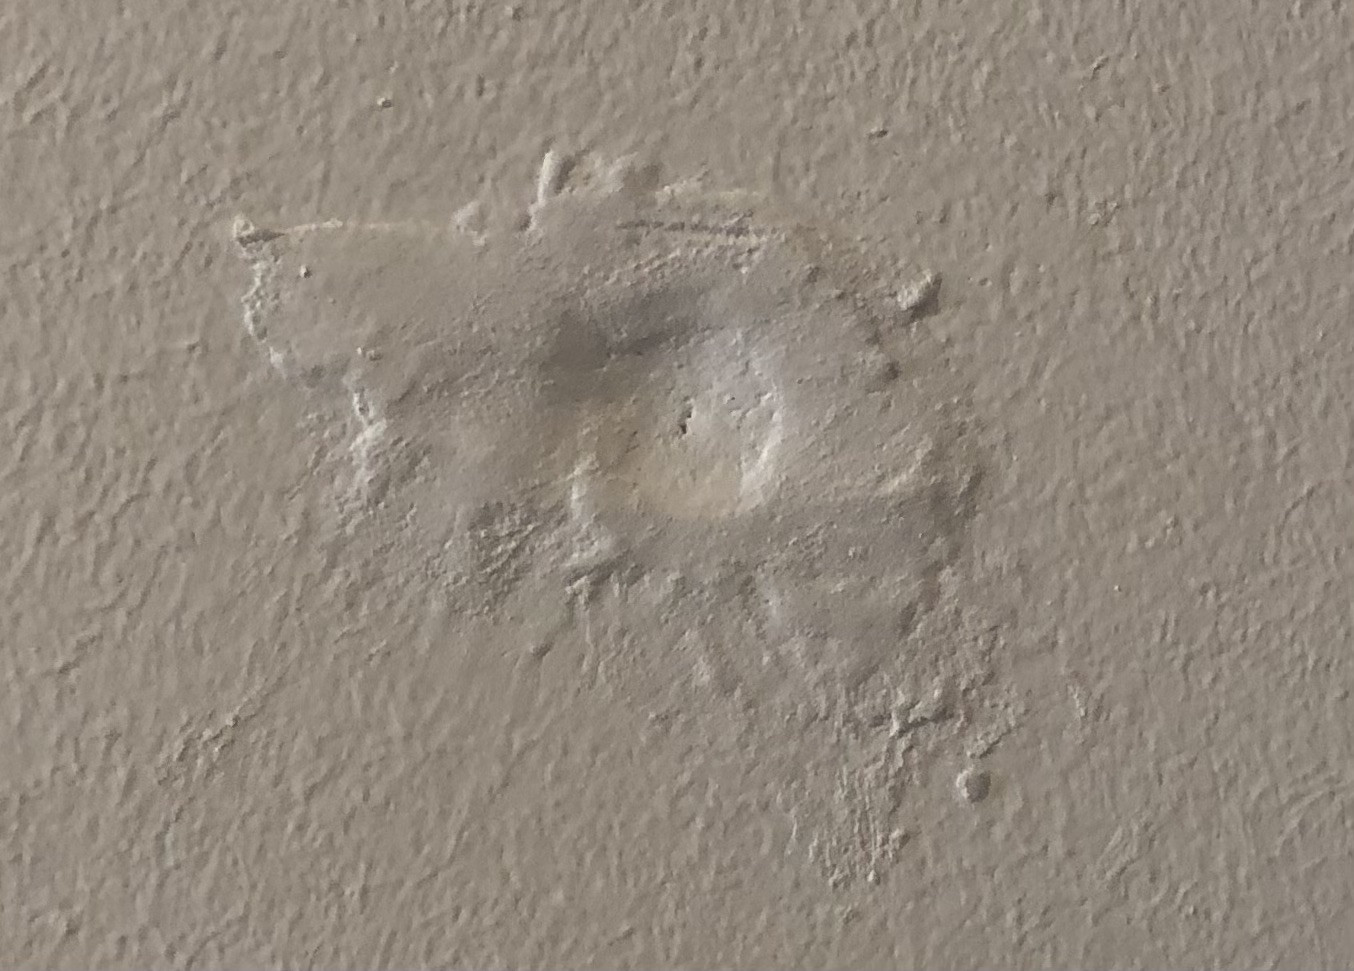
I need to fix these eyesores on my walls. I think the wall has been painted with wood paint, and wall plugs (anchors) have been mudded and painted over. Any advice for how to fix this? Thanks!
-
What is "wood paint"?– FreeManCommented Jan 20, 2022 at 12:50
-
Is that anaglypta or textured paint on the main wall surfaces?– TetsujinCommented Jan 20, 2022 at 12:59
-
It's normal white wall paint on main wall surfaces– Ahmed TawfikCommented Jan 20, 2022 at 13:38
-
Wood paint that is designed to go on wood, as opposed to plasterboard and brick– Ahmed TawfikCommented Jan 20, 2022 at 13:39
-
I had almost similar looking "patches" on my "cement" walls, the plugs were glued/caulked full and painted over. I first tried picking them, but soon found myself just drilling with 5-6mm drill bit over the 4,5mm plugs to remove them. And then just filled the holes I drilled with cement based coarse putty. A quick sanding, primer, paint and the walls were better than new.– Samuel MCommented Jan 20, 2022 at 14:36
3 Answers
It appears to me that the touch-up paint color doesn't match the original color very well. Either new, better matching paint will be necessary to cover the touch-up spots again, or repaint the entire wall. It also appears that the texture of the main wall was created by using a roller to paint the entire wall at once and the mismatched texture in the touch-up and patched areas is because they were painted with a brush. When you repaint, use a roller to replicate the general pattern from the rest of the wall for the best blending.
As to the bulge and dip, yes, I'd agree that those look like wall anchors that were very poorly mudded over.
For the one that sticks out:
- Chip off the mud until you can get to the anchor itself.
- Fix the anchor
- Using a screwdriver or needle nose pliers, pry the anchor out of the wall, OR
- Hammer the anchor further into the wall so it sits flush or slightly recessed. Note that this may be difficult to do, especially if the anchor itself has filled with mud because it won't be as compressible as it was originally. Also, you're attempting to hammer the flat washer head into the wallboard. That's hard to do and the reason this was left proud of the surface by the original installer, OR
- Cut the flat washer head off leaving the rest flush with the wall.
- Fill any void or damage with spackle. This is easier to work with than drywall mud and is designed specifically for small patches like this. It's also usually available in small containers for patching instead of big containers for mudding a whole wall.
For the one that's recessed:
- Scrape/sand the paint off to give yourself a good surface for the new filler to adhere to.
- Fill it with spackle until it's flush with the surrounding surface.
Once the bumps are repaired, clean the surfaces well to ensure there's no dust, and use some more of that touch up paint to hide your handiwork.
-
"It also appears that the texture of the main wall was created by using a roller to paint the entire wall at once and the mismatched texture in the touch-up and patched areas is because they were painted with a brush. " Precisely Commented Jan 20, 2022 at 13:42
-
@AhmedTawfik - roller application does not explain the existing texturing.– TetsujinCommented Jan 20, 2022 at 17:05
-
@Tetsujin my only other possible explanation is this is the natural texture of the wall. I'm not a wall paint expert at all, but I did literally observe the wall being painted with a paint roller. Also I also know that it's been painted similarly the last couple times too. Commented Jan 21, 2022 at 8:09
-
If you want that texture use a 3/4" nap roller and do not fail to keep a wet edge. "It's a brick wall"... that means it's plaster and 100y old with 20 coats of paint on it. But it could bare drywall and with a 3/4" nap roller, wet AF, it will put that texture on the wall. When you don't want this texture you have to use foam rollers, rolled until it's dry AF.– MazuraCommented Jan 21, 2022 at 9:49
Assuming re-finishing the entire wall is right out of the question, except for a new coat of emulsion...
This might be easier if that's anaglypta on the walls rather than textured paint, but the 'fix' is about the same either way.
Use a cheap chisel or sharp wallpaper scraper to get the worst of the over-filled patches off, taking the paper or paint off for a couple of inches around each hole, let the edges tear raggedly - it hides better later.
Use pliers or whatever will fit to rip out the rawlplugs.
Fill with Polyfilla, smooth to the plasterwork.
Tear a bit of anaglypta by hand so it has feathered edges & glue into the gap.
Finish with matt paint, which will hide the joins far better than eggshell. If you're trying to match to a surface that's had 17 layers of paint since it was last papered, over-layer the new patch several times until it starts to better resemble the old finish.
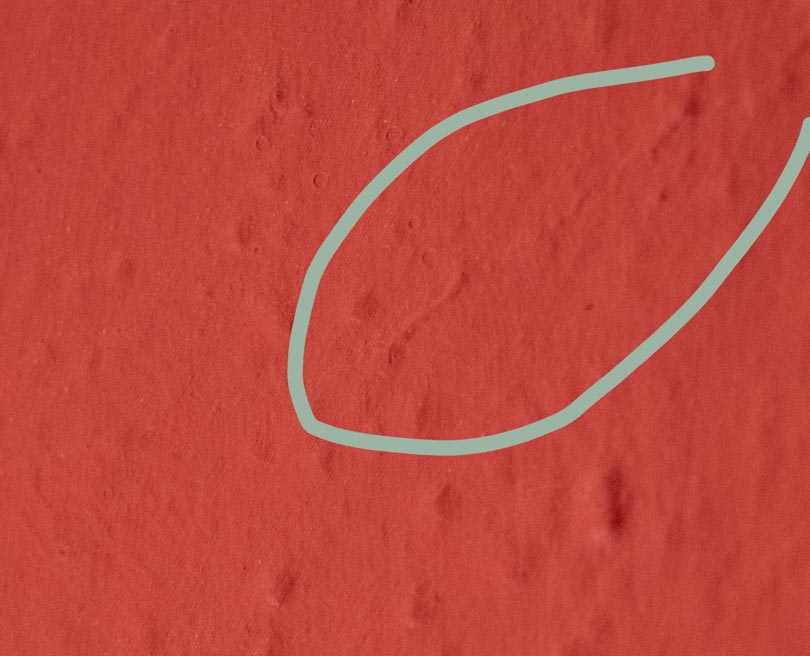
This is the edge of an anaglypta patch I managed to find, lit from the side so it stands out a bit more…
-
Apologies for lack of clarity; it's normal roller paint that's been painted over with a brush of wood paint. Commented Jan 20, 2022 at 13:41
-
The use of a roller does not explain the texturing on the main surfaces. The brush-work on the new paint is obviously badly done, but the original is not just roller on flat wall.– TetsujinCommented Jan 20, 2022 at 16:58
-
If you're implying wall paper, I've been living here a while and I've seen no evidence of wallpaper peeling over the multiple decades... :shrug: I appreciate your eye for detail though. I wish I could invite you over to take a closer look :) Commented Jan 21, 2022 at 8:11
-
You'll find out for sure when you start cutting into the patching around the rawlplugs. I suspect the top pic is papered, the bottom pic some kind of textured 'paint'. As soon as you cut away the over-filled polyfilla you'll see for sure. In my pic above, the obvious big lumps are the wood chips buried in anaglypta paper, under several layers of paint, the very very fine markings you see in between is the roller texture. To give a sense of scale, the circled area is slightly larger than two 1p pieces side by side.– TetsujinCommented Jan 21, 2022 at 8:27
I would also agree it looks like badly installed drywall anchors or perhaps in the case of the one sticking out even a stripped screw that whomever worked on this before had trouble removing was left in an old hardens stud making it even more of a challenge to remove that usual. In any case I would either remove the object sticking out entirely by either pulling it straight out with a claw hammer but be sure to put a small piece of 1/2 plywood behind the hammer so it doesn't cause further damage to the surface of the drywall. Then using very coarse sandpaper remove any paint, mud, or other material that is above the desired finish surface and apply a couple light coats of mud as it shrinks and to hide the flaws it will require more than one application. Sanding between coats is likely necessary to ensure a good finish. Once the surface is smoothed to your satisfaction you'll need to apply a coat of primer/sealer to the patched area to prevent it from "flashing" that is it will be abundantly noticable when bright light is reflected from the surface, this is undesirable so it's very important not to skip this step. A final sanding finish with 120 grit sandpaper will be quite sufficient to provide a nice smooth finish and I also recommend lightly sanding after the primer/sealer has fully dried before the finishing coat is applied. It's also very important to remove all dust before you apply paint or it will make the job look less than ideal on a good day, lol. Also the best way to apply paint to a wall is with a roller and for the most desirable results painting the entire wall will always provide better results than touching up a spot unless the was was painted very recently and you still have some of the same paint available. That being said after the primer/sealer has dried and been lightly sanded, wipe down the entire wall with a lightly dampened cloth to remove any dust on the wall, paint the area of the repair and allow it to dry before painting the rest of the wall and wheb you do paint it all in one single step so the finish is both uniform and consistent from top to bottom and sides to side. And remember when patching a blemish on drywall spread out the area to feather out the flaws unlike with an automobile when you repair a dent you have to make it exactly the same as it was prior to the damage and any flaws must be eliminated vs feathered out! I hope that helps...
-
Thanks @Aaron La Flam. It's a brick wall although I have the same issue on plasterboard which I presume is similar to drywall. Additionally, they're all wall plugs/anchors. Otherwise, good advice, thank you! Commented Jan 20, 2022 at 16:32
-
1
-
If you're dealing with a brick wall you're actually more fortunate as it can be more forgiving, simply remove the protruding object, fill the void with a little mortar or perhaps even sanded grout to get the initial surface as close to even as possible, it won't shrink the way mud or Polyfila will, then you can touch up with drywall mud or Polyfila to get the surface to match before priming/sealing and applying at least two coats of top coat paint with sufficient time between coats as manufacturers specifications then to improve the appearance blend the edge of the repair lightly with a brush. Commented Jan 20, 2022 at 18:51


