3

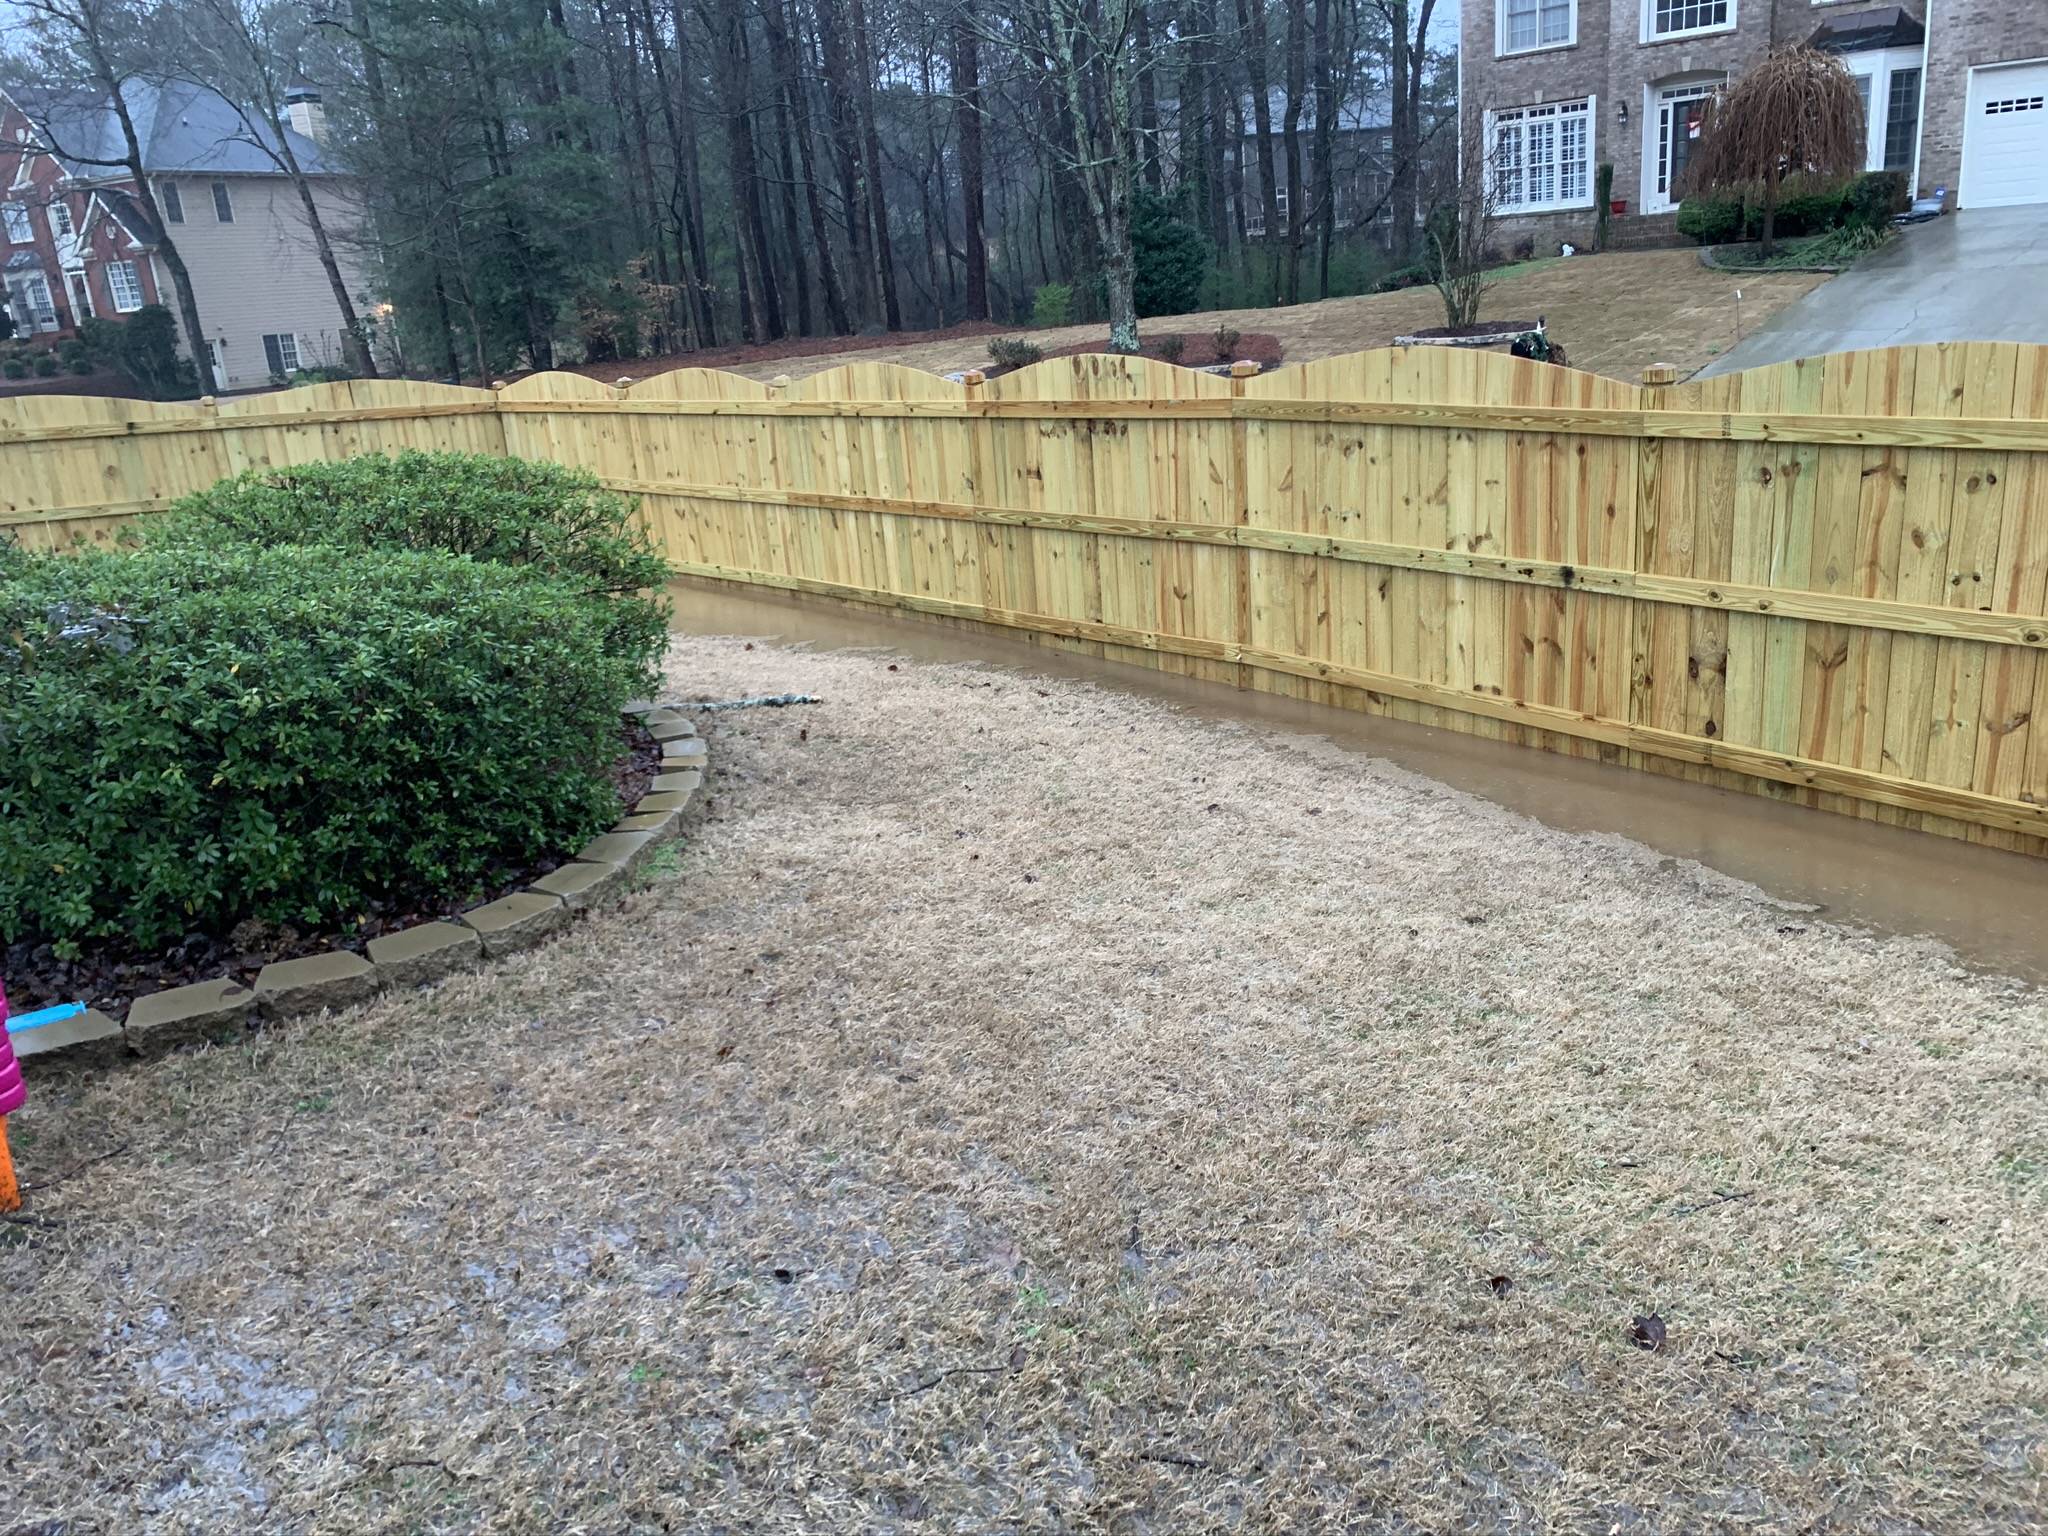
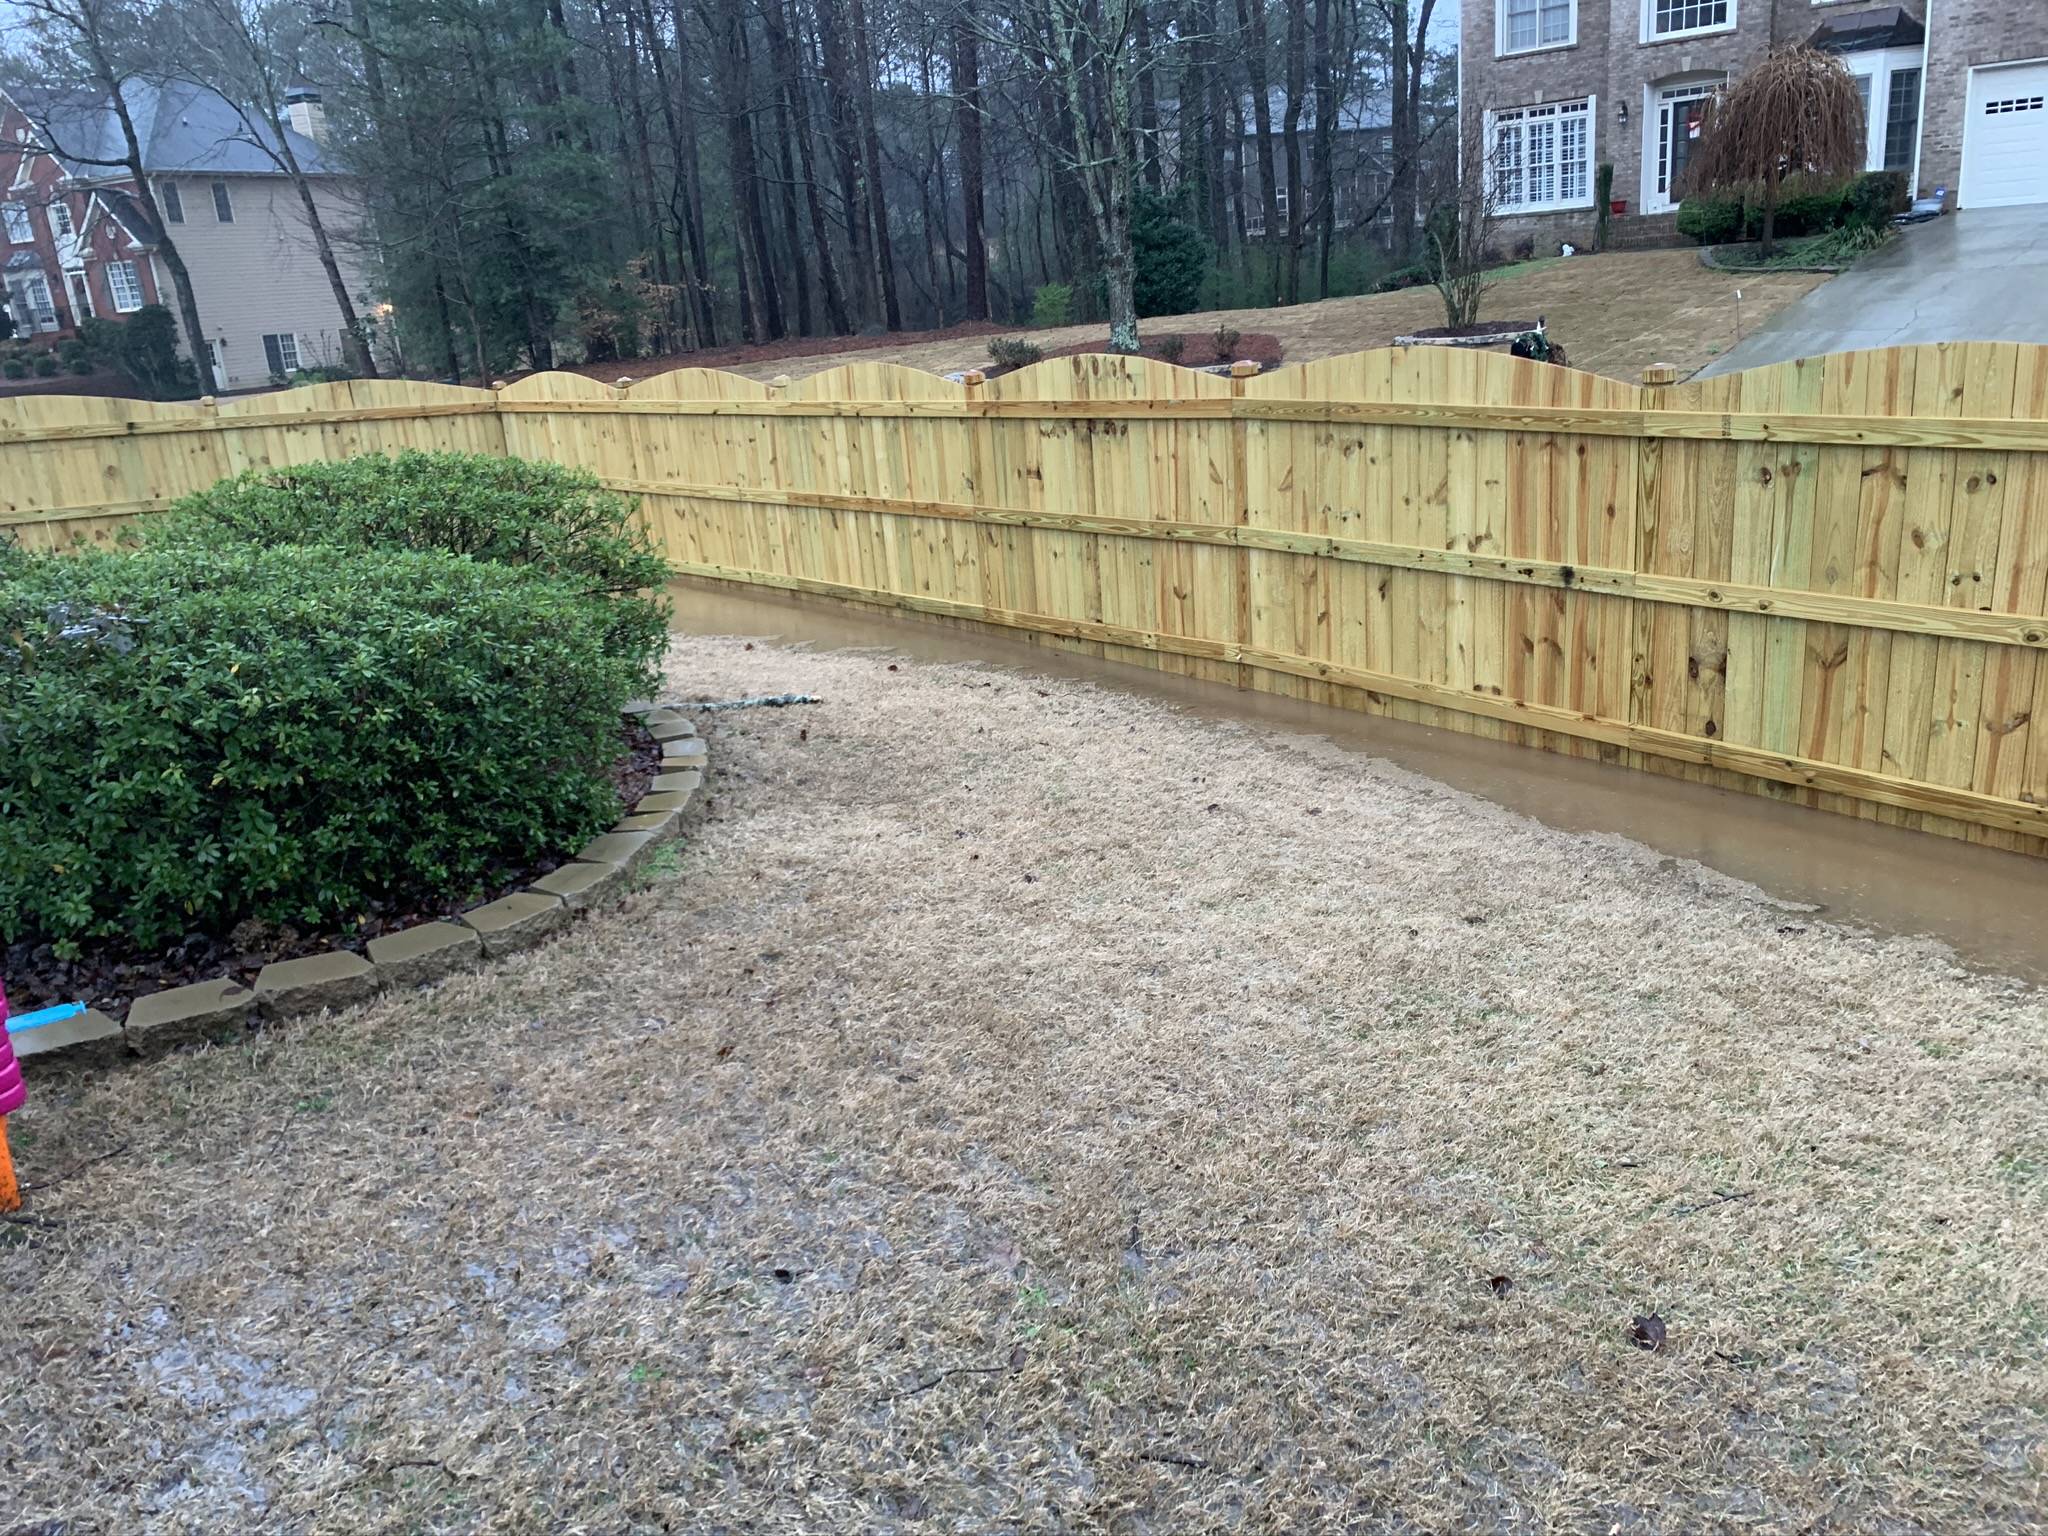
I got my fence installed a few months ago on a down sloping part of my yard. I need to resolve the nagging issue I have of water pooling due to it not being able to get through the fence fast enough.

My neighbors say I should try using a circular saw to cut 1/4” off the bottom, but before I go hacking away at my brand new fence, I would like to know if there are possible any other ideas that might prevent this.

Flooding was NOT an issue before the fence was up. It just appears to be an issue now because the fence pickets essentially go into the dirt, like they were designed to do. Thanks!

enter image description here

enter image description hereenter image description here

7
  • 1
    Have you thought about drilling a few 3/4" holes in the fence at the location where the water is the deepest?
    – JACK
    Commented Oct 6, 2020 at 1:32
  • 6
    Your pickets shouldn't be in contact with the ground. The fence has been installed incorrectly. A circular saw would be a good fix if you can maneuver one close enough to the ground to make the cut. Leave 1" to 2" between the ground and the bottom of the pickets. Don't set the blade depth so deep that you cut deep into the posts. And make your fence installation contractor do the work, if you can. This is a bad error. Commented Oct 6, 2020 at 1:59
  • 3
    detach the fence from the posts and raise the whole fence
    – jsotola
    Commented Oct 6, 2020 at 6:28
  • 2
    Drilling holes will be a short-term solution at best. With the amount of flooding you've got there, the holes will quickly clog with dirt, grass, and other debris.
    – FreeMan
    Commented Oct 8, 2020 at 14:45
  • 3
    I'm baffled that your fence creates that much of a seal. Your assertion that those panels were "designed to" be inserted into the ground is flat wrong. The wood isn't treated for that and it's just strange. What would be the point? Are you farming voles?
    – isherwood
    Commented Oct 8, 2020 at 15:29

3 Answers 3

6

Pickets should not be in contact with the ground because they will hold back water like this and they will rot out very quickly. This should definitely be on the installer to fix. Additionally, the pickets should not be installed so tightly against each other that they're sealing water in. The pickets will expand and contract with humidity and need room to move. If they're this tight against each other, they'll likely end up splitting or warping over time. Of course, that may create the space necessary to let the water out, so it could end up being a self-solving problem, however, that's not an ideal solution.

If the installer is unwilling to stand behind his work, you've learned who to never call again and can offer some negative feedback online, along with posting some pictures. Often, just the threat of doing so can get some motion...

If you have to do this yourself:

If the pickets are screwed to the rails, unscrew each one, cut 1-2" off the bottom*, then screw them right back into place with the existing screws through the existing screw holes.

If the pickets are nailed into place, wait about another year for the nails to pop, then remove the pickets, cut 1-2" off the bottom* of each one (more if necessary to get rid of the rot), then drive screws through the existing nail holes.

Each picket should go back where it came from, as each should be cut to the correct length to be in contact with the ground and maintain a consistent and smooth top arch. i.e., don't go removing them all, then cut them all, then try to figure out where each one is supposed to go back. Remove, cut, replace. If you have a spouse/kids to help, set up a fire-bucket line with someone removing, someone carrying, someone cutting to make things go faster and especially to teach the kids about work, helping and the fun of DIYing.

NOTE: You're going to want to remove the bottom of every picket on all runs of fencing. Just because it's not holding back water doesn't mean it won't rot out by being in contact with the ground.


* Pick an amount to cut off the bottoms and be consistent with it - otherwise it will look pretty sad. If you're not sure, start with 1" and put the picket back up and see what it looks like. It's easier to cut more off, it's tough to add some back on.

If you have a miter saw, set a stop-block at the right length - that will make it dead simple to cut the correct and consistent amount off each picket. If you're doing it with a circular saw, spend some time to make a jig that you can set each picket in. The time spent making the jig will more than be made up for by not having to measure and mark each picket by hand.

1
  • This is great. Thank you! Commented Oct 23, 2020 at 14:51
1

the posts in the fence appear to be untreated cedar (the entire fence appears to be untreated cedar actually) so if those posts are just going into the dirt then they will rot out within a few years and then you won't have this problem anymore as you won't have the fence anymore.

You can pick up a small circular saw that is easier to control for a job like this. But if the posts are untreated you might as well put new pressure treated posts in and raise the fence. As long as they didn't sink them into concrete a typical automotive floor jack will have them up and out of the holes pretty quick.

3
  • 2
    It all looks like pressure-treated SPF to me.
    – isherwood
    Commented Oct 8, 2020 at 15:27
  • All the pressure-treated SPF I've seen in the home center is darker with a bit of a reddish look to it that sort of fades over time. But the giveaway is the presence of groves all over the wood which are pressed into it both as a marker and to help the chemical get farther into the wood. That picture is not close enough to tell. PT wood looks horrible due to all of the dimples in it so I would think that the OP would have gone nuts if the contractor tried using it. If it's NOT cedar, then it's intended to be painted - white traditionally. It does sort of look like regular SPF. Commented Oct 17, 2020 at 12:46
  • Standard pressure-treated lumber is greenish, just like that, unless it's stained with a "cedar tone" color. None of it is perforated when it's expected to be used for anything like a fence. In fact, perforation is quite rare except in large industrial timbers (pole building components) and landscape products.
    – isherwood
    Commented Oct 18, 2020 at 17:44
1

Another option might be to install a drain basin in that corner, and connect it to a pipe that runs underground beneath the fence.

Your Answer

By clicking “Post Your Answer”, you agree to our terms of service and acknowledge you have read our privacy policy.

Not the answer you're looking for? Browse other questions tagged or ask your own question.