4

I was wondering if there is an industry standard in terms of what depth to set shower mixer valve blocking at? In your traditional house the wall is only a 2x4 depth, meaning a block of 2x4 would only leave 2" of depth if the back side of the shower mixer wall was drywalled. I have read that the standard plastic ground is supposed to be flush with the finished surface of the shower wall, in my case, tile.

According to these instructions, that makes me have to bump my 2x4 blocking OUT of the 2x4 stud cavity. I have this luxury because that is not a finished wall surface. However, it seems odd - even backwards, and it seems like I would need the block to stick inward instead because I have a thicker wall than a normal precast shower enclosure. I'm going to have 1/2" tile board, the thinset, and 1/4" tile. These numbers don't add up and I am thinking I made a mistake. It's a Delta shower kit, meaning mixer valve, shower head, and trim rings all in one and not something universal.

3
  • How are you using the blocking? Behind the pipes from the tub side?
    – isherwood
    Commented Jul 13, 2018 at 15:51
  • It's installed flat in the wall, so that I have a 3.5" surface to screw the mixer valve into. The valve does not straddle the blocking like some I have seen before.
    – CCCBuilder
    Commented Jul 13, 2018 at 15:53
  • A diagram would help here. I would put the full length blocking at the normal in and out position for most shower valves, then if the unit you're installing would require more, I'd add an additional shim that could be removed from the existing hole. That way if someone later wanted to install a valve with a different in-and-out position, then the job would be easier. Commented Jul 13, 2018 at 15:54

3 Answers 3

2

Different brands and models of shower valves require different wall-depth installation. You should always follow the installation instructions that came with the valve assembly.

Most valves come with a temporary plastic or cardboard "plate" that illustrates the location of the finished wall surface in relation to the valve-body installation depth. If you do not have that "template" anymore, you can often estimate depth by assembling the trim to the valve and measuring from where the wall surface would be to the mounting holes. You need to locate the supply piping according to final installation depth of the valve, not the other way 'round (not an issue with flexible supply tube like PEX).

Except for special application products, they are made to fit a standard wood-frame wall but may not allow the use of 2 x 4 lumber as a mounting support; in fact, some recommend use of a manufacturer-specific mounting strap/stringer.

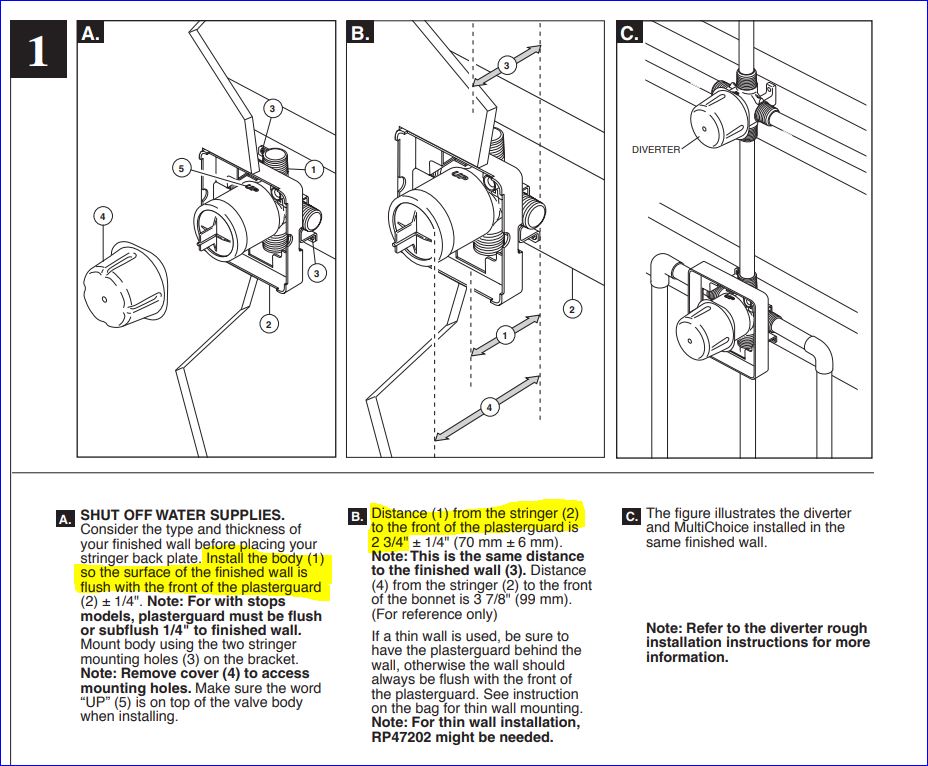
Example of depth mounting instructions for a random Delta valve model:

enter image description here

2
  • I'm just going to assume the directions are accurate. They say "The thick wall installation method is used when the tub/shower is greater than 1/4" thick. The plaster ground will aid with alignment and can remain attached to the valve until it has been positioned and secured." then it states "2. Position the plaster ground in the hole so that its printed face is flush with the finished wall. This will ensure that the valve will be at proper height to accept the trim." I notice the language isn't real clear. Height instead of Depth? Ground instead of guard?
    – CCCBuilder
    Commented Jul 13, 2018 at 20:45
  • @Nic - they can't even grammar so forget about anything they said. "estimate depth by assembling the trim" +1
    – Mazura
    Commented Aug 11, 2019 at 6:14
1

I have installed many. in thick wall install , plaster guard should be and exercise of looking at the trim kit to see how far the handle will protrude from the wall and how much of the center cover is showing. for my Delta installs with 1/2" Travertine i recess 3/8" back . I dont use a full 2x4 stringer. this will accommodate a delta trim later or an after market Danco with a long stem and handle that stick out into shower area. I have recessed deeper so that plaster guard is 1/2" behind flush with tile. years later on that on , i had trouble attaching the handle when changing out trim. I got it on there, it was just a steep angle for the Allan screw.

1
  • Hello, and welcome to Home Improvement. Thanks for the answer; keep 'em coming. And, you should probably take our tour so you'll know how best to contribute here. Commented Nov 13, 2019 at 21:13
0

If the hole is sized correctly to allow servicing you may be able to unscrew the fasteners from the body of the mixing valve, pull it forward an inch and place backing behind it, then refasten it.

Your Answer

By clicking “Post Your Answer”, you agree to our terms of service and acknowledge you have read our privacy policy.

Not the answer you're looking for? Browse other questions tagged or ask your own question.