9

I need some 16ft (5 meter) long 3 inch diameter ash poles that will be used for re-enactment pike shafts. They will eventually be tapered to 1.5 inches at one end.

For practical purposes however - mainly storage, transportation, cost and availability, a better option would be poles of half the length that can be joined together.

The join should be good enough to not cause an excessive bend when held horizontally, and not be too obvious if possible.

I can do basic to intermediate woodwork jobs so hopefully I’ll be able to do it, when I find out how!

What would be a good way to do this?

3
  • 1
    Have you ever seen how they do this with tent poles? You'll need something slightly more rugged, but the basic idea still works.
    – Mast
    Commented Mar 13, 2020 at 11:45
  • Is this for actual use (pikes being used as pikes), or just for "ceremony" and looks? Something like LARP? Also, if the pikes are to be used, are they to be used as typical 5 meter pikes (i.e. stop charging cavalry), or in a more "creative" way where force acts in a non-fiber-aligned direction? This has huge implications on whether there exists a non-WTF solution at all, and on what it is. For anything like "swing around", any solution including the one by Willk would be "WTF, don't do that". For anything ceremonial, a japanese wooden joint would look great and would work. Etc. etc.
    – Damon
    Commented Mar 13, 2020 at 12:07
  • @Damon Something like LARP but not as soft and spongy. It'll be waved around and may meet other pikes in light impact but won't face charging cavalry. Commented Mar 13, 2020 at 13:07

7 Answers 7

10

I'd use heavy studding, perhaps M20, M22 or even M24 (3/4-1" if you don't do metric). In one piece, insert it as far as you can drill (at least 20 cm I reckon), glued for the whole length with epoxy. The drilled hole should be a snug fit.

The matching threaded inserts are much too short to be of any use. Instead you'll need to make one: Buy tube and tap it out as long tap as deep as you can, then drill out the other end as you can. For M22 the tapping drill is 19.5mm, and the internal diameter of 25.4×3.2mm (1"×10SWG) tube is 19mm, so you would need to open it out a touch for tapping, then drill out the other end to 22mm (or maybe a touch over), before tapping as deep as you possibly can. Check the lengths first. It should be possible to hand tap aluminium tube up to this size, with plenty of cutting fluid, though I haven't done anything quite this big. If you're really lucky you may be able to find threaded tube in that size, but I can't.

This means buying: studding (aka threaded rod), tube, a tap, and drills for wood (2 sizes: for the studding and for the tube) and metal (also 2 sizes: pilot and snug clearance). Many of these will need to be ordered as they're rather specialised.

If you're doing anything to the poles, even just stripping bark, wait until after you've made the joint. Before you cut, mark opposite faces clearly across the cut, parallel to the length of the pole, then after cutting draw between the marks and mark the centre. Squaring up to the faces will be critical.

If you can handle the effect on the appearance, cross-drilling and pinning the studding and tube as well as glueing it would be a big help. In the case of the tube you'd need to leave a bit of length into which the studding doesn't reach, or screw only into the wall, but that wouldn't be as strong as pinning right through.

6
  • 1
    This looks like the best option. Going to give it a go. Thanks! Commented Mar 13, 2020 at 11:59
  • You could also use multiple threaded inserts in each side, which might be easier to install than trying to thread a pipe. You'd just need to make sure the threads match up on the inserts as you install them, so you can thread in the piece when it's done. And if you use a metal insert, you can use thread locker on one side to keep it in place, instead of glue. Commented Mar 13, 2020 at 18:04
  • @computercarguy if you get them without a flange that sits on the surface, that might be an option, but you would need to use glue-in ones with studding as a jig. That seems like more trouble than tapping out a tube, but maybe I'm more used to light metalwork
    – Chris H
    Commented Mar 13, 2020 at 20:27
  • @ChrisH, you could easily be right, but as a hobbyist, I have a hard time finding a tap that is longer than about 3", or even a drive extension I can use for a longer/deeper hole. Maybe that won't be a problem for this large of a diameter tap. Commented Mar 13, 2020 at 20:32
  • @computercarguy that's why I think the way to go is to tap as much as possible, then support the rest with a snug clearance hole. My favourite supplier of unusual drills, taps etc. doesn't have extension bars, but I could get them without much effort
    – Chris H
    Commented Mar 15, 2020 at 8:47
10

If you are going to be swinging this 2-part pike around like a weapon, there will be a lot of stress at the join. It would be good to spread that stress out.

  1. Obtain pipe the diameter of the 2 poles. Iron pipe would be strong but harder to work. PVC would be light and easy to work but less strong. Copper is expensive but strong enough, easy to drill and looks cool.

  2. Cut a length of pipe approx. 30 cm.

  3. Slide pike shafts in top and bottom of pipe so they meet in the middle.

  4. Tape shafts in place so they stay put when you drill.

  5. Drill hole thru and thru pipe and shaft. In one side and out the other. You could actually make 4 holes in the pipe so each pike shaft has 2.

  6. Thread bolt thru each hole and fix on far side with a nut.

This will be robust for swinging around in your re-enactments because the pipe spreads stress over a large section of shaft. It will be easy to break down.

2
  • 1
    This is the proper answer to this question. I do suggest that 30cm length (i.e. 11.8 inches) is probably a bit short considering the diameter and length of the poles. I would go for the sleeve pipe to be more on the order of 90cm in length.
    – Michael Karas
    Commented Mar 13, 2020 at 1:58
  • 3
    While this would work great, and I think look great (for some cases), it doesn't meet a major part of the question which is for it to be not too obvious.
    – Ack
    Commented Mar 13, 2020 at 3:40
7

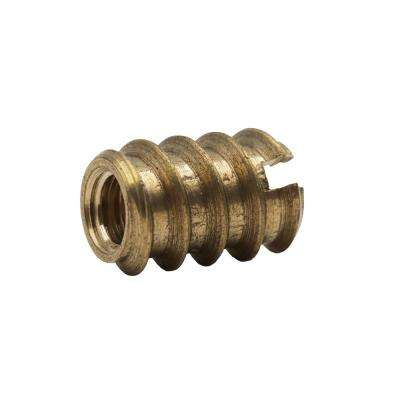
I think you need a threaded coupling that can be screwed into each end of the shaft. It's similar to what Ack recommends for pool cues but unfortunately cue joints won't have a 3" diameter.
You can find this at your Home Center store and they're inexpensive and easy to install. Just drill the proper size hole in the end of each shaft and screw them in. The only tricky part is making sure that the drill bores are perfectly centered.
enter image description here

They will also sell the threaded shafts with the correct pitch.

3
  • 3
    16' three inch diameter......not even a beginning solution.
    – Michael Karas
    Commented Mar 13, 2020 at 1:53
  • 1
    @Michael Karas I think you're correct and I gave Willk +1. Although I've used these fasteners before and they have surprising tensile strength if properly installed and then completely screwed down tight they're not the best solution here.
    – HoneyDo
    Commented Mar 13, 2020 at 2:51
  • Image source? Size?
    – Mazura
    Commented Mar 14, 2020 at 1:20
4

I would think that pool cue connectors would work great for this. Here is an example: https://www.aliexpress.com/i/4000427299129.html

7
  • 1
    that would need to be scaled up a bit for the 3" diameter of the pike shaft.
    – Jasen
    Commented Mar 13, 2020 at 8:53
  • 2.25" at the joint?
    – Ack
    Commented Mar 14, 2020 at 1:11
  • 1
    knock down connector +1. Hard to find in 3" (which sounds excessive anyway for something you're supposed to hold), probably because something that's 3" shouldn't be. - Use (at)me when you're trying to talk to someone, e.g., @Ack
    – Mazura
    Commented Mar 14, 2020 at 1:25
  • @Jasen, above I commented on your comment
    – Ack
    Commented Mar 14, 2020 at 1:28
  • A pool cue is much shorter and lighter than this pike. Even if reduced to a more easily handled diameter the forces in the pike at the join will be much greater.
    – Jasen
    Commented Mar 14, 2020 at 1:34
2

For a strong, practical answer, see Willk's answer.

For a better looking answer, don't join on the outside, join on the inside. Get a 1 foot rod of metal which is thin but resists bending. It will be light compared to the wooden pole, so don't worry about that. Drill a 6-and-a-small-bit inch hole into each of the wooden rods, almost exactly the diameter of the metal rod. Be careful to run down the middle of the wooden pole. Insert the rod, check that it works, remove the rod. Apply glue everywhere and insert the rod for good.

The main failure mode will be the wood cracking near the join. A well-drilled hole of the right diameter helps. You could tape at the join, but I'm hoping for a better look by not needing that step. The longer the metal rod the better, but personally I'd be limited by the length of my drill bits.

Good luck!

3
  • Drilling exactly in line for both halves is very difficult. I'd also be putting brass or copper ferrules on the ends of each join, maybe an inch or two wide.
    – Tim
    Commented Mar 13, 2020 at 8:39
  • 3
    If you have a lathe with a 3" throat it's not difficult. but 6" into each end seems kind of short .
    – Jasen
    Commented Mar 13, 2020 at 9:00
  • Instead of tape at the joint, spend a few minutes binding it with twine or fancy ribbon. Little strength would be offered, but helps the wielder find half-way by touch.
    – Criggie
    Commented Mar 15, 2020 at 0:22
2

I don't see why you need to tap the wooden shaft. Get some threaded rod, maybe 24" by M10. Drill 12" into each end of the shaft, snug fit but not threaded. Get some 20mm steel rod to go sideways through the shaft, two sections 2.5" long. Drill through the shafts sideways, maybe 9" from the join. Thread the short bars side to side to accommodate the M10 rod. Screw the two parts of the shaft together through the cross-pieces. Plug the four ends with matching wood plugs.

2
  • Thanks, although I'm not quite sure what you mean. Should the cross-pieces be drilled and tapped (at 90 degrees to their length) to accept the M10? Commented Mar 16, 2020 at 12:00
  • Yes. I stole the idea from how Ikea put wooden bed frames together. The idea is to use tension in the M10 to make the two flat ends of the wood butt tightly together, while the threaded rod keeps them centred (but does not directly pull on the wood grain). Additional hint would be to hacksaw a slot in one end of the cross-pieces, in alignment with the hole, so you can orient it for the M10. The hope is that the cross-pieces are a big enough radius that they don't split the grain of the shafts. Commented Mar 16, 2020 at 17:35
0

Here is an off-the-wall suggestion. Go to Tractor Supply or other farm implement store, and buy a small adjustable top link for a 3 point hitch for about $30+. Disassemble it. Cut the ball ends off both ends to leave straight rods on each end. Rough these up, or better still, file or cut some notches along the unthreaded length to better grip epoxy. Cut your ash pole to leave (3) pieces; butt end, tip, and a short section just slightly longer than the center sleeve on the adjustable end link, maybe 1-2 inches longer depending. Drill axial holes the same as or just a tiny bit larger than the diameter of the link end rods, and deep enough to accept the unthreaded link sections. If you don't have a better way, a drilling guide is a good idea. Get a scrap piece of flat board, say 3/4 inch or more thick, drill a tiny hole near the center perpendicular to the board, draw a circle the diameter of the pole around it, glue three or more positioning blocks flush with the outside of the circle, then drill the center hole with the drill bit you are going to use to drill the ash pole, making sure this hole is as exactly perpendicular to the guide board as possible. Once you cut the end of the ash pole exactly square, you can slip this guide over the end to position the bit in the center of the pole and help align it axially. Once drilled, epoxy the link ends into the shaft butt and tip sections. If there is any radial play at all, you can make a positioning jig for gluing the same as above, except use thinner board and drill the final hole just slightly smaller than the threads on the adjustable link, then turn the link all the way into it. It will press it's own threads into the wood. Take care not to epoxy the guide to the pole. Remove any squeezed epoxy, cover the pole end with waxed paper and coat the threads with vasoline. Store the pole sections vertically, epoxied end up, and let cure. Hollow out the center of the short piece to accept the link sleeve. You can drill this from both ends, and it doesn't have to be exact. If you can't cut deeply enough any other way, you can cut the section into three pieces and carefully glue them back together after hollowing out each. Use three sections to keep all the force on the intact center section when you turn it to assemble the pole. Position the link sleeve inside the short piece, drill holes through the pole section to match the adjustment bar holes in the link sleeve, and pin it in place with a bolt, or a piece cut from the adjustment bar that comes with the adjustable link. Make this pin a little short on both ends, and hide the holes with wooden plugs. You can epoxy this assembly together inside, but if you do, wait until final assembly to get good alignment. Once cured, to make this work, thread the pole end sections into the center link, and grab the short center section in your hand. It will rotate one direction to tighten everything, and in the other direction to take apart. You can use a strap wrench with a rubber strap to tighten more if you can't get it tight enough by hand. This whole thing might seem a little complicated, but pretty low tech as far as shop skill and equipment goes. Assembled, if everything fits, you should see nothing on the outside but fine cut lines, and I doubt that you can make a stronger final assembly without a lot of metal showing. A critical key to this whole procedure, and to many of the others posted, is to get good, square cuts on every cut made through the pole, and to get the mechanical parts of the assembly centered in their respective shaft sections and aligned axially. If nothing else, the guides may help with that. As a final thought, to protect against splintering, you might be able to strengthen the mating surfaces of the pole sections with a very thin film of epoxy, taking care not to make them uneven or unsquare. Thin metal plates could help also, if you don't mind the change in appearance. Or, you can glue wooden sections over damaged ends, and file/sand them down to match the pole surface. This could also be a way to get the cut ends of the pole sections exactly perpendicular to the axis if nothing else is working. Good Luck!

1
  • 1
    Hi, welcome to DIY. Just a comment that this is very hard to read. Do you mibd gormatying it and breaking it into paragraphs or lists. Commented Mar 24 at 6:54

Your Answer

By clicking “Post Your Answer”, you agree to our terms of service and acknowledge you have read our privacy policy.

Not the answer you're looking for? Browse other questions tagged or ask your own question.