0

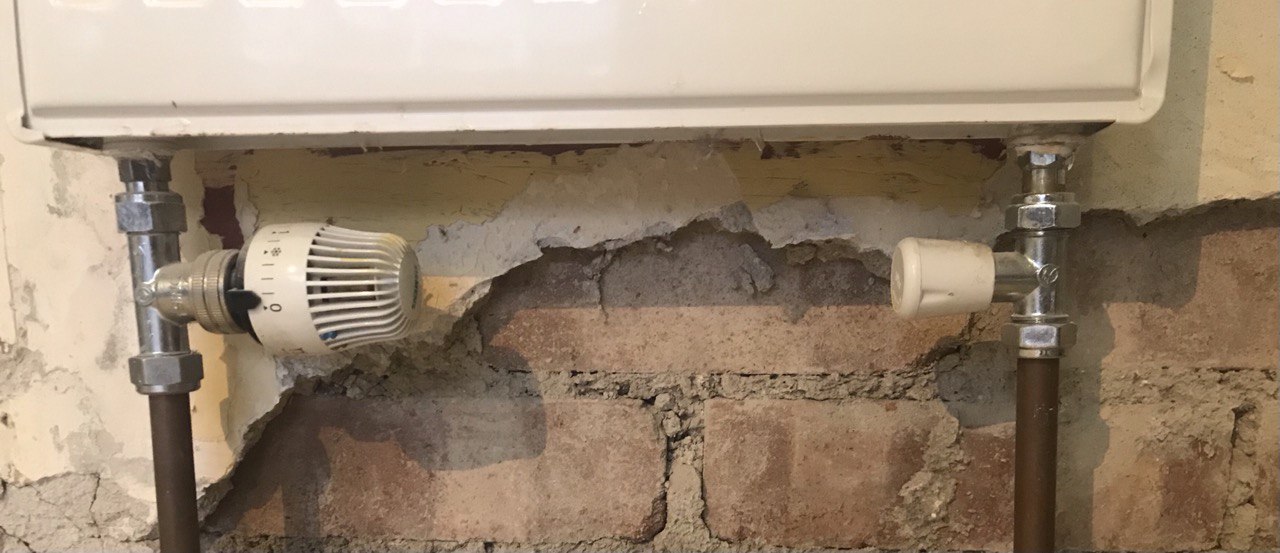
I'm skimming some old plaster walls and in the process found that the original bonding stops too far up the wall for the new (shorter) skirting board. Also it's coming away a little so I've gone back to the brick a bit further up in places too.

Photo shows some of the state of it, Ignore the radiator.

I'm not keen to chip off and redo the entire wall so I plan to fill in new bonding at the bottom before skimming the whole lot.

My question specifically is:

Should I add bonding flush with the old surface

or

Should I add a layer of finishing/patching plaster on top of that to match the old top coat, then skim the lot?

All tips appreciated for this kind of job.

old plaster at bottom of wall

2
  • Do you have access to the bonding you speak of. Over in the states If I get your reference, it is called brown coat over here. Structolite is a material that is used for that, but I do not know if I am going the right direction with it.
    – Jack
    Commented Mar 7, 2021 at 16:22
  • I was going to use either Thistle bonding coat, or Thistle "hard wall" (which I have some of already). This isn't really the part I'm worried about.
    – Tim
    Commented Mar 7, 2021 at 17:52

1 Answer 1

0

Since you do have the Thistle Hard Wall and not needing to use another substitute like thinset for tile work, do add a scratch coat of the Thistle Hard Wall. That is, place a 8-10mm layer over the brick, pressing it into place solidly to insure its grab onto the brick. While wet draw lines into the surface (scratches) so the next layer of the same material will grab onto the rough surface that you made in the first coat. When the second coat is added, this one can be brought flush to the surface. Allow to set or cure the recommended time before adding the skim coat and sanded if desired.

Typically plastering is done in stages to get the desired thickness. If too much is added to the wall at one time the material will slump off the wall and cause great problems. On reading the recommendations for install, the Hard Wall can be applied 8-11mm thick in one application. Your plaster will be or should be much thicker than that, therefore requiring 2 coats to fill the area. The install specs also suggested that is is good for the finish as well, so it can be filled to the adjacent surfaces, making it easier to finish, then adding a skim coat will make it easier to sand smooth.

I did not read the specs thoroughly so I may have missed a minor detail, but this should get you on your way.

2
  • Thanks for your view that flush bonding is the way to go. I'm going to leave the question open until I've tackled the job and accept your answer afterwards - unless anyone else wants to jump in.
    – Tim
    Commented Mar 8, 2021 at 10:13
  • Understood, please look over the install specs to see if what I got out of it is the same as your understanding. Since I am not familiar with the product, but I am familiar with standard plaster, which is typically a 3 coat process, scratch, build, and skim with a different product.
    – Jack
    Commented Mar 8, 2021 at 15:21

Your Answer

By clicking “Post Your Answer”, you agree to our terms of service and acknowledge you have read our privacy policy.

Not the answer you're looking for? Browse other questions tagged or ask your own question.