4

I'm building a flat roof (3.6m x 3m) and I've purchased some treated timber firring strips which go from 100mm to 0 along the length. These will be placed directly on the joists.

I will then add ply, vapour barrier, insulation, OSB3, then roof covering.

If the fall were from the back to the front, with a rainwater gutter along the front, this would be a very simple thing to do. I could simply lay the firring strips from back to front, and the ply would create a slight ramp on one plane.

However my problem is that I don't want a gutter along one side, but rather a downpipe near one of the front corners.

Should I have the main fall / ramp from back to front, then a slight fall at the front from one side to the drainpipe side?

Or should I attempt to create a fall in 2 directions at the same time?

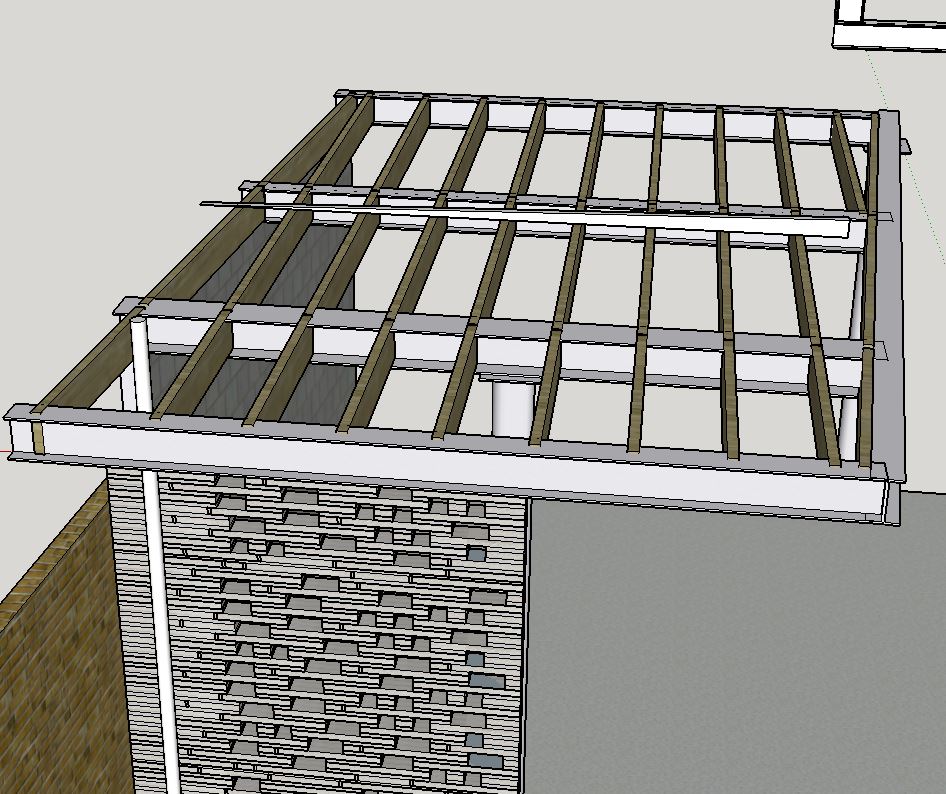
If I imagine a 2-plane fall, with a split across the diagonal (top right to bottom left of pic below) this seems ideal, however the firring strips need to bear on the joists and I want to avoid having to create additional support between joists for diagonal firring strips.

3D mockup of roof

1
  • You're basically asking about making the entire roof into a gutter, like a conventional valley. Are you ok with the front fascia being sloped sideways on top?
    – isherwood
    Commented Apr 1, 2017 at 13:26

2 Answers 2

5

It goes without saying that the full weight of the roof bears on the firring strips, and they are far too thin (in places) to carry that weight across any gap. They can only run along and atop joists.

You do not want a roof to puddle or otherwise impound or store water. The slope of the "flat" roof must be steep enough to assure this doesn't happen, even with the normal build tolerances and settling which will occur. With that in mind...

Close your eyes and imagine your perfect roof line. Now imagine the existing joists are tall enough to reach your perfect roof line. That gap is what you need to fill with firring strips. I would not worry about the crosswise slope of the firring strips, that won't matter much. Just get the longitudal slope correct.

And each firring strip will be custom. That's how it is.

How on earth do you lay that out? Computers are no help. Computers only help you automate what you already know how to do. They don't solve problems for you. So close Google Sketchup and grab a piece of graph paper. Old-school! Let's revisit how you slope a roof the simple way: suppose our code requires 2 in 100 slope.

Graphic here

OK, so we want to fold the roof so it tends (tends!) to dump in a corner. It's not as simple as simply having two 2% planes intersect, because the intersection will be less than 2% (whoops). But let's divide and conquer. To make sure we keep our Code required 2/100 slope, let's strike out at the diagonal first. A 45 degree diagonal is 1.414 times longer (Pythagorean theorem) so at 2% rise and 100 square, we must rise 2.88 on the diagonal (3 is good). So let's strike that first.
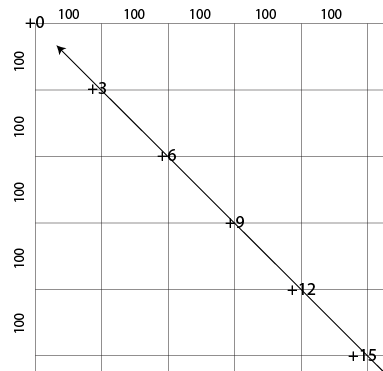
Graphic here

The rest of the roof needs the same minimum slope.

Graphic here

Next, since the roof is basically two planes intersecting, we are able to interpolate (fill in gap numbers) within each plane. That is a matter of 0 x 6 y 12 z "fill in the missing numbers". Don't interpolate across a plane boundary.

Graphic here

The math gets a little more complicated if you're not on 45 degree angles. You may need to roll out Pythagorus's theorem again.

Now follow the lines of the joists. That reveals the shape your firring strips must be. It's funny, even though this started complicated, it ended simple. That happens. You can do any design or complexity of roof this way. The key is knowing where your planes are, so you know where to transition.

It's up to you whether you cut the firring strips custom, or composite them out of pre-made layers (e.g. a 3% taper on top of a piece 6 thick).

From your roof and your materials, you will have to figure out whether to try to bend your plywood/OSB around the bend(s), or cut. If you cut, consider reinforcing it so you don't have weak edges unsupported.

3
  • Excellent answer, thank you. Indeed we aren't dealing with a 45 degree diagonal so I'll apply Pythagorean Theory. Re the practical aspects of installing I have some follow-up questions. (1) Your last paragraph about bending the ply around bends. Do you mean along the diagonal where 2 planes meet? (2) I guess this diagonal will need flashing under the roof covering (i.e. fibreglass?) (3) Is there a clever way to avoid seeing a roof from tapered from side to side from the rear?
    – hazymat
    Commented Apr 2, 2017 at 11:36
  • 1
    And a follow-up question about the theory. Your final diagram has arrows perpendicular to the diagonal. Shouldn't the arrows be at 45 degrees to the diagonal (i.e. the bottom left lot should all be facing upwards and top right lot facing left)? The path of water along the joists and across the joists is steeper than diagonal to the joists. (Hope that makes sense)
    – hazymat
    Commented Apr 2, 2017 at 11:37
  • 1
    Yes I mean bending the deck material at the diagonal. Flashing depends on your roof system. I was looking at worst case, i.e. Water is in the valley and must have a 2% grade in some direction. And the valley does have to be that. But you're right, the planes on either side can be shallower than I show, it just gets more complicated if you do that. You can hide the grade change with a parapet, which will also keep water drom spilling off the sides of the roof. Commented Apr 2, 2017 at 14:18
0

If you really don't want a gutter (which would be typical,), then you could do it with a compound miter on the furring strips. In addition the the existing front to back miter, give them a slight left to right miter. However, since yours taper to zero, which leaves you no room to taper, you probably need new strips

4
  • I understand. When you say "new strips" do you mean I should make the right to left taper first, then taper the length to zero after that?
    – hazymat
    Commented Apr 1, 2017 at 12:48
  • Couple of thoughts come to mind. 1. Cut both at the same time, on a table saw. Build a taper jig for the front to back taper, and tilt the blade for the left to right. 2. Cut front to back first, then use a custom router table fence (tilted) with some hold downs to keep your fingers safe
    – Mobius
    Commented Apr 1, 2017 at 13:27
  • The how to would be better suited as it's own question on the woodworking site. They might have more suggestions
    – Mobius
    Commented Apr 1, 2017 at 13:51
  • yes a table saw would probably be the best way to slice these strips, I'd e inclined after marking the cut with a chalk-line, to freehand them using mk1 eyeball. any irregularites can be fixed with a hand plane or some construction paper and a stapler. the valley wants a board under it for support, this can be fixed between the rafters at the bottom of the slope and continue over then as its elevation permits.
    – Jasen
    Commented Oct 4, 2019 at 23:04

Your Answer

By clicking “Post Your Answer”, you agree to our terms of service and acknowledge you have read our privacy policy.

Not the answer you're looking for? Browse other questions tagged or ask your own question.