3

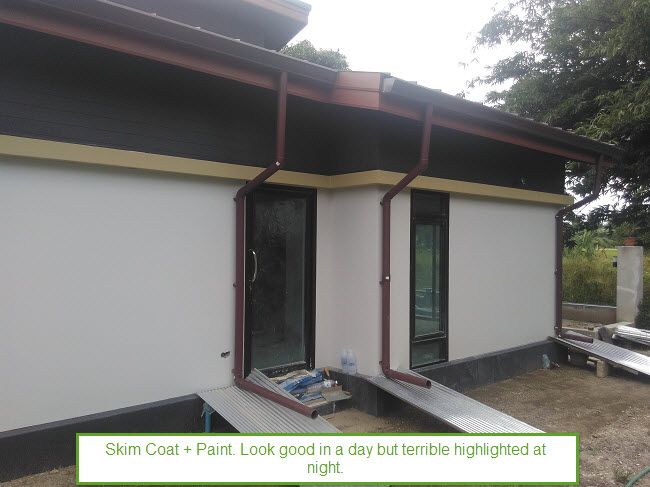
I’m polish expat based in Thailand. I’m at the finish stage of building a 150 m2 small house. Basically all work left to complete the unit is just painting job which is turning out to be a nightmare because of uneven plaster with very bumpy skim coat all over interior and exterior walls.

Here is few important points to illustrate the problem:

  1. Poorly plastered walls. 30-100 cm large and 2-6 mm deep Indentations as well as smaller bumps all over the surface. I think this is not much visible and would not be a problem but I’m guessing that it raises a problem for the skim coat to be applied as the substrate is too much uneven.

  2. Exterior surfaces looks pretty much acceptable in a daylight but terrible at night when flushed with lights. There is a sweep at the top of the walls wrapping around whole house. The sweep has several LED down lights which highlight the bumpy skim coat very much.

  3. The skim coat product is Australian Parex Lanko 103 considered in Thailand to be one of best quality product available. Reference: www.parexgroup.com.my/images/product/Lanko%20103.pdf

    Skim coat is painted with a premium quality Elastomeric paint (eggshell).

  4. 2 different tradesman failed to apply the skim coat. After that I decided to learn and complete the job on my own. I have spent weeks practicing, watched and tried many tutorials and advised techniques. I can’t get satisfactory results when wall get lights at night.

The short story is that all looks pretty good in a day but turns into terrible mess when highlighted at night.

I’m pretty disappointed at this point but don’t want to give up. After so much effort giving up would just break me up completely.

Please advise or guide me through. Feel free to ask for additional info or images.

UPDATE: After posting this I have got an important addition and more direct question that may lead to a solution.

I have realized that one thing making the job difficult is the fact that I can't tell if the surface is smooth enough unless I paint it over with the final coat.

I have even tried applying final coat of mud followed by sanding it at night with lights on but even than I can't really say if all is good enough.

The skim coat is very flat white and also covered with dust. Whats more I see gray plaster in small points where the mud layer is very thin which makes an illusion of uneven surface...

All bad stuff is just showing up after I paint it over with a final coat of paint. Than, at this stage is to late to make any fixes as there is a need to sand out the paint along with the excess of mud in places where I see the bumps. The paint is to elastic, rips a part and just makes all more difficult.

So, my question: Is there perhaps some type of paint that I could use as a tester? I imagine it would have to be easy to sand and have some gloss to cast shadow of all bad places to be fixed.

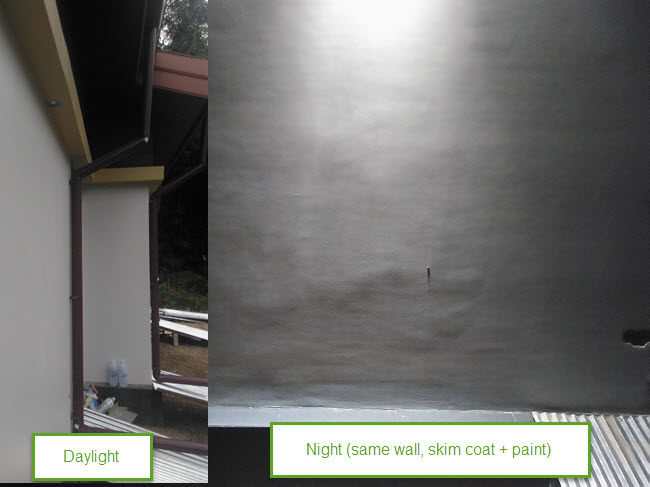
enter image description here enter image description here

5
  • 1
    Getting a smooth skim is something that takes years for professionals to master. Don't be too hard on yourself. Have you considered (1) ignoring it, (2) changing the lights, or (3) adding some texture (sand, or additional compound in artistic sweeps)? Commented Oct 15, 2016 at 13:50
  • Yes I did considered these as a last resort but I do like the challenge and see more value in completing the project as planed and learning the skill. Commented Oct 15, 2016 at 14:13
  • 2
    I thought that looks like a nice job. Adjusting the lighting so it doesn't shine directly on the wall or adding additional lighting from other angles may be the only way to get rid of all the shadows other than patching at night so you can see the problem areas.
    – Ed Beal
    Commented Oct 15, 2016 at 19:29
  • Thank you for your input Ed. The cans have no rotatory mechanism. I can just position them along the wall but not against. I would have to add so much more of lights to cancel the shadows at all because I got the bumps and little waves everywhere. Whats more the cans are fixed permanently with epoxy glue. Commented Oct 16, 2016 at 6:22
  • I still have few walls that I'm skim coating and sanding at night with the lights on but it looks to me like all imperfections are hardly visible unless the wall gets painted. I intend to do just a primer coat on one of the wall today and do fixes from this point. Lets see if that helps. I will post some pictures. I don't have enough experience to tell but I thought maybe the mud is just to tough to sand smoothly. Technical data sheet says it contains resin and other additives making it more durable... Commented Oct 16, 2016 at 6:44

2 Answers 2

1

You should take note of Ed Beal's comment above. I am a bricklayer by trade and I have seen this same problem with wall mounted lights on brickwork a lot. The brickwork looks, no, IS spot on, but at night, it looks steppy because (most) bricks are not flat.

I'll stick my neck out here and say that it's going to be very difficult to get a perfectly flat surface with cement based coatings/ rendering etc. i.e good enough to shine lights down.

The answer is to do what the historic buildings do. Shine the light ON the building (not down it). Not only does this look spectacular, making the house stand out, it will of course totally 'hide' the walls you're not happy with. This usually means lamps mounted in the grounds/bollards etc. and angled back towards the walls.

6
  • "I'll stick my neck out here and say that it's going to be very difficult to get a perfectly flat surface with cement based coatings/ rendering etc. i.e good enough to shine lights down." Commented Oct 24, 2016 at 8:11
  • After trying best I came into exactly same conclusion. You would have to have a precision as a laser at your hand to go so extremely smooth. Commented Oct 24, 2016 at 8:13
  • As to the lights they do not have to go from down or shine directly on the wall as you suggest. I did test with a torch highlighting the wall vertically from top to bottom. If the torch is so close the wall that it almost touches it the effect is very bad. Now. Move the torch just 0 cm away from the wall and all is smooth and perfect. Commented Oct 24, 2016 at 8:14
  • The reason I was so much into correcting the wall surface was that my down lights are fixed permanently with an epoxy glue, so I can not redirect the rays as I need. Best solution will be to cover the lights with a piece of wood and install new one but not so close the walls as current ones. Commented Oct 24, 2016 at 8:14
  • Is it possible to 'shield' or blank off part of the lamp next to the wall? Say with a thin strip of aluminium. Obviously it'd need to be able to withstand any heat. I'm thinking about the time I had to shield part of a PIR sensor to stop the light going on every time a person walked past a small gap... (the sensor was inside a wardrobe to switch internal lamps on when the doors were opened).
    – handyman
    Commented Nov 23, 2016 at 18:41
0

I don't know how well this would work as having never tried it - I've only skim coated interior wallboard and I now know my limitations and stick with knockdown texture and satin paints - but couldn't you use a long straight edge to move along the surface of the wall? Shining a light from the opposite side of the straight edge would show the high/low spots. Then you could spot sand/fill as needed.

Your Answer

By clicking “Post Your Answer”, you agree to our terms of service and acknowledge you have read our privacy policy.

Not the answer you're looking for? Browse other questions tagged or ask your own question.