2

First post here. I am currently doing a small remodel of a bathroom in a house I just bought and am trying to keep costs and time spent, low.

I had to tear out all the drywall due to the previous owner/s painting over wallpaper and not sealing the drywall before the wallpaper was applied (this causes the wallpaper to be nearly impossible to get off without ruining the paper backing of the drywall, too).

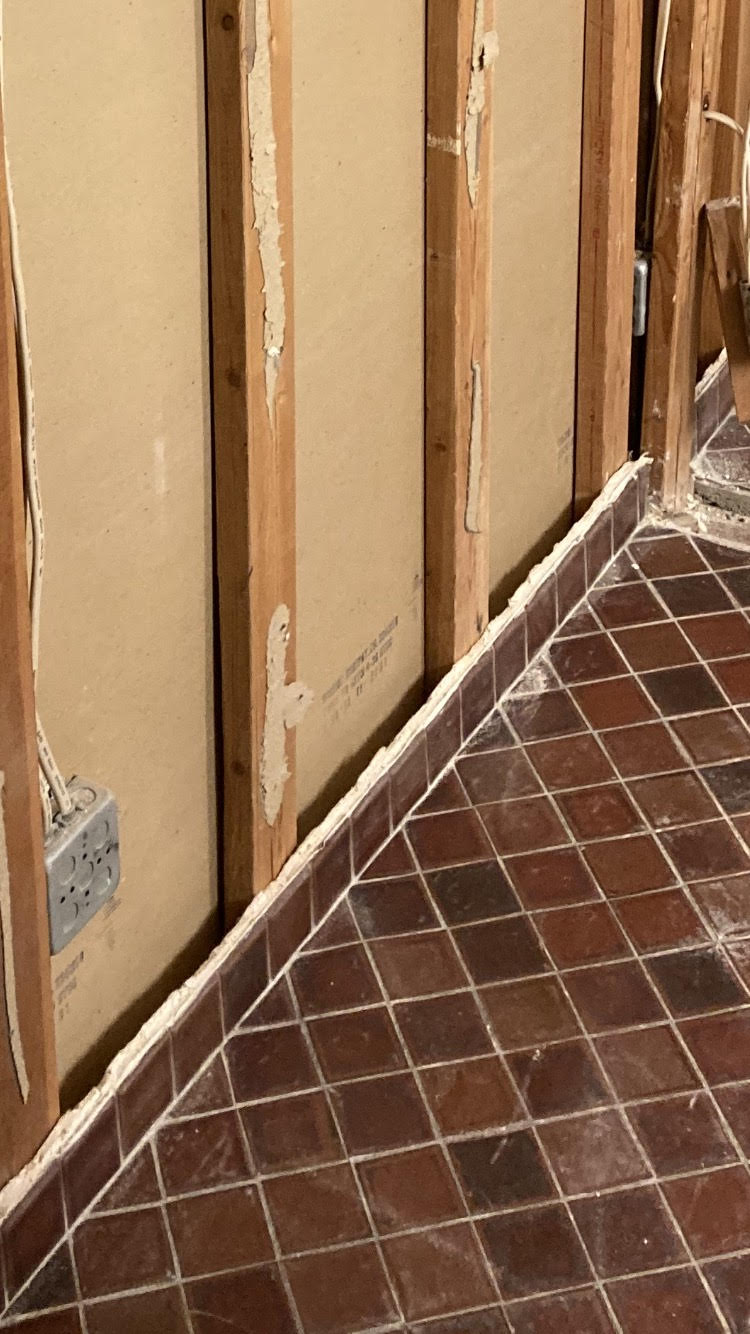
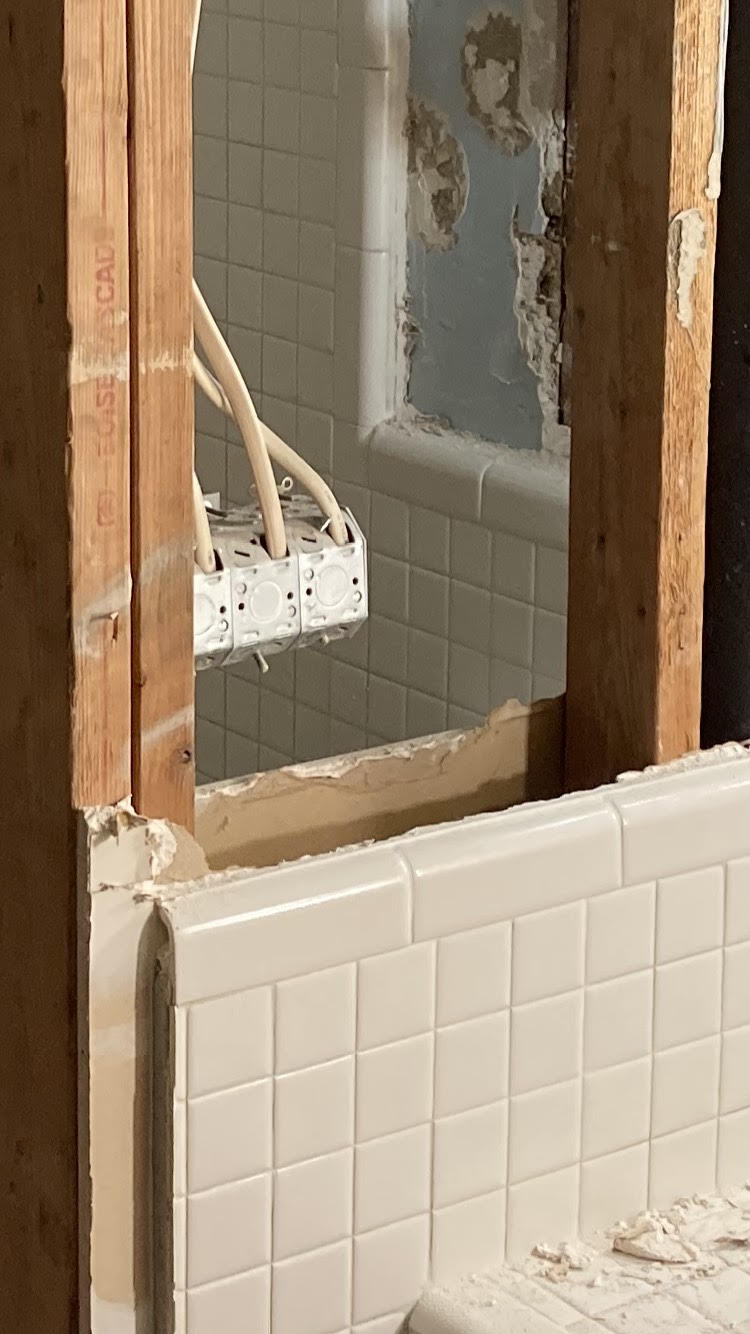
Anyway, I want to avoid redoing the tile. I have removed the drywall to the point where there is still drywall behind tile baseboards and tile backsplashes and such.

Does anyone know of a good way to stack new drywall on top of the old drywall that still sits behind the tiles without it looking like a hack job? I was thinking of using some sort of drywall bead but don't know it that will work out best.

I've attached some photos for reference. Thank you all in advance!

enter image description here

enter image description here

5
  • 2
    I'm not at all clear what you mean by "stacking" drywall. Can you please clarify? Also, drywall is not suitable as a base material behind tile in a shower. You should be using a cement-board or a waterproof tile-backer board. It's not clear from your photos what is shower and what it not.
    – jwh20
    Commented Oct 26, 2020 at 15:59
  • 2
    By the way, if the brown floor is the shower floor and that is drywall behind the lip, then you need to tear this thing out and do it properly. I also question the use of 2x4 studs in the wrong orientation. That's going to make the wall very flexible and your tile or grout lines will crack.
    – jwh20
    Commented Oct 26, 2020 at 16:01
  • @jwh20 - There will be no replacement of anything behind the shower tile. Also, "stacking" is just a term I made up for this application. It just means adding the new drywall to the wall so it fits seamlessly with the drywall that is already behind the tile.
    – EthanT
    Commented Oct 26, 2020 at 16:02
  • Just to clarify, I am not touching the walls where the bath sits. Those walls were installed properly and were installed with a cement backing board. I am only replacing the drywall on the non-bath walls.
    – EthanT
    Commented Oct 26, 2020 at 16:11
  • 1
    @jRaef - For the white tiles, what do you think about removing the top curved tiles only and then putting them back on after the new drywall is jointed and sealed with the old?
    – EthanT
    Commented Oct 29, 2020 at 5:28

3 Answers 3

1

OK you are in luck here because I had this just happen 5-6 years ago. You have a tile border that isn't really supported at all at the top and you have access from the other side... I am going to give you some easy steps.

#1 - Score about one 1" below the lip. You can use a sharp utility knife + drywall saw or an oscillating multi-tool.

#2 - While doing this you need to make vertical cuts every 6-8" so that you can pull small rectangles out. But do not pull yet!

#3 - You have to be sure the top is disengaged. You can use your knife, fingers, scraper, whatever. But carefully make sure the caulk and drywall is slightly cut out on the top outer. You should not have to do much to pull the drywall out.

#4 - Thoroughly clean the top of the tile, including the ridge behind it. You make need to use sand paper or get things wet to remove.

#5 - Now you will just slide the new piece of drywall in. You can add glue to the framing by and behind the tile.

Big disclaimer - you very well likely will not be able to get a full sheet for that wall. You cannot come in at an angle, the drywall needs to go straight down very very carefully because tile - even secured tile - isn't meant to be secured from outward pressure. You may need to put down a 2' strip (don't want a seam near the tile) and then do the rest.

0

Add blocking and run the sheets horizontal or vertical with a j trim bead. Fill gap with mud. Paint then caulk the tile to drywall transition

0
0

For what it's worth at this point late in the game, the right approach would've been to leave a few inches of the old drywall protruding, now matter how shredded the paper, to which you could tape the joint with the new sheet (possibly with some lumber backing to support the area). Some masking tape on the tile and you'd have been golden. Now... fussy detail work.

What I'd do now is lay in some lumber behind the tile edge, mount the new drywall, and tape that as normal using the best, most flexible (or toughest) mud you can find. Maybe you'll get lucky and it won't crack.

Your Answer

By clicking “Post Your Answer”, you agree to our terms of service and acknowledge you have read our privacy policy.

Not the answer you're looking for? Browse other questions tagged or ask your own question.