5

and thank you for all the help so far! This place is great!

Can you help with this?

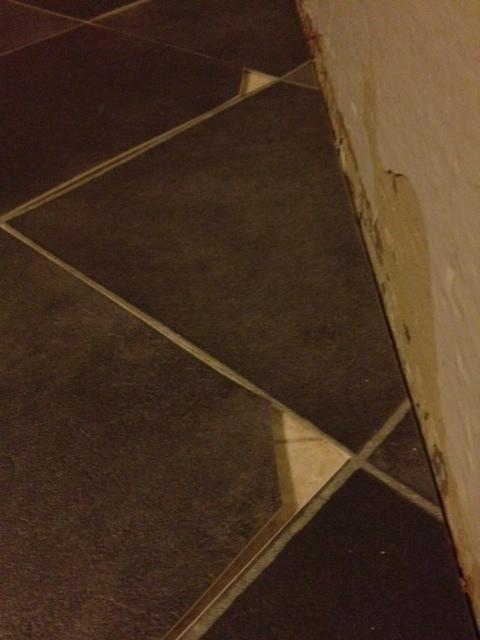
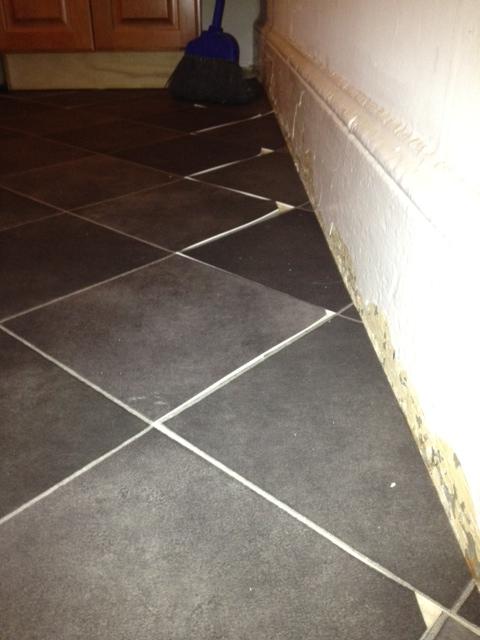
I really blew it when I cut my vinyl floor in the kitchen. So to "fix" it I made cuts along the grout lines in the vinyl. After that I made pieces from the remnant that fit "pretty" well. Not perfect, but close.

I still have a few "triangles" to fit into place as you can see in the pictures.

Any suggestions on how to best make this all look good? there are some gaps between the seams...

  1. How can I fill in the seam gaps?

  2. How can I then make the seams strong?

  3. Any wise advice on how to make this look good?

enter image description here

enter image description here

5
  • 3
    what picturess? Commented Mar 27, 2012 at 8:55
  • oh yeah. I can't add pics till I get a 10 rating... jeez. Can someone vote me up a few times so I get a "10" rating. Then I can add pictures. Commented Mar 27, 2012 at 18:13
  • or post links to the pics and someone else can post the pics Commented Mar 27, 2012 at 18:15
  • Ok @slindsey3000, you got the rating now so you can post with picture goodness.
    – lqlarry
    Commented Mar 27, 2012 at 18:52
  • Thanks! OK here are the pictures. How can I save this floor? Commented Mar 27, 2012 at 22:36

1 Answer 1

3

OK, first obvious question: Where did all the corners go? Did they get cut off? Is this sheet goods or adhesive tiles of some type? I think it is sheet goods from the pics.

Until I get a bit more info, here are a couple of ideas for ya. Short of starting from scratch, go ahead and glue down the flooring as you have it in the pics. If you have any extra scraps, cut some small triangles and glue them in with an over-cut procedure to assure no gaps in the solid color joint. Cut away some of the "grout" in the offending joint so you have at least an 1/8th inch gap, 1/4 inch would be better. After gluing and rolling the vinyl , let it cure a few hours, maybe a day.

Next: Get a quart of premixed synthetic grout in a matching color to the grout lines in the flooring. Apply the grout to the gaps with a plastic putty knife, wiping away excess from vinyl with a damp sponge. Try to get a nice even layer of grout into the gaps. It is important to get the synthetic adhesive style grout designed to be used with vinyl tile or CVT. This type of grout will stick better in a thin coat and does not need sealing later. After about 20 minutes clean all excess grout and haze from the vinyl. Be careful not to disturb the grout lines. After the grout has dried, finish cleaning any haze from the area with a damp sponge. Good Luck
1
  • 1
    My guess is that they have the corners cut because they are intended for a layout with contrasting square "tiles" in between
    – Steven
    Commented Mar 29, 2012 at 13:22

Your Answer

By clicking “Post Your Answer”, you agree to our terms of service and acknowledge you have read our privacy policy.

Not the answer you're looking for? Browse other questions tagged or ask your own question.