4

I have 3x8 Brazilian Cherry timbers cut with tongue and groove that stack on top of each other to make a very large wooden piece of art to hang on my wall. I have all of the pieces glued to each other and 2 solid pieces of threaded rod running from top to bottom on each side right through the middle. (What a pain to put those in)

My question is now that I want to hang it on the wall, what is the best way of doing that without having and mounting hardware showing and wanting to keep it as close to the wall as possible? The whole piece weighs roughly 250 lbs and I can have no risk of it falling as it will potentially hurt or kill someone.

I was thinking maybe running 2x6 across the back cut in half at a 45 degree with match boards on the wall... my only concern is that it would be pretty far off the wall at that point. Maybe 1x6 would be better... Just not sure how many boards I would need to hold the weight and what would be the best fasteners to use to screw into the wood?

Keep in mind this wood is Jatoba.. about twice as hard as Oak.

Thanks!!

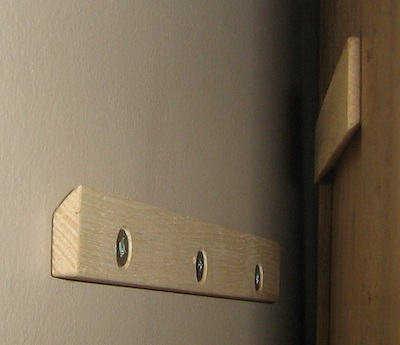
Picture of the wall laying on the ground

1

4 Answers 4

6

What you described with the 45 degree bevel is called a french cleat. It's used for securing heavy items to walls and I've seen them used in upper kitchen cabinet installations. 1x6 hardwood cut in half on a 45 I think would suffice.

I would consider putting one on the top and one on the bottom (mounted upside down) if you have enough room to slide the piece from the side. That way it eliminates rocking and someone trying to lift it up.

They make metal french cleats for hanging large pictures and mirrors but that max I've seen was a 200lb rating. Maybe you can find some that are rated for your project. Unfortunately they are 20" wide which would be too long to have 2 of them side by side but they do make smaller ones. Maybe there's the right pair for your work.

Here's another idea I had..... Disclaimer... verify that this will be strong enough for your needs. this is a DIY solution with no testing for fitness.

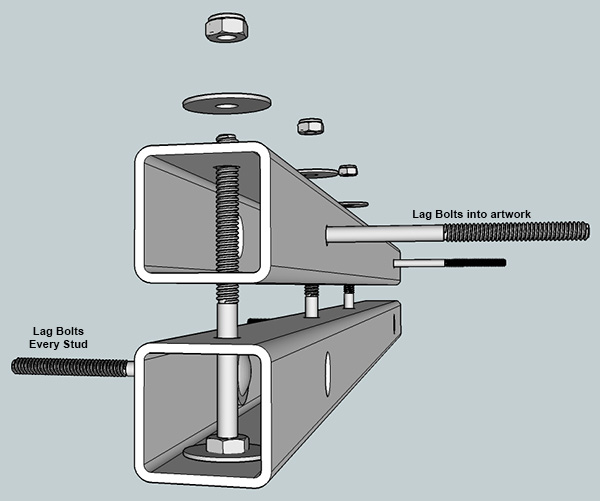
if you can drill into steel. Get some structural steel channels and drill some holes in the backside every 16" to drive lag screws into studs. In the front drill slightly larger holes to allow you to get the lag screws in from the front.

On the top and bottom drill holes for long bolts. Drill the holes just the right size for the bolt to slip through and fit snug so there's no rocking. You'll need to secure them on the inside of the wall mounted channel with a nut. Getting the nuts in on the edges shouldn't be hard. The ones in the middle you'll need to cut some access holes in the front to get the nuts in.

Attach a similar channel with the same type of cutouts (except the access holes for the blot nuts) and attach it to the back of your artwork.

Make another pair for the bottom or at the very least attach a piece of channel as a spacer.

Attach them near the top and bottom so that you can reach in with a nut driver extension to secure the bolts.
enter image description here

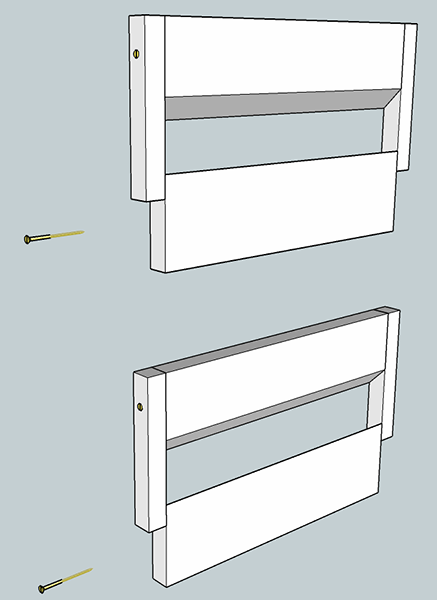
If you can't or don't want to work with steel here's an improvement to the french cleat that will provide some more support to help keep the artwork from lifting up and moving side to side if bumped and doesn't require reversing the bottom cleat.

Make the cleats as you normally would out of 1x6 lumber but make sure it's a couple of inches shorter than the width of the artwork. To the upper cleat attach a 1x1 or 1x2 strip of wood that is 5-1/2" long so that it's flush to the top of the cleat on the artwork. Do this for both the top and bottom cleats.

After you slide the artwork on the wall mounted cleats, predrill and drive some long wood screws into the sides of the bottom cleat. I only did 2 screws per side piece but should be room for 4 on each side.

This way the artwork won't fall, lift or slide to the sides.
enter image description here

2
  • 250lb artwork, inverted french cleat, "eliminates ... someone trying to lift it up." - That would be your weightlifter friends after they've emptied your fridge of beer? Commented Feb 12, 2015 at 11:42
  • 1
    @RedGrittyBrick, lift up is probably the wrong way to describe it. More like swing up by pulling forward from the bottom. In that case the french cleat would actually act as a lever and it would take considerably less force than the weight of the artwork to start prying the cleat apart. Commented Feb 12, 2015 at 16:19
4

As @OrgnicLawnDIY suggests, use french cleats. These are 1x4 or 1x6 boards cut on a 45 degree angle. The lower section has the short side against the wall and the upper section, attached to the item to be hung, lowers into the trough created to snug the piece into the wall. Many carpenters use strips of 3/4" or 1 " plywood instead of solid boards. You can use hardwood, but most are made of clear dimensional lumber.

French Cleat

(French cleat" by Tenbergen Licensed under CC BY-SA 3.0 via Wikimedia Commons.)

Attach the upper section to the artwork using #10 or #12 screws, at least 2 inches long. Attach the lower cleat to the wall the same way, driving the screws into studs.

You can use two cleats, one near the top of the work and one near the bottom if you want extra support and to reduce the chance of someone pulling the bottom out and up (but that is very unlikely and hard given the pressure that the angle asserts within the upper cleat). You can orient both the upper and lower cleats in the standard fashion. The angle pulls them into the wall and reversing them is unnecessary (and makes installation a bear).

This system is used to hang heavy upper cabinets on kitchen walls, that are then filled with heavy ceramic dishes or canned goods. And your project is a static load - you are not plopping stacks of platters on them the way you are in cabinets.

3
  • 2
    Even when using french cleats for cabinets other fasteners are used as well since the french cleat only inhibits the cabinet from falling down. It can still slide side to side and lift up which is why I recommended the reversed bottom cleat. I just had a better solution which I'll add to my answer though. Commented Feb 12, 2015 at 3:00
  • @OrganicLawnDIY I wholly agree with the fastening on the bottom when using a french cleat. The nature of the art work seemed to preclude that. Your side braces help.
    – bib
    Commented Feb 12, 2015 at 14:32
  • 1
    Yeah. Use plywood - it's actually stronger for this application, because there's no consistent grain for it to split along. Commented Sep 15, 2019 at 19:26
2

Z-clips are french cleats made from aluminum- they come in all kinds of lengths and keep the hanged piece about 3/16 from the wall- they will have holes to attach one piece to the wall/studs and the other to screw to the back-they can hold a lot of weight (we've hung whole mahogany wall panels with them) The item can easily slide left to right to center. Great things..

1

Utilize a big enough Flat panel TV mount. This would keep the mount itself hidden, keep it close to the wall, and provide the strength you need to keep it on the wall. You'd just need to find a way to affix the art to the mount without destroying the art ... If you are not afraid of what exactly is attached to the back, epoxy might do the trick. Applying epoxy the length of the runners on the wall mount would provide more than enough surface tension to keep it affixed. It is too bad the boards are already glued together as you could have mounted something into the tongue and groove portion which would have been totally solid.

2
  • @mbeckish ... sorry, I saw your comment as I posted this up. Commented Feb 11, 2015 at 21:52
  • 2
    No problem - I was too lazy to write more than 1 sentence.
    – mbeckish
    Commented Feb 11, 2015 at 21:53

Your Answer

By clicking “Post Your Answer”, you agree to our terms of service and acknowledge you have read our privacy policy.

Not the answer you're looking for? Browse other questions tagged or ask your own question.