I purchased some nice-looking 4" recessed LED fixtures to replace my existing fixtures that use incandescent bulbs. I've now discovered that my current recessed lights are of the 6" variety. I like the size and appearance of the 4" lights better than any 6" fixtures that I've seen. How hard it is to "shrink" the holes in the ceiling so that 4" recessed lights will work. What's the best way to achieve this?
5 Answers
Four inch and six inch recessed fixtures consist of two main parts - the can and the trim. They need to match.
The first issue will be getting the old can out. If it is old-work style, it may be held in just by pressure clips on the sides, fairly easy to remove. If it is new-work style, it will be attached to framing members, either directly or with a brace system. More complicated to remove and usually requiring cutting a bigger hole to get to it.
Even if it is old-work, a 6" hole differs from a 4" hole by 1" on each side. Cutting a 1" ring from drywall is hard, leaves you with a fragile piece, and will be difficult to tape and mud smoothly, and hard to brace properly.
I would suggest cutting a somewhat larger square out of the existing ceiling area. This will allow you to remove a new work can, if that is what you have. Leave at least 2" on each side of the hole. I would cut the new 4" hole (check the fixture for exact hole size) before mounting the patch to the ceiling.
Once you have a section out of the ceiling, you may be able to reach the framing to attach a new-work type unit. More likely, you will use an old-work style.
In either case, you will need to brace the new patch to provide strength to hold up the patch and possibly the new fixture. You can do this by using furring strips that are at least 6" longer than the size of your patch. The furring strips will extend on either side of the patch.
The strips should be screwed to the ceiling beyond the patch and the patch should then be screwed to the strips. I would use 4 strips, all parallel, two on the outside edge of the patch and two just a bit wider than the location of the new 4" hole.
Once the patch is up, tape and mud (spackle) the edges.
Finally, you might want to think about moving the new fixtures to a slightly different spot to get a solid surface to attach to. This may require some adjustment in wiring.
I would need to see pictures of what said bulbs look like in your current cans but I can tell you that they sell thousands of varieties of recessed lighting trim for 6 inch cans. I am almost positive you can find trim that will work for your 4 inch retrofits and you don't have to touch the drywall.
-
I'd like clarification on what trim is. In recessed lighting, is the trim only the exposed metal/plastic that is visible from the ground or is it the exposed metal/plastic as well es the socket and internal structure that holds the socket to the can?– drsCommented Feb 4, 2014 at 23:33
-
1Well trim usually would include the rings for the hole opening and sometimes refer to the beveled pieces that extend up - these are used to support different bulbs and change the lighting affect. To change the socket connection these are usually called conversion or retrofit kits but sometimes I see these sold as "trim kits" too. I think we need some pictures of what you have.– DMooreCommented Feb 5, 2014 at 0:45
My guess is that you really don't want to shrink the holes that the existing 6" recessed lights are in. That requires a lot of drywall skill, paint color matching, paint blending, and a lot of work to make your ceiling look as good as it does now. Instead, I think you should consider LEDs with a 6" baffle trim. This video shows an example: http://www.youtube.com/watch?v=9oCX_ZBga5A. Or, you could possibly use a baffle like this with the fixtures that you already bought: http://www.homedepot.com/p/Halo-6-in-LED-Baffle-Trim-494WB06/202024774.
-
How hard is it to patch drywall so that it's optically flat? Just below expert level. +1– MazuraCommented Feb 2, 2020 at 23:34
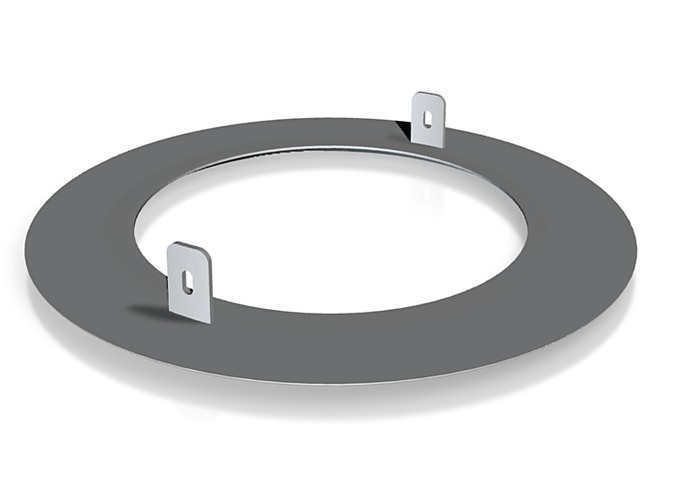
One solution that may be more expensive, but possibly simpler is to create a "trim adapter" specialized to the 4" LED fixtures. The fixtures should mount into the trim and the trim should mount to the existing 6" cans (e.g. via spring holes). Something like this below:

The trim adapter can be printed using an online 3D printing service.
Unfortunately if you would like a very professional finish using the same spot that the 6" light was in, there is no short cut but to remove the 6" can entirely. The question is now "how do I make a 6" opening to be able to fit a 4 inch opening the size of the smaller light fixture?".
Cut a 4" opening in a piece of sheet rock the size of the old opening. Slide the circular piece of sheet rock into the opening in the ceiling and use some sort of tape to hold it in place.
Spackle around the newly inserted piece. After it dries, sand the area and paint. It will look as good as new.
