20

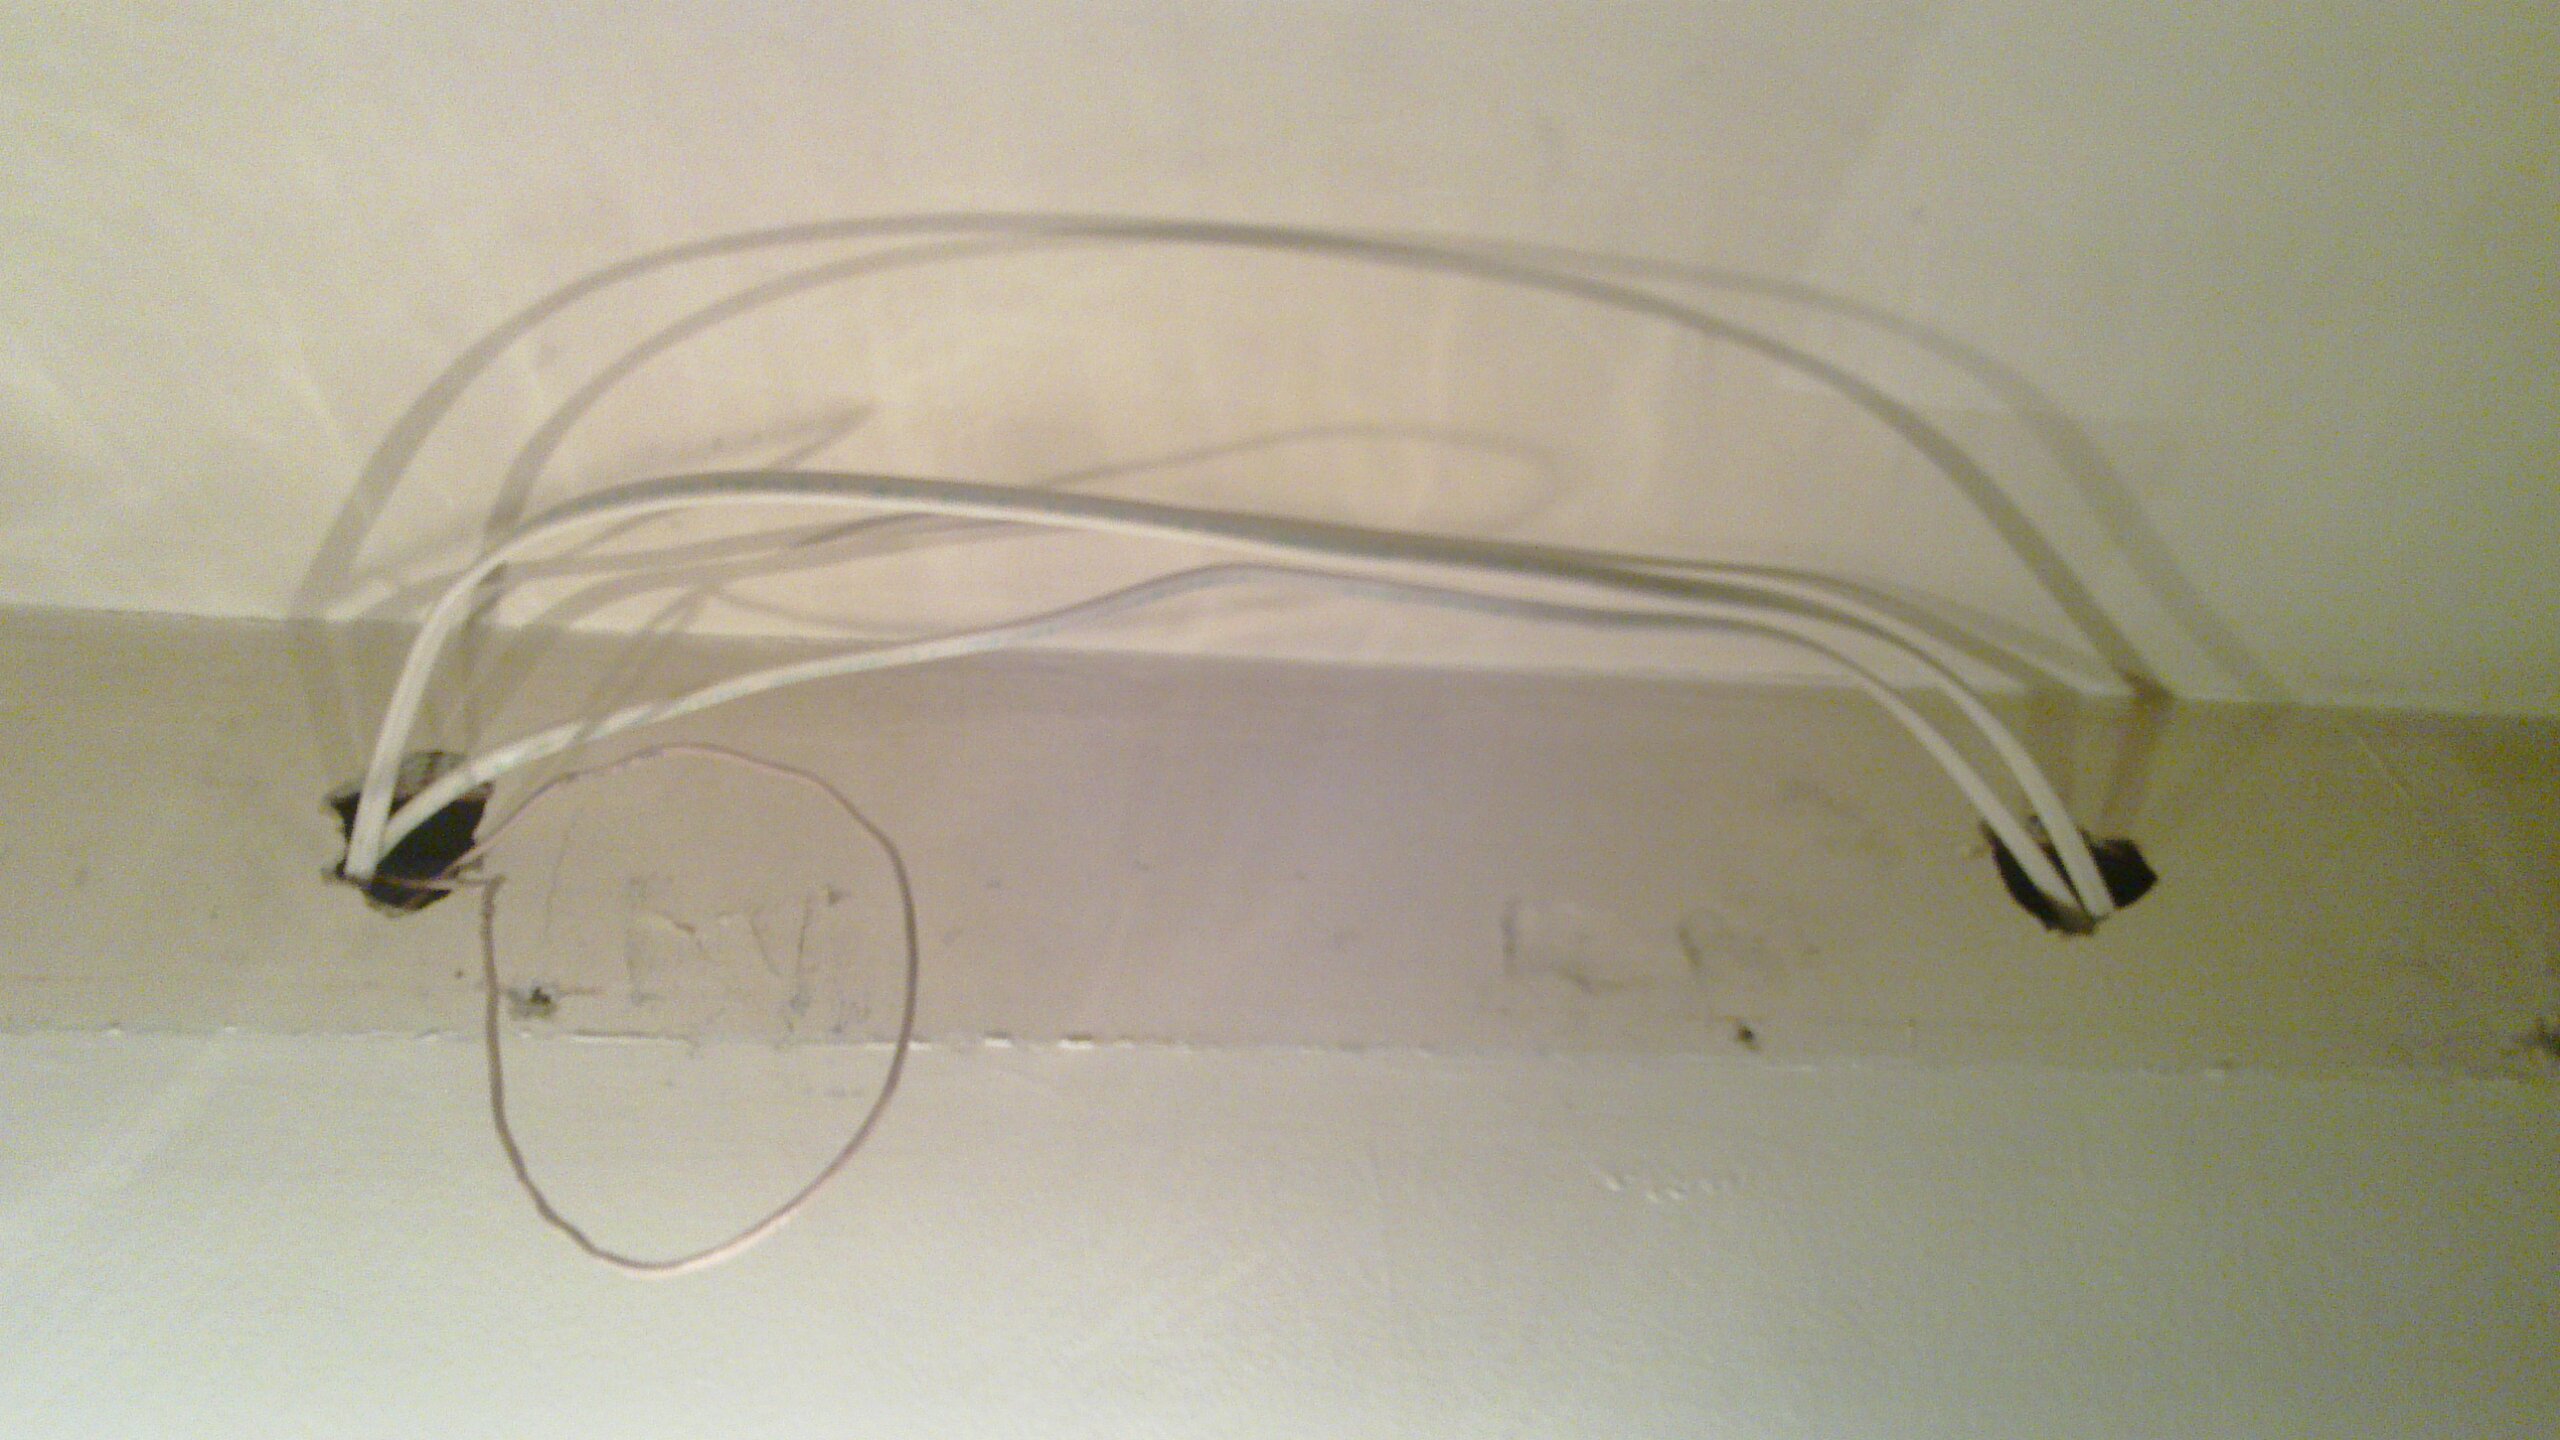
I recently removed an abominable drop ceiling from my dining room and found this close to the ceiling on the one side of the room.
enter image description here

There is definitely a stud between these two holes. On the other side of the wall, there is another wall perpendicular to this one, so I'm thinking there is several studs there and that's why someone did this.

My question is what would be the logical steps I should follow to get this into the wall?

EDIT: I figured out what is on these wires. This loop has four light fixtures and two outlets on it. In the room next to it is a drop ceiling (that I have not removed yet since the frame of it is supporting an air duct (thanks previous owner...) and there are two more wires just like this one, though much further from the receptacle--probably a good 10-15 ft in each direction. So to do the method described in the answers would work for the wire in the picture, but it sounds like a lot of work for a long run.

3
  • 3
    I see two Romex wires installed in a very bad way. Wha is that other loop hanging out of the left hole?
    – Michael Karas
    Commented Oct 30, 2012 at 12:24
  • 10
    Warning: This appears to be the work of an amateur. It is possible (perhaps even likely) that you'll find other problems as you go. You may end up having to fix other things that you don't yet know about. You may even end up going all "Holmes" on it and "take it all down". Commented Oct 30, 2012 at 13:18
  • @MichaelKaras, I believe that is an old, non-functional door bell. It was actually handing down loose; I just tucked in in that hole. Commented Oct 31, 2012 at 2:33

4 Answers 4

13

You will need to remove that portion of the drywall, which shouldn't be that big of a deal anyway because you will need to do drywall repair for the two holes as it is.

  1. Turn off power to that circuit! If you are unsure which circuit this wire belongs to then shut off the main power just to be safe. You don't want to risk injury by accidentally cutting that wire or possibly other wires that you can't see.

  2. Determine to the best of your ability if the perpendicular wall is load bearing. If you have any suspicions at all then stop, you are done. You won't want to do the drilling steps described below on a load-bearing wall. It would be best for you to disconnect this wire and re-run it.

  3. Locate the closest outlet or junction box that this wire goes to on any side. Test it to make sure there is no power. Temporarily disconnect the outlet from the wire(s) and if there are any clamps on the wire in the box then temporarily loosen or remove them if possible. If it is a newer style box with Romex-style wire clamps on the outside, this may not be possible, so you should stop. The wire is clamped and possibly also stapled into studs or joists. You won't be able to pull it out from the hole in your picture. I would deactivate and rerun the line at this point.

  4. If the clamp in the outlet box is loose then have a buddy look at the wire in the picture and see if it moves when you pull and shake on it. If so then that means it was a crappy DIY job and he didn't staple the wire down like he was supposed to. This is good because it means that you can pull it out and rerun it through a different hole. Not yet however. If the wire doesn't move at all then that means there is another outlet or junction box before this or that the wire is stapled down, meaning you will never be able to rerun this without tearing down obscene amounts of drywall.

  5. Locate the studs. If you have a fancy pants stud finder then use it to locate and mark the positions of the studs on the facing wall and also possibly the perpendicular wall. If you do not have such a tool then use a strong magnet to find where the nails are, this is where the studs will be.

  6. Drill a small hole halfway around the center of the stud at the top left of the rectangle you will cut out. This will allow you to fit a keyhole or drywall saw into to start cutting.

  7. After cutting out that rectangle the perpendicular wall will be exposed. Inspect the path of the wire and see if can it be easily pushed through back to the outlet. If so then tape up the end of the wire at the box and tie off a thick fishing line or strong twine to the end of it. When you pull the wire, it will take the fishing line with it, giving you something on the other end of the outlet that you can pull on to help direct it through holes and other paths. If the path is long or there are some crazy bends or very small tight stud holes that you can see then this may not work very well. At that point the wire should be disconnected and a new line should be rerun.

  8. Drill a hole through the necessary studs so the wire will run properly behind the drywall. Disconnect the fishing line and run it through the new holes, then re-attach the fishing line to the wire.

  9. On the outlet end start pulling gently and slowly while a buddy helps feed you wire from the other end. The fishing line will help properly navigate the wire back to the outlet box. If you get hopelessly stuck and don't mind cutting more drywall to see what you are getting snagged on, then proceed, otherwise call it a loss and disconnect the wire.

  10. The wire is back at its home! Reconnect everything back in the outlet or junction box as it was. Turn the power back on. If nothing tripped then you have no shorts. Test all affected outlets, and switches on that circuit to make sure they all still work properly.

  11. Cut out a rectangle of drywall that fits mostly inside what was cut out. screw it into place, tape and mud the edges two or three times using progressively larger mud knives until everything is smooth. Leave for a day or two to cure then primer and paint. You are done.

8
  • 2
    +1 I'd add that you should be sure no junctions are hidden within the wall (entirely possible when you see sloppy work like this). I also strongly recommend against running any wires near the surface of the studs like others have mentioned, it removes important structure and creates an electrocution hazard. One tip: be careful with the keyhole saw since a sharp one will go right through any insulation on electrical wires behind the wall.
    – BMitch
    Commented Oct 30, 2012 at 12:20
  • @BMitch I thought of that, which is why I suggested actually shutting of main power and is what I would do personally. Also about junctions in the wall, well if they were in a box then wouldn't be able to pull on it much anyway. If it is an exposed junction then you got some major electrical problems and should rerun anyway. Commented Oct 30, 2012 at 12:28
  • 1
    By hidden junctions, I mean any junction that isn't accessible from from an fixture/outlet/switch/blank. Any junction that is made in or outside of a junction box and then covered over (e.g. by drywall) is against code. So if you find them, they need to be fixed by either exposing it with a blank plate, or removing it completely and rerunning a continuous line between two proper junction points.
    – BMitch
    Commented Oct 30, 2012 at 12:35
  • +1, but I'd recommend renting a right angle low gear drill + auger to make the hole. Keyhole saws, especially on old joists tend to be .. well .. not pleasant. At the best, you end up with this odd graphite smell and taste in the air.
    – Tim Post
    Commented Oct 30, 2012 at 13:56
  • Did you write "You want want to do the drilling steps described below on a load bearing wall."? Did you mean "You do not want to do the drilling steps described below on a load bearing wall."?
    – Konerak
    Commented Oct 30, 2012 at 19:15
10

Here are some ways you could go about it. Not all of this would be to code depending on where you are:

  • Hide it behind a cornice: you could put up a decorative cornice around the perimeter, and cut a channel for the wires on the back of the cornice.
  • Dig a channel through the stud for the wires: grab a hammer and chisel and get busy! You wouldn't need more than 1/2 to 3/4 square for those wires, and that shouldn't cause any structural issue. It would be smart to put the wire in some sort of conduit before plastering over the area
  • Re-wire: this is the most work, but the way I would go about it myself if I had the time. You'll have to cut through the ceiling, drill holes through the studs, run the wire through, then re-do the ceiling.

With all the solutions above it would be a very good idea (if it isn't legally required it should be) to put the wire into a protective conduit wherever possible for safety reasons. This will protect the wires, and anyone working near them!

Before you do anything I'd spend some time figuring out what those wires are and what path they take. Just think how dumb you'd feel if you spend loads of time burying those only to find out they aren't in use anymore! Also, I'd want to know more about the setup, if someone was prepared to cut corners that way what else have they done? It's good to know for your own peace of mind.

8
  • 4
    I want to downvote this because I was nearly electrocuted during a remodel demo by somebody who plastered over a wire that didn't have conduit. It would be extraordinarily stupid and unsafe to plaster over a wire that isn't protected. Commented Oct 30, 2012 at 11:53
  • 2
    @maple_shaft I did say to put the wire into a conduit! I will make it a bit more prominent.
    – GdD
    Commented Oct 30, 2012 at 11:57
  • 2
    It's a good point, I've edited and made a special point about that.
    – GdD
    Commented Oct 30, 2012 at 12:03
  • 3
    There is no need for conduit. All you need is a metal plate covering where the wire passes through the stud(s).
    – Tester101
    Commented Oct 30, 2012 at 13:35
  • 1
    You don't use conduit inside of walls.
    – DA01
    Commented Oct 30, 2012 at 18:33
8

I guess the "abominable drop ceiling" was installed to hide this horrendous wiring mess. The proper technique to fix this is to open up the wallboard and drill holes through the studding to pass the wires through the studs. This proper fix would also involve opening up the wall on the other side to locate the destination of one end of the wire so that it can be pulled back and re-routed through the new hole in the stud.

There is a less desirable fix that you could also try to do. This one would also involve opening up the drywall large enough to create a work space around the studs. It looks like you are already faced with some major drywall hole repair anyway. :-( This approach should probably be avoided if the wall is a load-bearing wall.

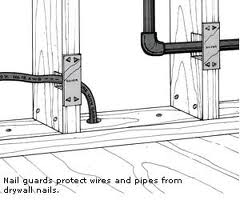
You would notch into the studs to create a groove through which the wires can be routed. Then cover over the groove with metal screw or nail safety plates. If multiple studs are in that area you may have to install several of these plates side by side.

enter image description here

If it becomes necessary to make the grooves in the stud deep enough that it could weaken the stud by a significant amount, you may need to pre-notch a cripple stud from the other edge and install it in along side the existing stud. I would install such a cripple stud using framing screws that pass through pre-drilled pilot holes. (This as opposed to nails. This cripple stud can help to restore lateral strength to the existing stud and should be as long as feasible down from the ceiling.)

The eventual drywall repair can follow the techniques I illustrated in this other answer a while back.

3
  • 4
    It's certainly less desirable to notch the studs since this removes a critical part of the structure and leaves the wiring dangerously close to the surface of the wall where drywall screws or even hanging a picture could result in a short. If anyone does this, those nail safety plates are essential.
    – BMitch
    Commented Oct 30, 2012 at 12:25
  • +1 I was almost finished writing up a similar statement when this appeared. If you're going to do it, do it right. Commented Oct 30, 2012 at 13:18
  • There is no problems with notching studs, as long as you do it properly and of course use nail plates.
    – Tester101
    Commented Oct 30, 2012 at 13:40
1

Call a professional to make sure that whatever you do is safe.

Depending on the situation (rental, temporary living, time, price, ability, major structural beams in the way) I would consider using a product like wiremold to surface mount the cable in a raceway that looks like this. You will still have to pull out one end of the cable to properly mount the entry and exit points for the cable. Using this would save you from notching, drywall, paint, and a mess. It should also meet code.

Again it depends on the situation and it does not put the wire "in" the wall but might be an acceptable alternative. They sell it at the big box stores.

Your Answer

By clicking “Post Your Answer”, you agree to our terms of service and acknowledge you have read our privacy policy.

Not the answer you're looking for? Browse other questions tagged or ask your own question.