2

I am a complete and utter novice when it comes to woodwork (this is in fact my first ever project) so there may be an obvious solution to this, but:

I'm building a TV lift cabinet. I started with the shell of an old oak & hardboard unit. I stripped everything out (shelves, screws & nails, drawers, plinth) and added a lot of pine and MDF to drastically strengthen it and support the TV lift mechanism. This all works, but the TV lift needs another ~100mm of clearance at the top.

I was going to use the same sturdy pine I've been using for supports (47mm x 100mm), however I'm not confident that I could do a decent mitre join to get a perfect 90° (and I'm not sure how to join mitre joins either), and they're too thick to do a dovetail join. They also need to be reasonably sturdy; although they're not structural, they do need to support a 20mm hardwood top (either sapele, walnut or oak).

I'm also not sure how best to attach this wooden rectangle (assuming that's the best solution) to my 'structural top' - this is a sheet of 19mm MDF with a hole cut into the middle for the TV to pop up through. For reference:
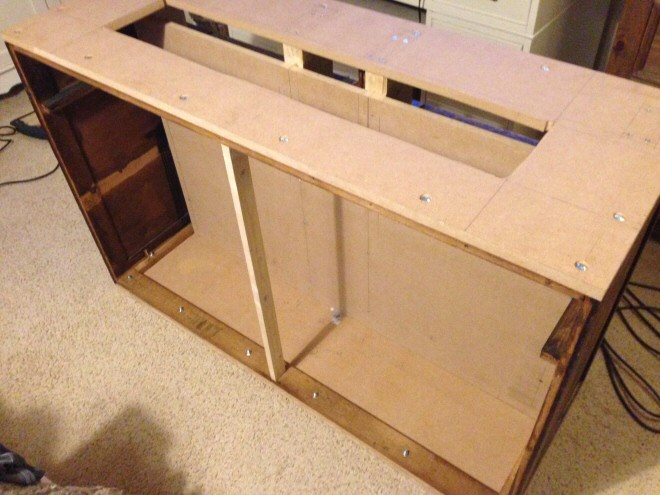
TV Unit

I've debated using wood screws up from underneath (although this will be tricky in a couple of spots), and/or glue, but I've not had much luck with No More Nails, and as I said it does need to support a hardwood top (with will be 1240mm x 480mm).

Any suggestions would be gratefully received - I've been winging it thus far.

4
  • 1
    I beg to differ WRT "too thick to dovetail" - cut them with a handsaw and a chisel and there Ain't Nuffin' too thick to dovetail. Router jigs are not the only way (or the best way) to cut dovetails. There are also many other joints you can use on 47mm thick wood...but I'm not up to a full answer right now.
    – Ecnerwal
    Commented Nov 16, 2014 at 2:02
  • 2
    I've never done a dove tail either; I'd use brackets. Any of the classic wood joints would be aesthetic; you'll never see the inside of this like you would a drawer.
    – Mazura
    Commented Nov 16, 2014 at 2:52
  • Dovetails are very much a functional joint - our forefathers used lots of them and carefully covered them up with molding so nobody had to bear looking at them. Tastes have changed, but they are still functional, even if people can bear to look at them now.
    – Ecnerwal
    Commented Nov 16, 2014 at 4:49
  • @Mazura I had considered brackets as well (seems easy!), I just wasn't sure if I'd end up with a less aesthetically-pleasing join at the external corners.
    – indextwo
    Commented Nov 16, 2014 at 11:55

2 Answers 2

3

Jack brings up a good point, you can create height in both directions. If you want to add height to the top, the process of selecting the method of construction would be determined by the look or style you're trying to achieve. If, for example, you want a Greene and Greene look, the riser might have a pinned finger joint like so:

enter image description here

If you want something a bit more reclaimed looking, maybe you could build a rough box to create your height and then wrap it in rusted sheet metal.

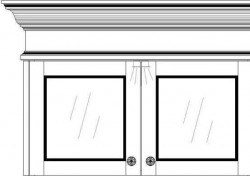
If a more classical look is desired, turn to architecture. This picture shows a cabinet with what's called a frieze between the crown moulding and the top of the cabinet. This is called Greek revival because it's based on the buildings of ancient Greece .enter image description here Note the small moulding below that conceals the joint between the frieze and the case.
In any case the methodology for affixing the top to the riser and riser to the case would be similar.

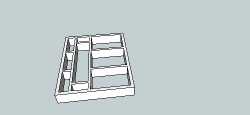
  1. Assemble your riser in whatever fashion you choose and add some ribs that delineate the opening for your lift. enter image description here This is overkill but you get the idea, which is to give yourself more places for attachment points and to create a chase for your lift to pass through.
  2. Lay the completed riser on the case and mark out where the perimeter and ribs will be when assembled. Set the riser aside and pre-drill the lid of your case.
  3. Pocket screw (and glue if you wish) the riser to the top. If you don't have a Kreg jig for pocket screwing, L-brackets will work.
  4. Set the top/riser sub assembly on the case making sure to orient it in the same way it was when you marked out for your holes.
  5. Run screws up through the pre-drilled holes into your riser. You may want to pilot holes into your riser depending on what materials you're using.

Hope this helps, good luck!

3
  • Ah, I hadn't considered adding ribs! I like this as a solution for attaching the riser to the top. I just need to figure out the joints now!
    – indextwo
    Commented Nov 16, 2014 at 11:53
  • One other thing I wanted to mention is that a lot of lifts are designed to work with stone tops (not wood) so they need additional counter weights to ride smoothly up and down. The last one I installed (a Nexus 21) would go up as smooth as glass and then clunk,clunk,clunk all the way down. Took me forever to figure out what was going on. Just a heads up.
    – user23534
    Commented Nov 16, 2014 at 15:53
  • Thanks for the tip. I'm using a small Venset TS750 which simply has a nudge to push a lid open, rather than having the lid attached to the top. Worth remembering for the next I do this! Which will probably be never.
    – indextwo
    Commented Nov 16, 2014 at 17:09
2

I would add a base, some call it a plinth at the bottom of your cabinet to get your height. Then cut a hole in the existing bottom, that will allow the mechanism to drop the additional amount you need.

3
  • +1 because I actually considered this idea myself when I was writing the question last night. I have some reservations about how well the TV lift mechanism would be affixed at the bottom (as, for some reason, that's where most of the screw holes are), but definitely worthy of an upvote!
    – indextwo
    Commented Nov 16, 2014 at 11:51
  • The ones I worked with were attached to the face of a "wall" built inside the cabinet. Pretty much what it looks like what you have already, so it did not matter what was below a given portion, meaning what it needs to attach to at the floor. The again, the added base can have a floor too.
    – Jack
    Commented Nov 17, 2014 at 2:27
  • Yep, this one is exactly the same, except for some reason most of the screw holes for attaching it to the back 'wall' are near the very bottom of the TV lift, so I'd need something extra between the existing base, the new base and the back of the unit to secure the bottom dropped lift against.
    – indextwo
    Commented Nov 17, 2014 at 13:17

Your Answer

By clicking “Post Your Answer”, you agree to our terms of service and acknowledge you have read our privacy policy.

Not the answer you're looking for? Browse other questions tagged or ask your own question.