5

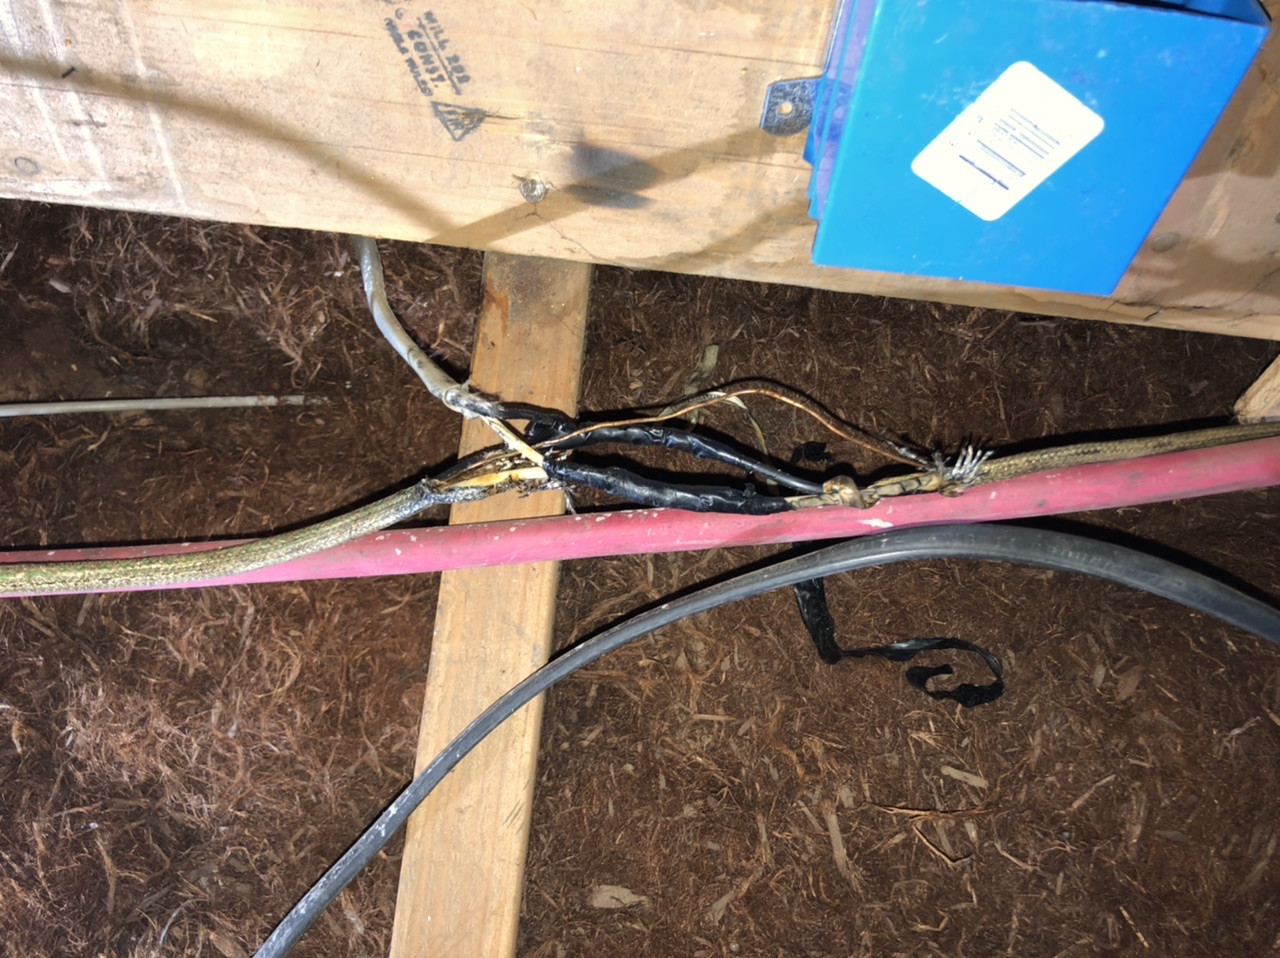
I found this junction in my attic when doing some unrelated work. It was entirely wrapped in electrical tape before I took the photos. My assumption is that it’s not code since it’s not in a box, but how dangerous is this? They split the wire and spliced the hot and neutral, potentially soldered to then new line, but left the ground intact. I took it apart and put it in a box. Is it worth looking for other DIY electrical?

enter image description here

enter image description here

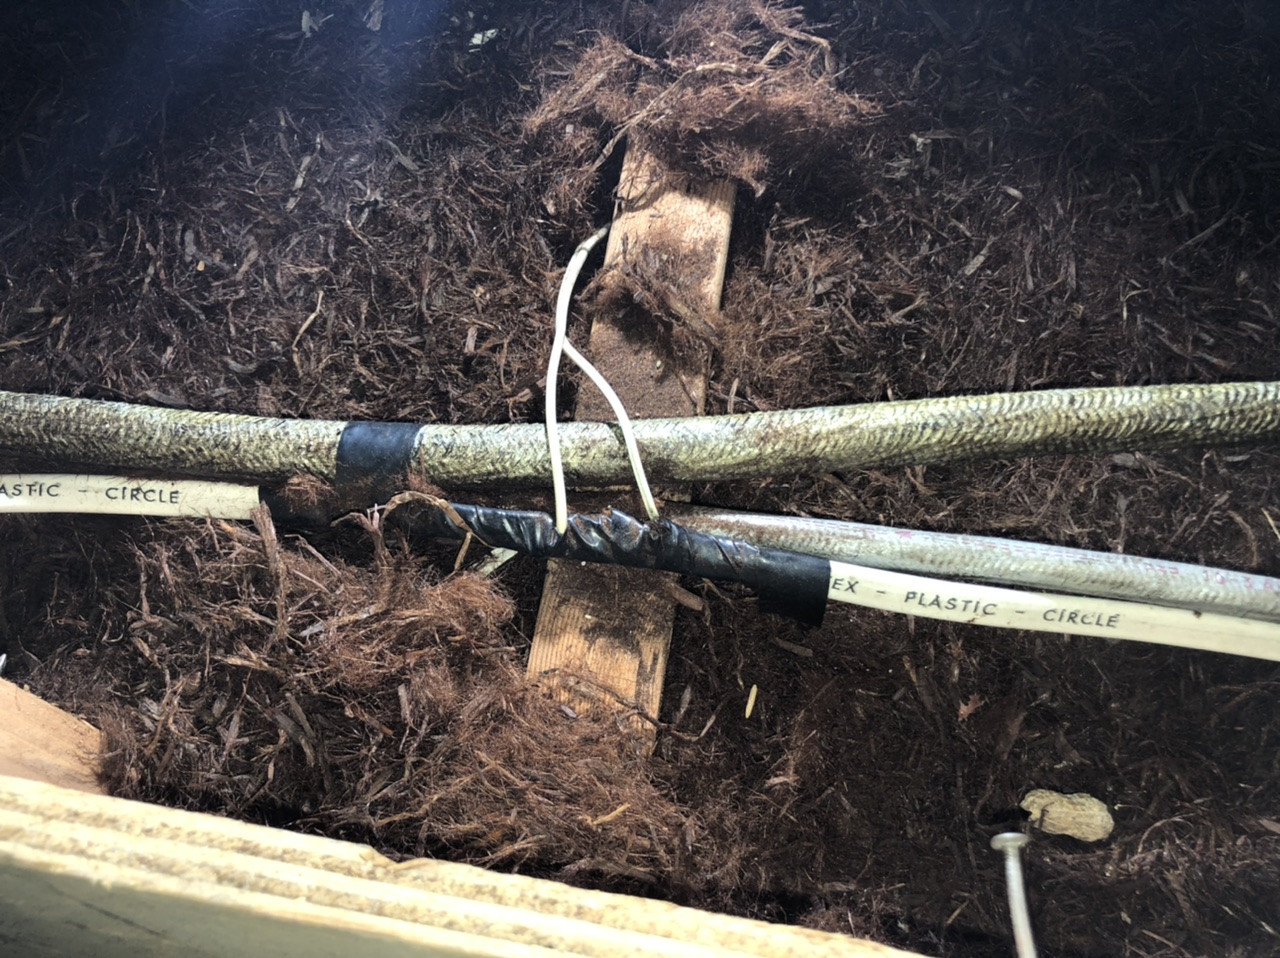
EDIT: Found another one! It seems even worse. Unfortunately I can’t even tell what this powers. It runs to an area that is difficult to access. Should I just disconnect it and see what loses power? It strikes me as a poor choice of wire to power outlets, to say the least, but I don’t know what else it could be. It seems to be a cheap extension cord which was spliced.
enter image description hereenter image description here

3
  • "Is this electrical junction in my attic up to code or reasonable?" No and no. Commented May 14, 2020 at 4:46
  • 3
    Given the scorch marks on the wall, it looks like OP almost lost the house. Commented May 14, 2020 at 6:40
  • 2
    Scorch marks = Soldered with a torch, I'd guess. Likewise the burned insulation.
    – Ecnerwal
    Commented May 14, 2020 at 12:32

2 Answers 2

8

The junction is not to code because it would need to be made in a box. The wire is wrapped for a mechanical connection but I was taught 7 turns for a tap with old knob and tube, and without even counting we can see the insulation is burned. this happens when there is a poor connection.

The best option would be to purchase two construction boxes boxes and blank covers and a couple of feet of the same gauge wire. And 6 wire nuts and last some electrical staples 5 will be needed (the wire looks like 14 gauge). If you cannot read the size get 12 gauge. Or take a chunk to the store to match the size--bigger is ok.

  1. With the power off, cut the cloth braid wire to the right of the splice in the photo route the cable into the box. You need 6” of wire and the covering needs to enter the box--1/4” beyond the clamp staple that cable to the wood you mounted the box on.
  2. Run your new piece of wire into the box same thing 6” minimum and the covering needs to extend 1/4” inside minimum staple that wire.
  3. Mount your second box to the left where the two original cables can enter with 6” just like the others. Staple each wire separately unless you got staples rated for two cables.
  4. Bring the new wire to the second box and staple within 8” (note on boxes that do not have screw clamps or clamps that lock the wire in place, 8” from the box is code; if the clamps hold the wire from moving the staple can be 12” from the box).
  5. Strip the wires and use wire nuts to combine the 2 whites, 2 blacks and the 2 grounds. Twist the wire nuts until the wire has 2 twists. Do the same for the 3 wires in the other box install the blank covers and you are done.

This really should be done right away. (Is that burned spot on the wood from the bad splice on the white wire?) You don’t want a fire and this would be the least expensive way to make a proper repair.

3
  • I definitely agree this should be done as soon as possible.+
    – JACK
    Commented May 14, 2020 at 12:07
  • Thanks for your comments and answers. I put it in a box as described by Ed. It was dark up there and didn’t even notice the scorch marks until I looked closely at the photos. I’m worried the previous owner wired the majority of the garage on their own (which is where the new wire is headed). Sadly there is a few instances of Romex running outside the walls there and I’m worried about what I can’t see.
    – KVL
    Commented May 14, 2020 at 16:06
  • Ecnerwal noticed the solder so that may be the cause for the scorch marks but I have seen similar from poor connections.
    – Ed Beal
    Commented May 14, 2020 at 16:22
2

Yes, this is very bad Bangkok-tier work, just hack-n-slash it in.

Here are the rules with boxes:

  • Every splice must happen inside a junction box.
  • The cable sheath must come into the junction box at least 1/4" past the cable clamp.
  • The individual wires must be 6" long past the point of entry (including sheath).

Now in a case like this, either fixing this mess or just properly tapping a thru-wire, you typically have 2 boxes about 18" apart. You strategically choose where to cut the wire so the necessary length will be inside the box when you are done. Then you add an additional stretch of cable (30"?) between the two boxes, again assuring it has the 6" length inside the box.

Do your splices first-rate, and you'll never have trouble. For novices, I recommend metal boxes; because if you accidentally do your splices not first-rate and they create heat, a plastic box will melt and drip molten box onto flammables. The steel box is a good heat conductor, and will effectively use the whole box as a heat radiator to reduce the chance of it reaching flammable levels. It's not a silver bullet, but it buys you time.

But yes. You generally expect Person X will do Person X style work throughout. Expect more of the same.

1
  • Code allows 6” from point of entry 300.14 length of free conductors , where it emerges from raceway or sheath. I find more shorts in metal boxes where diy and apprentices skin the wire on the metal and cause a short rarely see that with plastic.
    – Ed Beal
    Commented May 14, 2020 at 18:51

Your Answer

By clicking “Post Your Answer”, you agree to our terms of service and acknowledge you have read our privacy policy.

Not the answer you're looking for? Browse other questions tagged or ask your own question.