14

I am about to renovate my room. A part of this plan includes painting all but one wall and the ceiling white, the other wall will be bright green. My walls are lightly textured and if this makes any difference, the original surface under most of the walls is plaster and lathe (with the exception of the wall being painted green, which is drywall). The surface I will actually be painting over will be the previous coating of yellow semi-gloss paint that is about 20 years old.

So here's my question... How do I get crisp, clean edges in the corners where two colors meet (keeping mind that these are semi-gloss walls and are textured)?

6 Answers 6

35

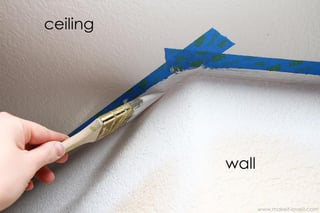
Use painters tape (blue tape, Frog tape, lots of different names and brands) to mask off the areas you don't want to paint green.

First, paint your ceiling and 3 walls white (2 or 3 coats, however many are needed) and wait for the paint to dry. Then, apply the painters tape to those walls and ceiling as close to the 4th wall as possible. Next, and this is the most important part, go back with the white paint and "seal" the edge of the tape with a light thin coat. Failure to do this will lead to green paint bleeding under the tape, and you'll wind up with sloppy lines at the corners. Textured walls are a pain...

Once the white paint is dry, go ahead and paint with the green, using however many coats you need. Peel off the tape carefully and enjoy!

Most painters tape says to peel off within 14 days, so you could tackle this project over two weekends if needed. Also, if you seal the tape with too thick of a coat, some of that paint could come up when you peel the tape off, so don't glob it on.

6
  • Thank you very much. Having used painters tape for years, I've been pushing it hard to seal the tape, when the solution (painting it) is so much easier! I'd like to add that I lightly score my paint at the tape edge, to prevent the tape from pulling up some of the less sticky paints.
    – Edwin Buck
    Commented Apr 30, 2018 at 21:24
  • In the UK the usual name for this tape is "masking tape", usually a beige colour. Just be sure not to leave it too long before peeling it off as the glue can go hard and stay on the wall.
    – uɐɪ
    Commented May 1, 2018 at 7:09
  • 17
    Conventional beige masking tape is commonly available in the U.S. as well. Painters tape is for house painting and has a gentler adhesive that's less likely to pull old paint and texture when removed.
    – isherwood
    Commented May 1, 2018 at 13:04
  • Yes, there is masking tape in the US, but as indicated, painter's tape is gentler. "Frog Tape" is a specific brand/variety of painter's tape that uses a different kind of "gentle" adhesive; I believe it's thicker and kinda gummy, and is intended to seal against the wall on its own, so you don't need to seal with paint. The scoring along the edge before removing the tape is an excellent idea too!
    – Doktor J
    Commented May 2, 2018 at 15:48
  • @DoktorJ I've found that, on a textured wall at least, even with Frog Tape you still need to seal the edge with paint. The tape just doesn't conform well to the texture.
    – mmathis
    Commented May 2, 2018 at 16:13
18

In my experience, tape just doesn't do that well. Even if you get a clean line, you're at the mercy of the tape's shape, and it's following the texture. It often ends up looking artificially sharp and jaggy.

Instead, use what I call the twitch technique, which is a variation of the standard cut-in. Load your brush on one side, just an inch deep or so. Press the loaded side to the wall and flex the bristles to create a tapered edge in the brush. Now work your way down the corner, twitching the brush with tiny movements. By doing so you can control the position of the brush edge and work toward the corner with precision.

The first third of this video clip shows how to load the brush with paint and hold it to create the edge. Introduce a slight twitch to see the magic in action.

The result will be a much more natural line which works with the texture, not in spite of it. With a little practice you'll be able to work along wall and ceiling corners without messing around with tape. It's liberating!

4
  • 2
    Learn how to cut against anything, +1. The key is staying relaxed, and not going too fast or too slow. Don't be on-tilt. You can always cut either color again.
    – Mazura
    Commented May 2, 2018 at 0:29
  • Well, assuming you still have the other paint color. So not always. :)
    – isherwood
    Commented May 2, 2018 at 12:29
  • 1
    In older homes, often the corner where the ceiling meets the wall is often irregular so this is a good technique to learn. I typically alternate between ceiling and walls with smaller and smaller brushes. In some spots, it's not really clear where the wall ends and the ceiling begins so it's really just about making it look right.
    – JimmyJames
    Commented May 2, 2018 at 13:42
  • I totally agree with the tape just not working very well. More often than not, we peel off either the top paint or the bottom paint. Taking a small brush and doing the edges yourself, so long as you have a steady hand and take a moment to relax and focus, don't rush. That works so much better. Commented Aug 7, 2018 at 15:22
3

If you decide to use tape rather than learning how to cut in with a brush, make sure you use the blue type masking tape and also run a flexible painters scraper along the inside edge to really seal the inside edge down. If you don't, you're guaranteed to get some 'bleed' underneath the edge of the tape.

3

I beg to differ and offer an alternative to other answers offering the best way to achieve a nice crisp edge. From my experience, the best way to achieve a good looking corner interface between different wall colors is that

You don't.

Especially if the surface of one of the walls which meet in said corner is textured. A good looking straight and nice line where two colors meet is notoriously difficult to achieve even for professional decorators. What you do instead is that you

offset the color interface a bit from the edge.

Two to ten centimeters or one to four inches, depending on your liking and the interrior design and situation.

Not only does it save you from the headache of getting the edge right, it also gives you more creative options and possibilities to liven up your room.

1
  • 1
    I see that method used extensively on textured ceilings (here in Norway). Bringing the white ceiling colour down onto the walls by 12mm or 1/2" or so. This emulates a cornice and looks fine.
    – handyman
    Commented May 22, 2018 at 22:05
1

When I painted a house we used paper tape:

Cover the edge of one wall with tape, so you can quietly brush the other wall, without worrying to get out of the lines. I used this trick between the wall and the ceiling, but it will work between any two surfaces.

Note (thanks Carl): First paint over the edge of the paper tape using the same color you're going to use on the wall without the tape, and then paint your final color once this has dried.

enter image description here
image source


For example, this kind of paper tape:

enter image description here

0
1

I've used the Shur Line brand edger tool with great fast results. The only trick is to be very careful dipping the tool in paint, if you get paint on the plastic parts of the tool and not just the pad it will start to get on the other surface.

Your Answer

By clicking “Post Your Answer”, you agree to our terms of service and acknowledge you have read our privacy policy.

Not the answer you're looking for? Browse other questions tagged or ask your own question.