6

I would like to create a groove 3/4" wide and 1" deep in a piece of red oak 2x2, approximately 5" long (it is being sized to slip over a 1x2). I have a 1/2" router bit, and have successfully created a 1/2" wide, 1" deep groove in the piece; when I attempted to widen the groove with a second pass, the piece shot off of the router table.

What is the best way to enlarge the groove to the desired width?

I have tagged this question with "circular-saw" because it is the other possibly-relevant tool I have available.

8
  • Can you post a picture of your setup? Does your router table have a fence? Commented Nov 2, 2016 at 16:47
  • @DarthCaniac I was not using a fence (this was a learning experience). It is a standard Craftsman router table; I do not know if this is the exact model, but basically this: bit.ly/2fbBls2
    – kyle
    Commented Nov 2, 2016 at 16:50
  • 2
    I would recommend using the fence for this cut. Set your fence so that you do a perfectly centered cut, then offset 1/8 in and cut each side, and you will be all set! :) Commented Nov 2, 2016 at 16:54
  • I can post a more detailed diagram below if you want Commented Nov 2, 2016 at 16:54
  • @DarthCaniac ha :) --- that's what I tried, sans fence; will the fence fix the "shooting" problem? My fingers will thank you.
    – kyle
    Commented Nov 2, 2016 at 16:55

4 Answers 4

7

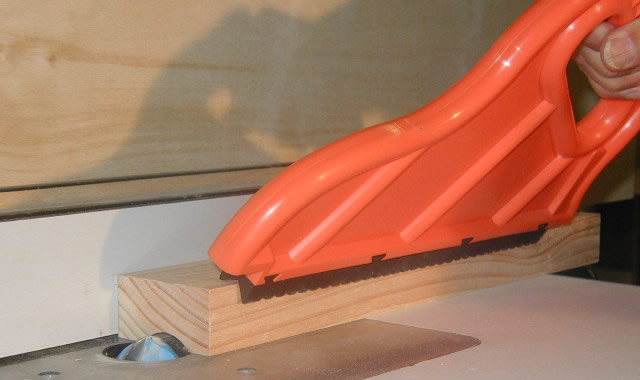
I highly recommend using a pusher and gloves for this project. There are lots of "brands" you can choose from, or you can use another board to do it. You only have one set of fingers though, and keeping them safe is more important than any project.

Pusher Stick

If you will note in the above picture, the board is being pushed forward and into the fence. This is an excellent way to get an even cut and retain control of the board. If you don't have a fence, you can clamp another board to the table and that will work almost as well

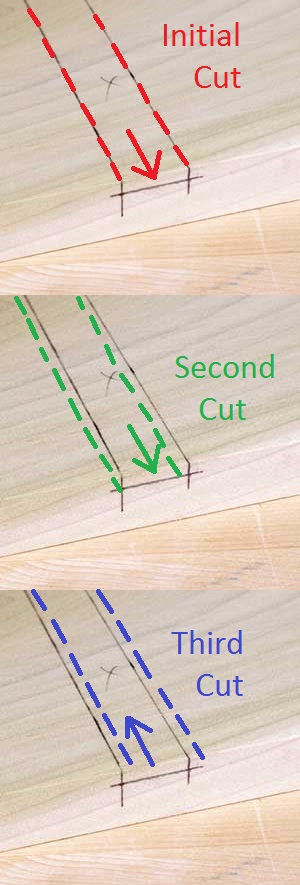
Once you have lined up and completed your first cut, move your fence back from the cutter 1/8th of an inch, and cut again. Then rotate your board 180° and cut again.

Cutting Diagram

Hope this helps!

2
  • 3
    Maybe add feather boards to the setup as they will help keep the cut straight and between the fence and feather board. Then your pushing force can be more down & forward instead which may be easier for him.
    – Dano0430
    Commented Nov 2, 2016 at 17:46
  • Featherboards are a huge boon to this kind of work. In the right application they can even add a bit of friction to prevent the work from shooting out backwards. If I'm ever forced to work in wood with lots of knots, crotches, etc. I always make sure to use featherboards. Commented Nov 3, 2016 at 19:00
6

You are quite lucky that you were not injured. Perhaps you should take a step back and plan it out a little better. Proper shop safety should always be followed, even on small jobs.

For starters, the piece of stock you were trying to machine is far too short to be cut with a router safely. The minimum length that can be cut with a router is around 12". For these cuts, you should also be using a fence with a featherboard attached to it to prevent kickback. A push stick should also always be used. A rule of thumb is to keep at least a foot of distance between your hands and the bit at all times when the router is in operation.

Try starting with a longer piece, and then make all of the necessary cuts before trimming it down to length. You can keep the leftover piece, and use it on another project in the future.

3

While a push stick is a great first step, one or more featherboards with a push stick really is the best solution here. When they are well secured, they will prevent nearly all kickback, either on a router table or table saw. When kickback occurs with just a push stick you are still relying on your body to resist the kickback, with featherboards kickback is resisted mechanically.

As an added benefit, featherboards apply constant pressure at the bit and will give you more accurate cuts.

They are basically free to make yourself with scraps, or you can buy ones that clamp to your miter gauge slots.
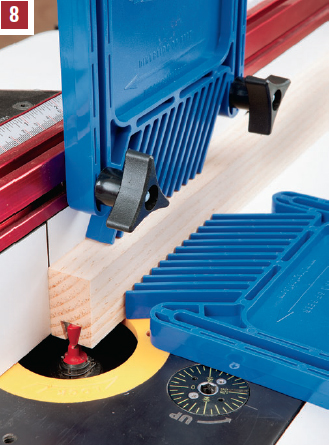
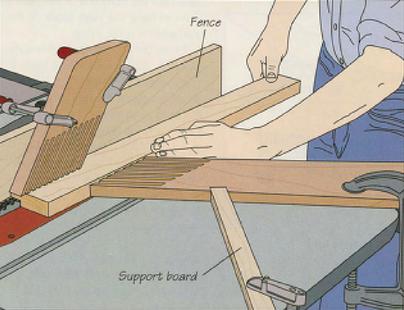
Featherboards

enter image description here

Also, pay very close attention to which direction you are feeding the wood, or moving the router. If the wood is being fed in the direction shown below it is called climb cutting and can be very dangerous. In a climb cut, the bit is cutting on entry and has the effect of pushing the router away from the workpiece. If not resisted by the operator, the bit can exit fully from the cut and "climb" its way along the workpiece. For a router running at 10,000 rpm, this can mean a sudden loss of control and high risk of injury.

enter image description here

1

Here is how you can use a circular saw to cut your 3/4" groove very accurately and easily. You can certainly do it using a router table but it will take a bit more time to set up properly and I'd say the circular saw is arguably safer. Using a router, you would also need to be sure you take multiple passes, increasing the depth of cut each pass. This method can be done at the exact depth in one shot: https://www.youtube.com/watch?v=KNX9Y2cyRhk

In your case, since you've got a narrower piece than the base of your saw, you should sandwich it flat between two other pieces of same-height material so the saw has a wide base to move across.

An ideal way to cut your groove would be using a stack of dado blades and a table saw but you didn't mention if you had that available.

Your Answer

By clicking “Post Your Answer”, you agree to our terms of service and acknowledge you have read our privacy policy.

Not the answer you're looking for? Browse other questions tagged or ask your own question.