1

I noticed my old fridge was unable to stay cold. At first I assumed that constant opening had caused it to freeze up so I unplugged it and let it defrost completely as there was a layer of ice on the coils in the freezer. After plugging it back in ice is slowly forming on the inbound end of the evaporator coil. The evaporator fan works fine. I tested both the thermostat and the heater...

First testing of thermostat after removal showed it was open - no voltage across it. I placed it in a working freezer and after 10 minutes it had continuity, so it appears to be working. I tested the resistance of the heater element and it showed 30 Ohms.

I reattached the thermostat and plugged the fridge in. The voltage across the terminals to the heater was 100v AC (Which I found odd, as I expected 120?). So the thermostat was closed and sending voltage to the heater. The voltage directly to the thermostat was 40v AC.

Even though at least 100v AC is getting to the heating element, I still feel no heat coming from it.

I don't think this fridge has a defrost timer. I believe it is all controlled by electronics in the fridge side. Is it possible that the control board is the issue? Is there any way I can further test it?

Any other possible tests?

Edit: Over night last night I had it shut down for 5 minutes every hour via an outlet timer. After ~8 hours the freezer (empty, set at the manufacturer recommended 50% cold) was still only 39° F (measured via a wifi thermometer) and there was still ice on the first few inches of the input line after a 55m run, fridge was 62°F. The fridge side has drinks in it, but is set as warm as possible. If all were fine I would expect an empty freezer to cool down much faster than that right (even with the fridge being full)? Seems either... a) 5 minutes isn't long enough to actually defrost and the line is remaining frozen. b) 5m/hr is too often and the unit just can't keep up or c) there is still some unresolved issue.

Is it possible this is a refrigerant issue? Is there a more accurate test for that?

Edit: Looking at this answer: https://diy.stackexchange.com/a/141659/77713 I am inclined to think this is related to the compressor system / refrigerant. My coils look exactly like those shown in the last pic - iced at the input but no frost whatsoever below. So how do I diagnose this further? Or if that system is something I can't repair myself then is it even worth continuing to diagnose?

Edit: Based on other reading I'm just going to roll up my sleeves and install a valve on the compressor suction line and test the pressure there. A bullet piercing valve is easy to install and given that this fridge is probably 25 years old I'm not worried about voiding any sort of warranty. Although I haven't completely confirmed that the defrost heater works, I feel certain that the evaporator coils are not cooling properly (regardless of whether the heater works). So I'll need to address that issue first. Will update again soon.

12
  • The low voltage is probably because of a bad contact in the timer. You could cheat by getting a timer and have it shut down for about an hour in the middle of the night. Keep an eye on it and if it still ices increase the time, if no you got it about right. While you are at it take a turkey baster fill it with hot water and flush the drain.
    – Gil
    Commented Aug 10, 2022 at 2:29
  • Plug the fridge into a "power strip" and check the voltage between the hot and neutral on the power strip. It might be a delivery/supply problem. If so, check outlets all over your house. If you find some under 120V and others over 120V by about that amount, then you have a totally diferent problem, but fixing it is free. Commented Aug 10, 2022 at 4:01
  • @Gil Over night last night I had it shut down for 5 minutes every hour. After ~8 hours the freezer was still only 39° F (measured via a wifi thermometer) and there was still ice on the first few inches of the input line. If all were fine I would expect an empty freezer to cool down much faster than that right?. So either... a) 5 minutes isn't long enough to actually defrost anything. b) 5m/hr is too often and the unit just can't keep up or c) there is still some unresolved issue. Should I change the setup to shut off 10m / hr? Or is that rapid ice build up a sign of low refrigerant? Commented Aug 10, 2022 at 10:56
  • @Harper-ReinstateMonica Doesn't appear to be a supply problem as everything else in the house functions fine, and another fridge on that same outlet functions fine, but I'll keep that in mind if other fixes continue to fail. Commented Aug 10, 2022 at 11:01
  • @Gil Forgot to mention that freezer is empty, and fridge side is set as warm as possible. Commented Aug 10, 2022 at 11:08

1 Answer 1

1

Credit to this answer for helping solve this: https://diy.stackexchange.com/a/141659/77713

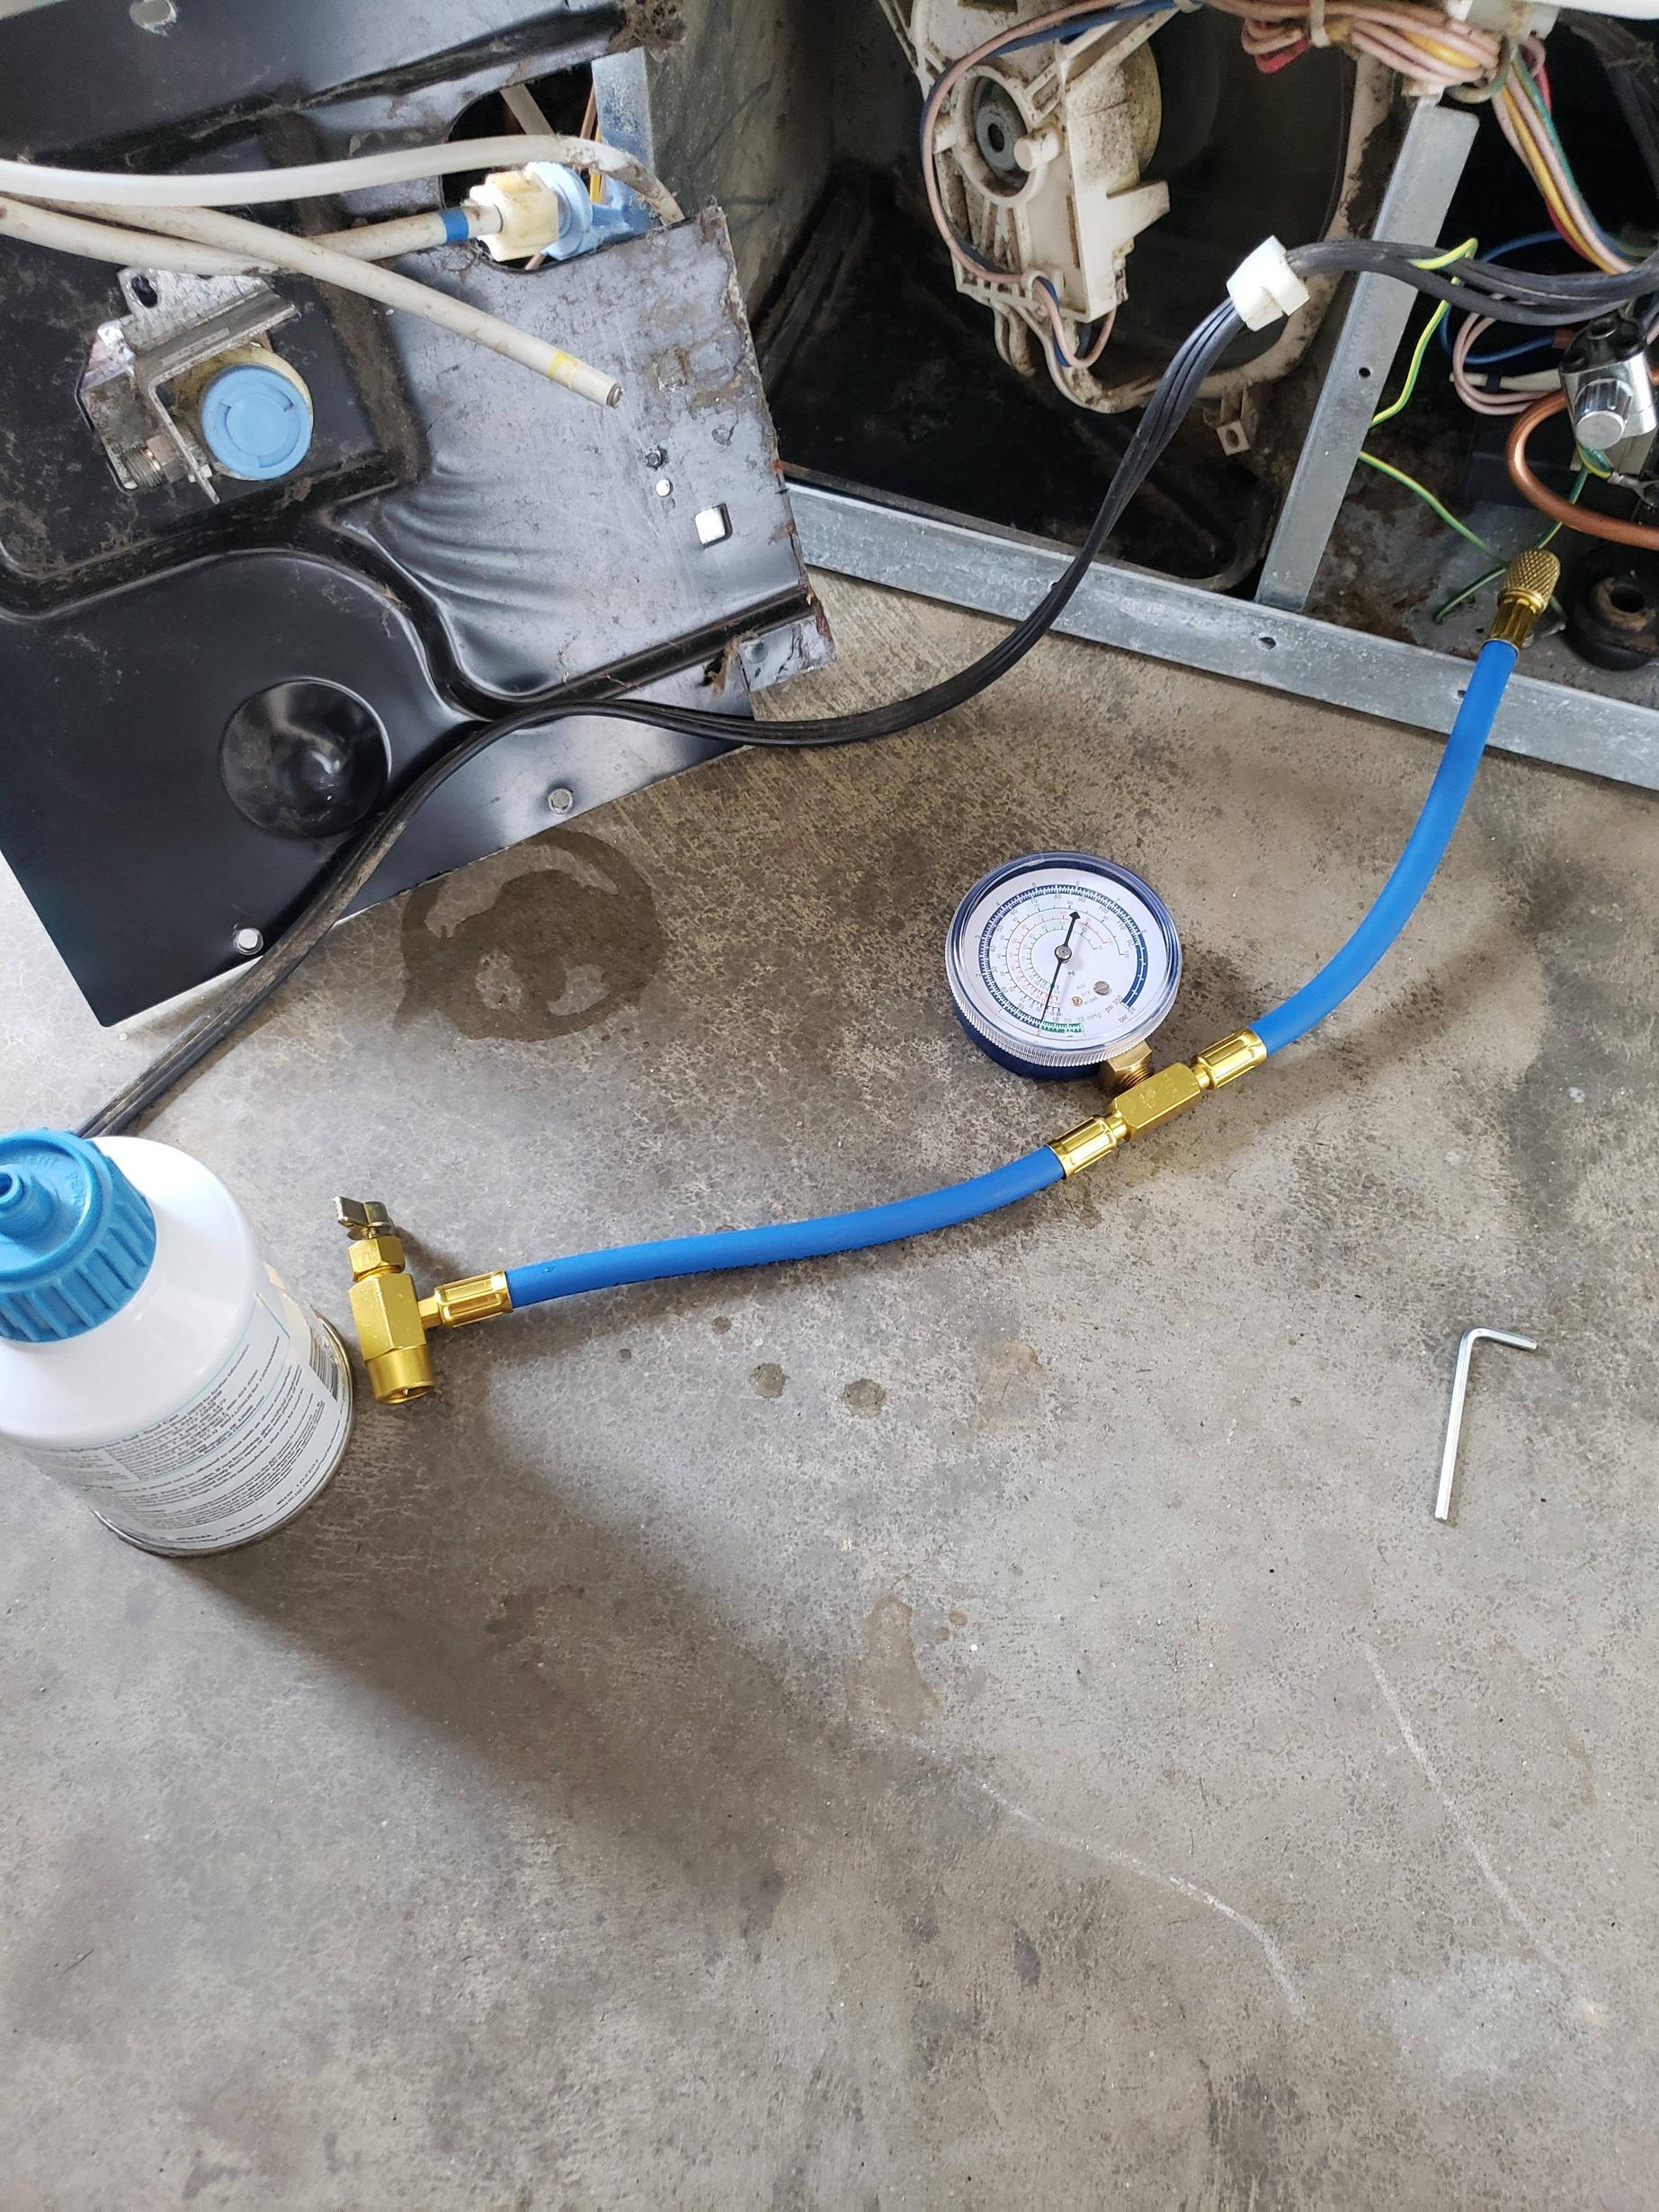
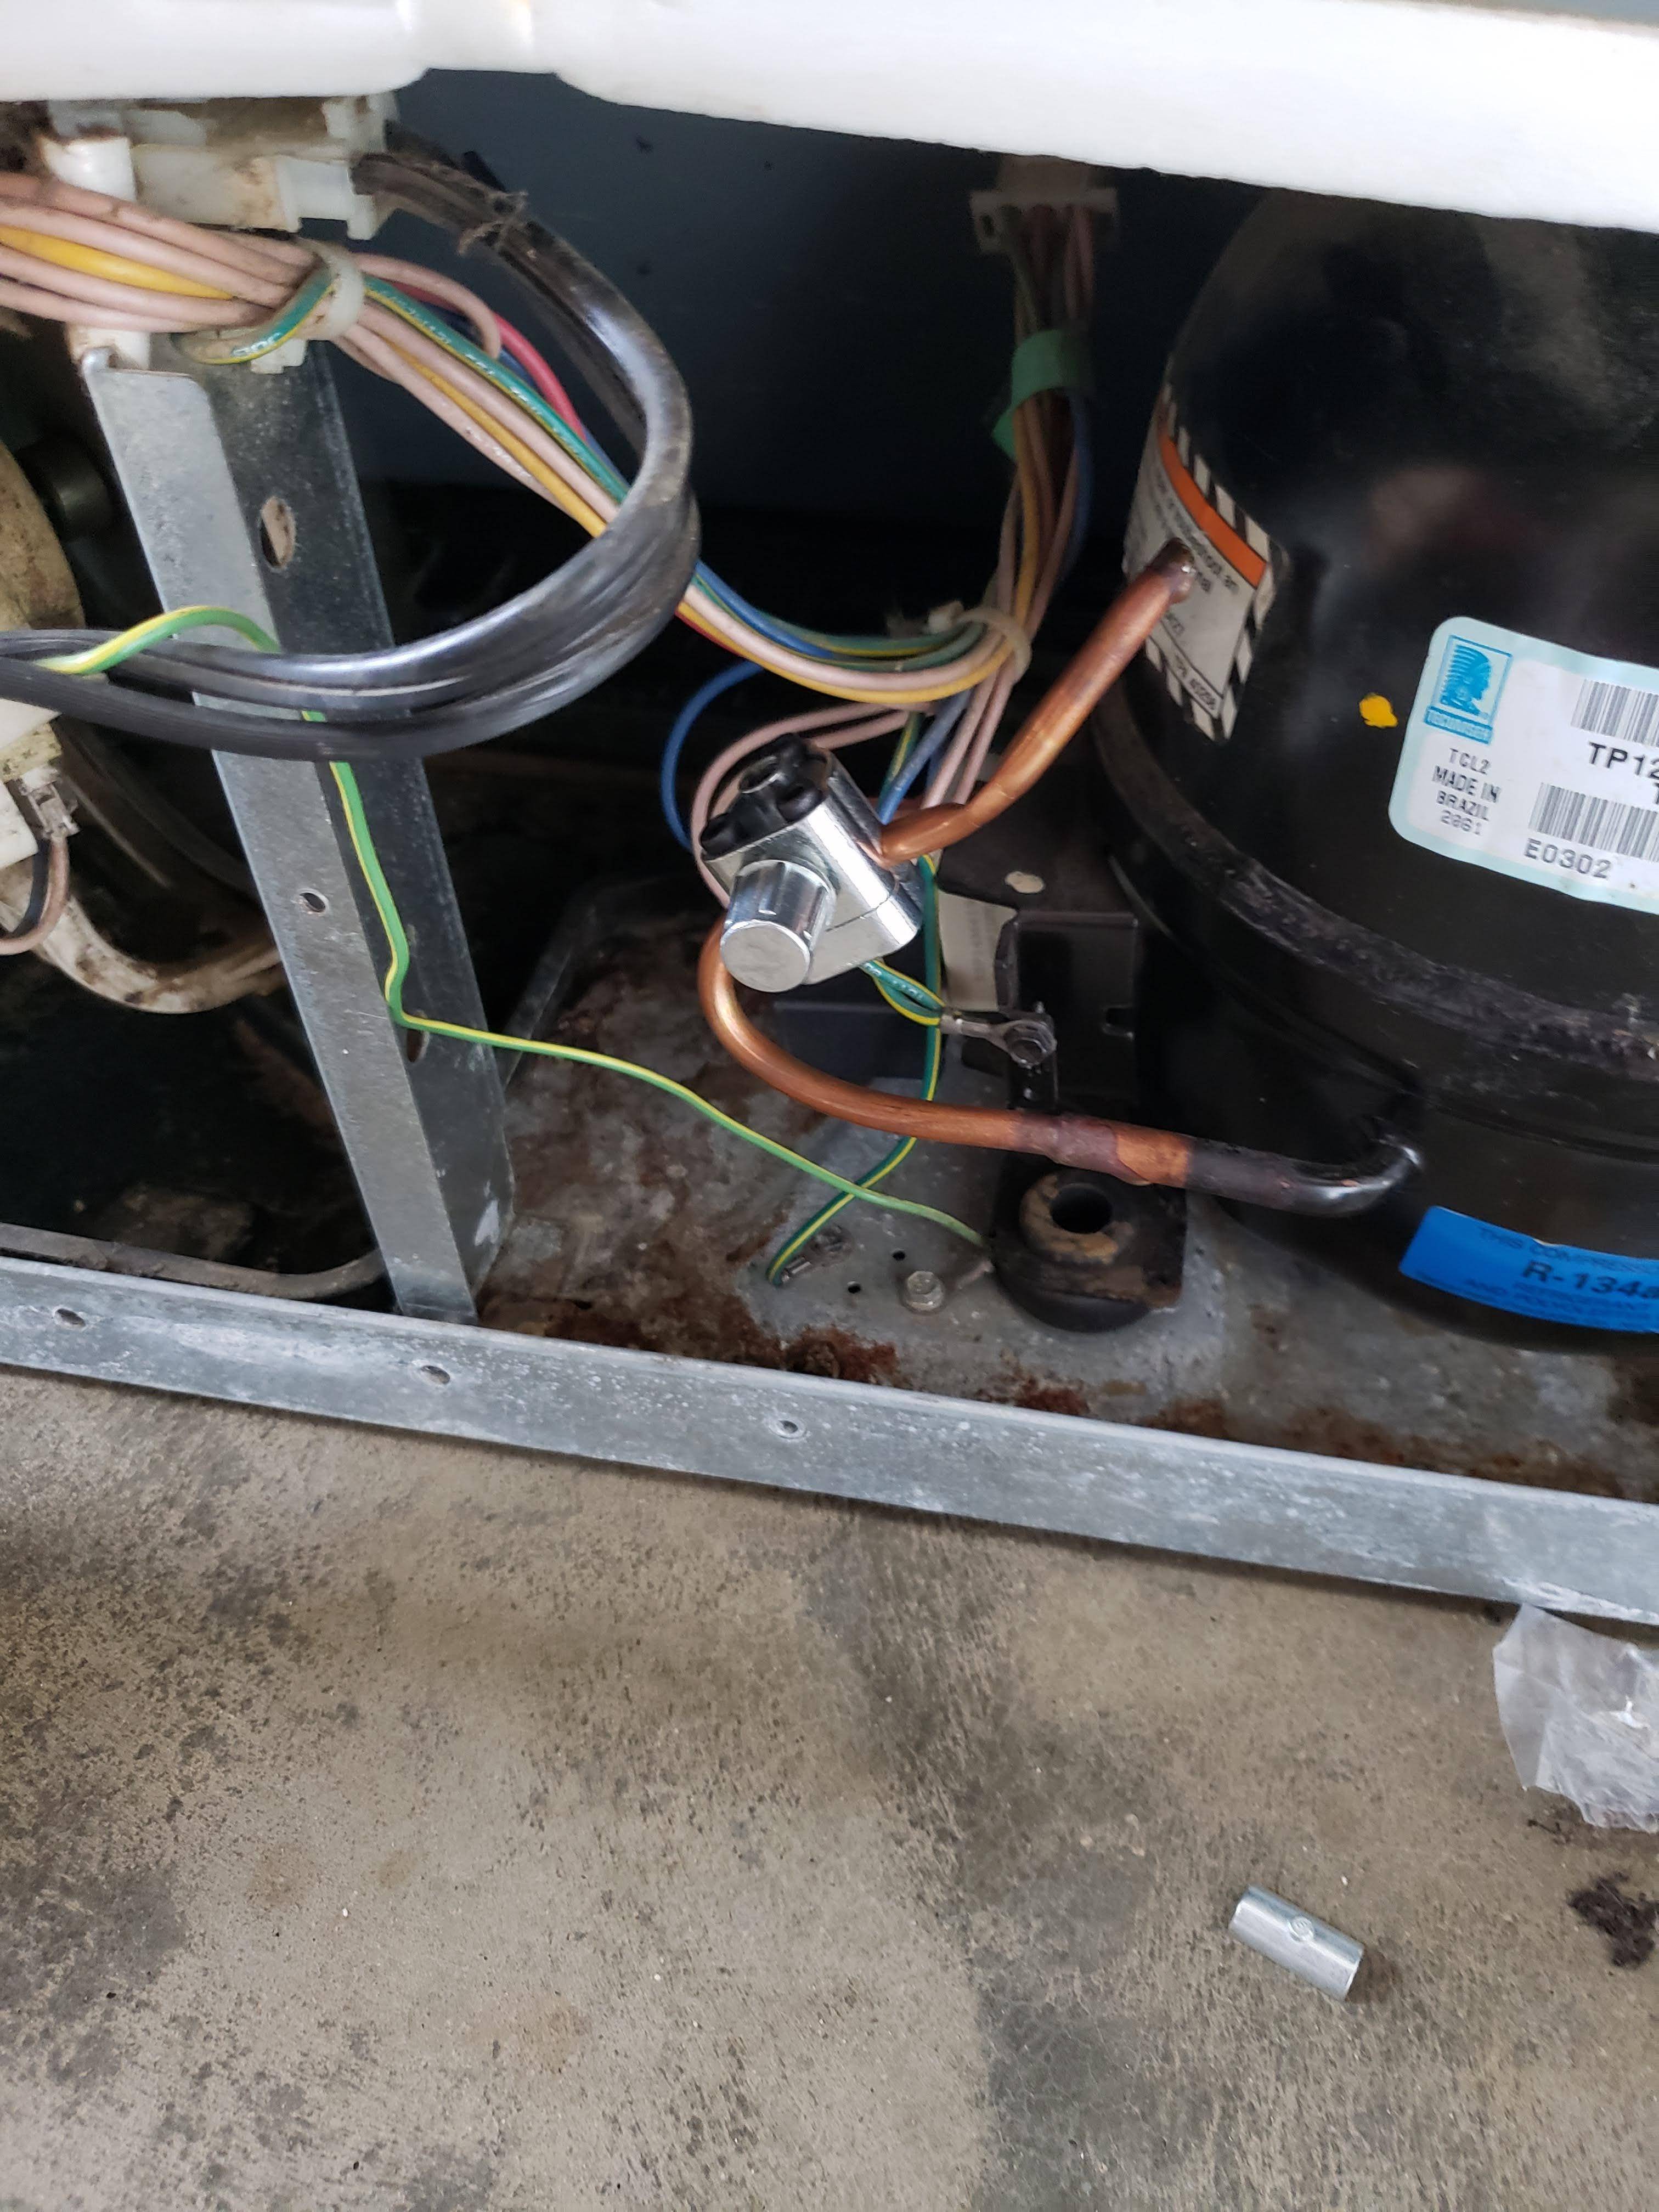
So ultimately the problem was refrigerant, specifically, the compressor did not have enough of it. Because this is a closed system, that implies there is a leak somewhere, but finding and repairing the leak is a different issue (that I may or may not take up). However the short/mid term fix is to fill the compressor. This fridge uses r134a refrigerant, a common type, which can be obtained from most auto parts stores. After watching multiple DIY videos on how to fill a closed system compressor I was able to do it and get the fridge back working. I would strongly recommend watching a video or two on how to fill a fridge compressor (there are many) just so you know what all you're looking at, but it's not as hard as it sounds. A couple pictures of my setup are at the bottom.

The price of the entire fix was ~40$. I bought the "cheap" r134a because the expensive stuff just has additives to fill rubber hose leaks, and this system is all metal.

First get the tools and supplies. For me this was:

  1. 10oz Can of r134a refrigerant
  2. Bullet piercing valve for 1/4 in pipe
  3. Pressure gauge / fill hose combo
  4. Plastic adapter that allows the fill hose to attach to the can (I guess the new style cans have some sort of seal that the valves don't work with? Not sure, but either way I needed the adapter.

Steps to fill the system...

  1. Attach BPV Attach the bullet piercing valve to the fill stem (or if it doesnt have one, then on low pressure suction line) of the compressor. These valves come with instructions and you'll need to pick the right size for your compressor line. Essentially it pierces a hole into the copper pipe while also creating a (supposedly) air tight seal around it so that you can safely fill the closed system.
  2. Attach hose. With newly installed BP valve closed, attach the hose end to the valve (only one end of the hose should fit). Then screw on the plastic adapter to the refrigerant can. Lastly, close the valve on the other end of the hose and screw it onto the can. You now have a connection from the can to the compressor system.
  3. Pressurize System Turn on the appliance and wait for the compressor to turn on (May take a couple mins). Now open the BP valve on the compressor. This will allow whatever pressure is in the system to fill the hose. In a very empty system you will actually see negative pressure, as the compressor is experiencing a vacuum due to lack of refrigerant. Most of these compressors operate ~2psi so that's the target. Look at your gauge, and make sure you know where 2 PSI is. It's probably very close to the 0 mark as most gauges will read 50-100 PSI. Now, in short bursts you need to open the valve that's attached to the can of refrigerant. When you open that valve you'll see the gauge jump to ~50 psi or more, that's fine. You'll hear it enter the system and the can will start to get cold. Leave it open for 3-10 seconds and then close the valve on the can and let the system pressure come back down and stabilize. You will then need to repeat this process until the stable pressure is ~2psi.
  4. Close valves and detach hose. Once your stable pressure is 2psi you need to close both valves, and detach the hose from the can and the compressor.

If your problem was the same as mine then you should notice a change almost immediately. The evaporator coils should not freeze at the top, but instead should show a normal thin frost pattern across the entire length.

The refrigerant is cheap and safe, so If I had to add some once a year it would not be a big deal. But an added benefit of installing the BP valve is that it could potentially be used to inject UV dye into the system to actually find and repair the leak. The easiest way to really know how bad the leak is is to fill the system and see how long it works. Mine's been running fine for a week now. I have a thermometer in there to monitor the temp and also have an energy monitoring plug that in theory should show increased consumption over time if the compressor has to work harder.

Compressor with BP valve attached

Compressor with BP valve attached

Hose, gauge, refrigerant, and adapter

Hose, gauge, refrigerant, and adapter

Your Answer

By clicking “Post Your Answer”, you agree to our terms of service and acknowledge you have read our privacy policy.

Not the answer you're looking for? Browse other questions tagged or ask your own question.