6

We are installing a wall mounted cooktop hood over a gas cooktop as part of our renos.

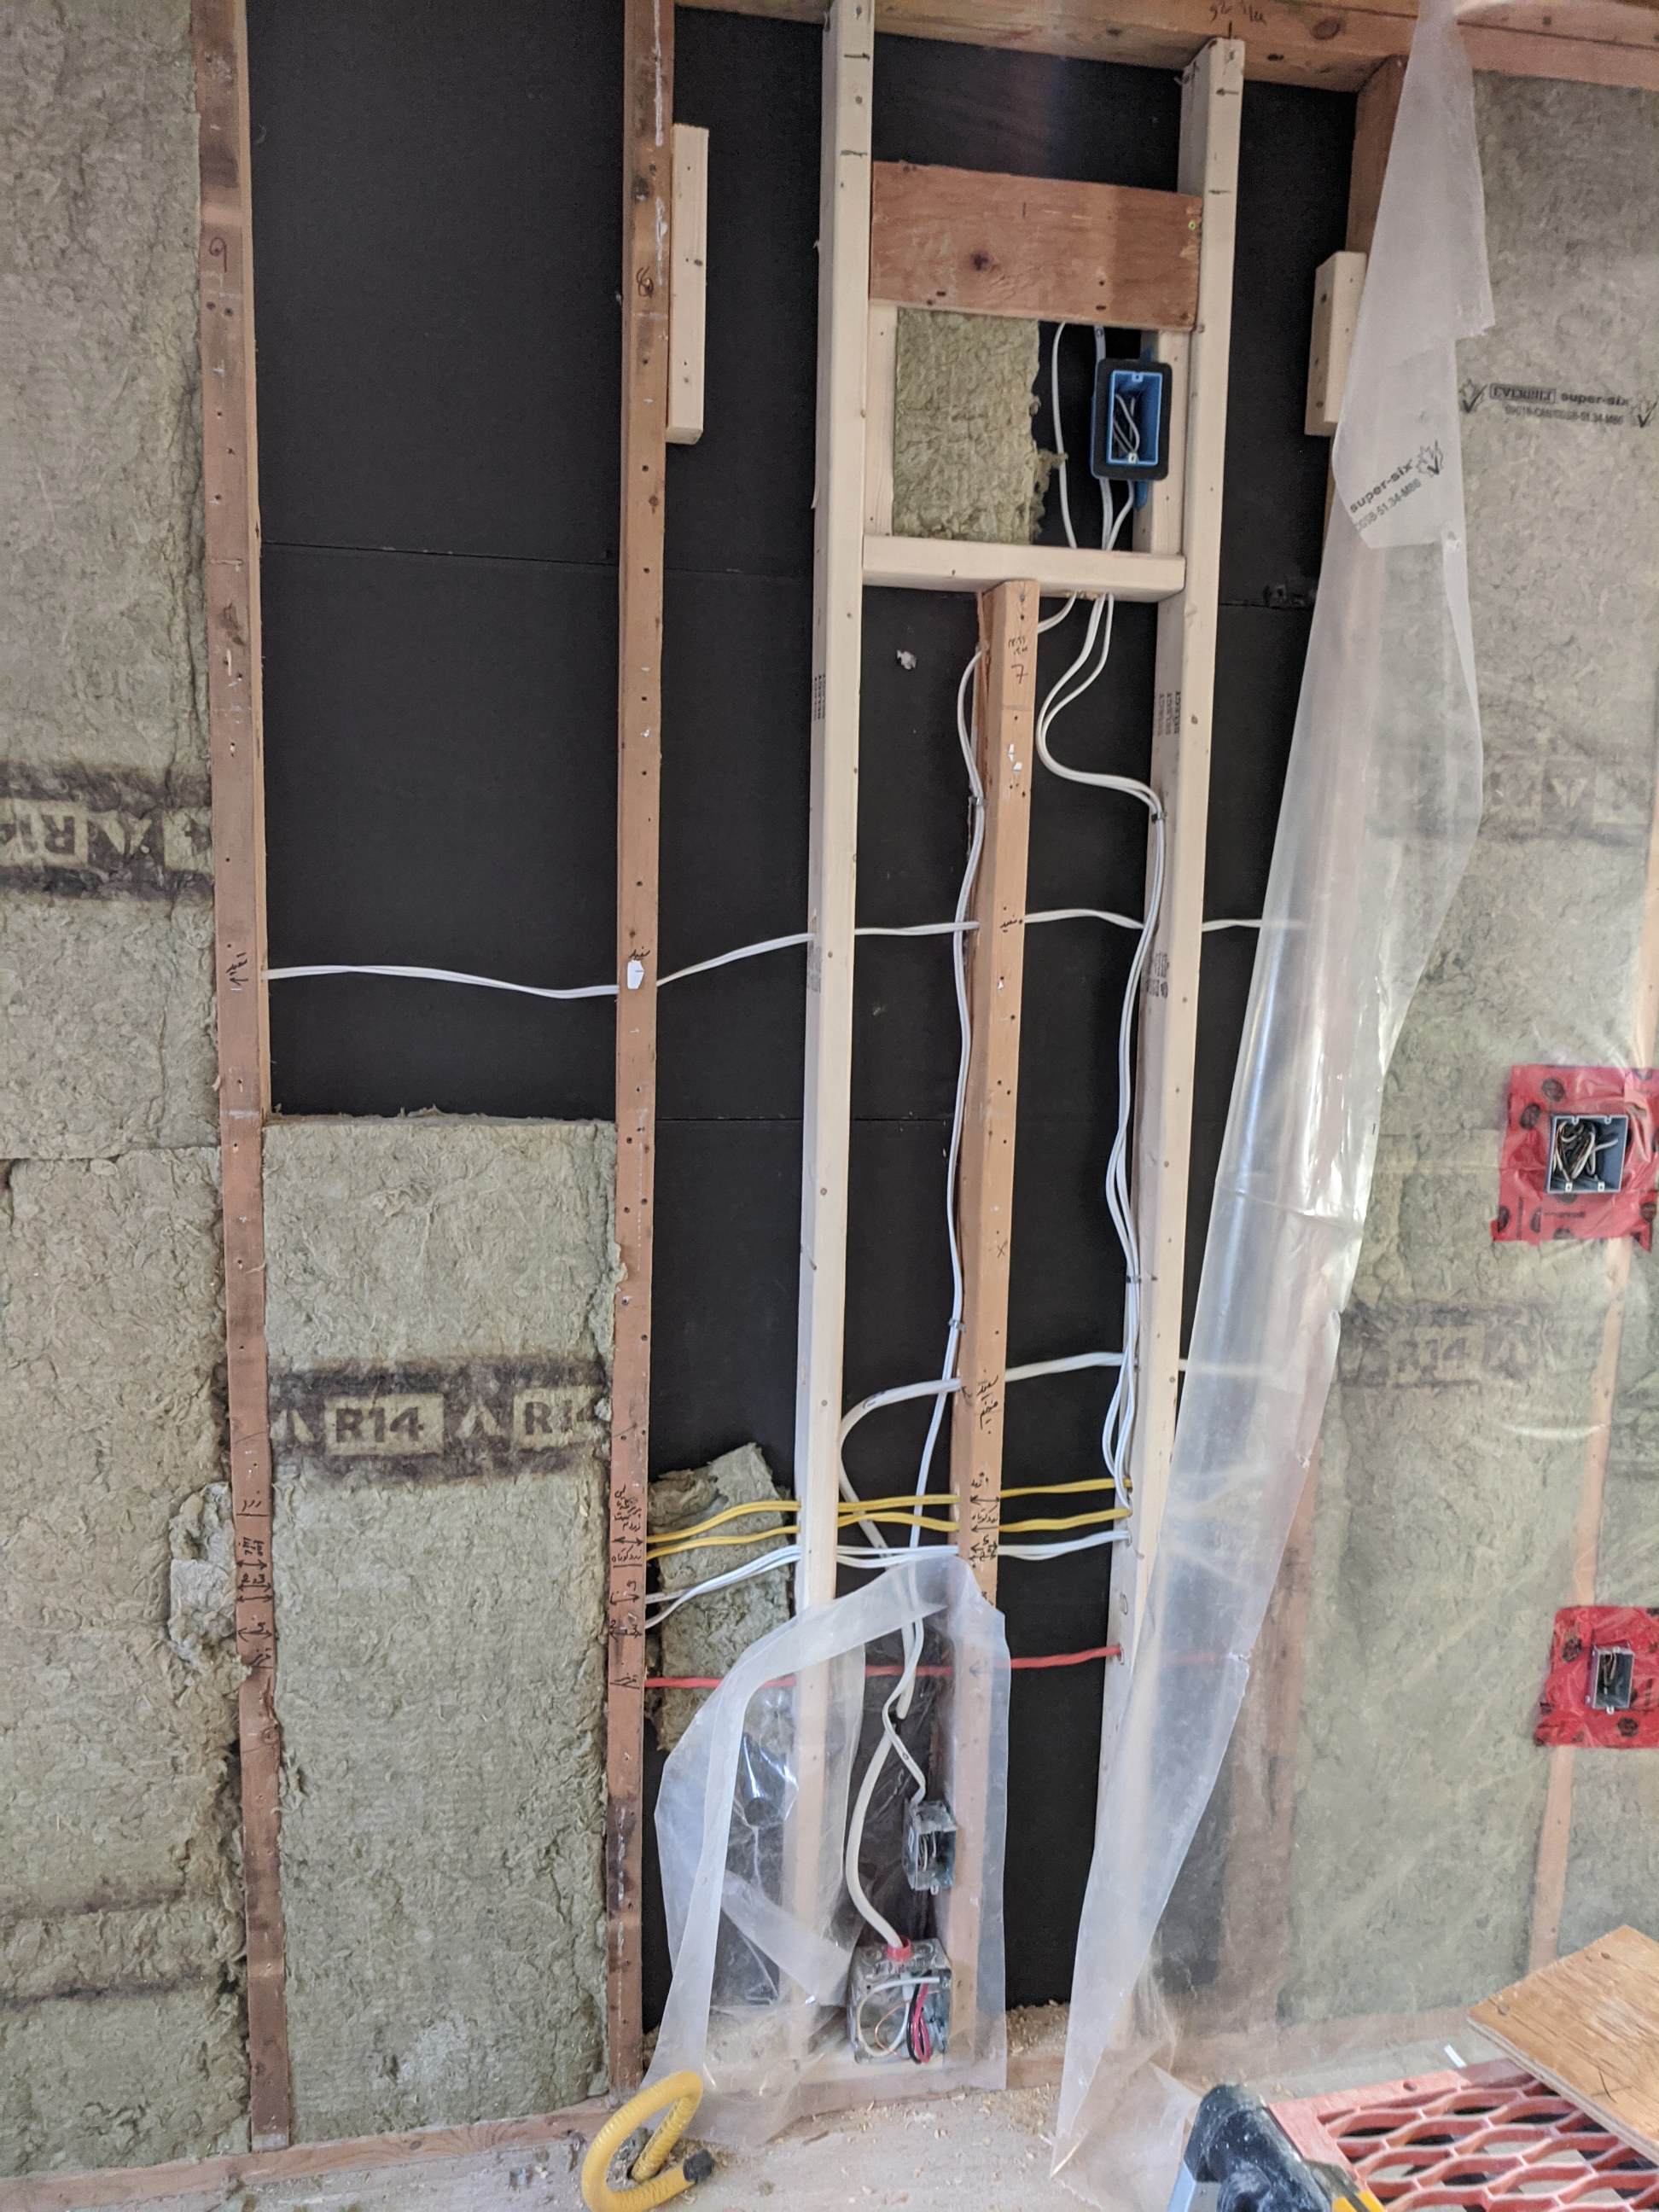
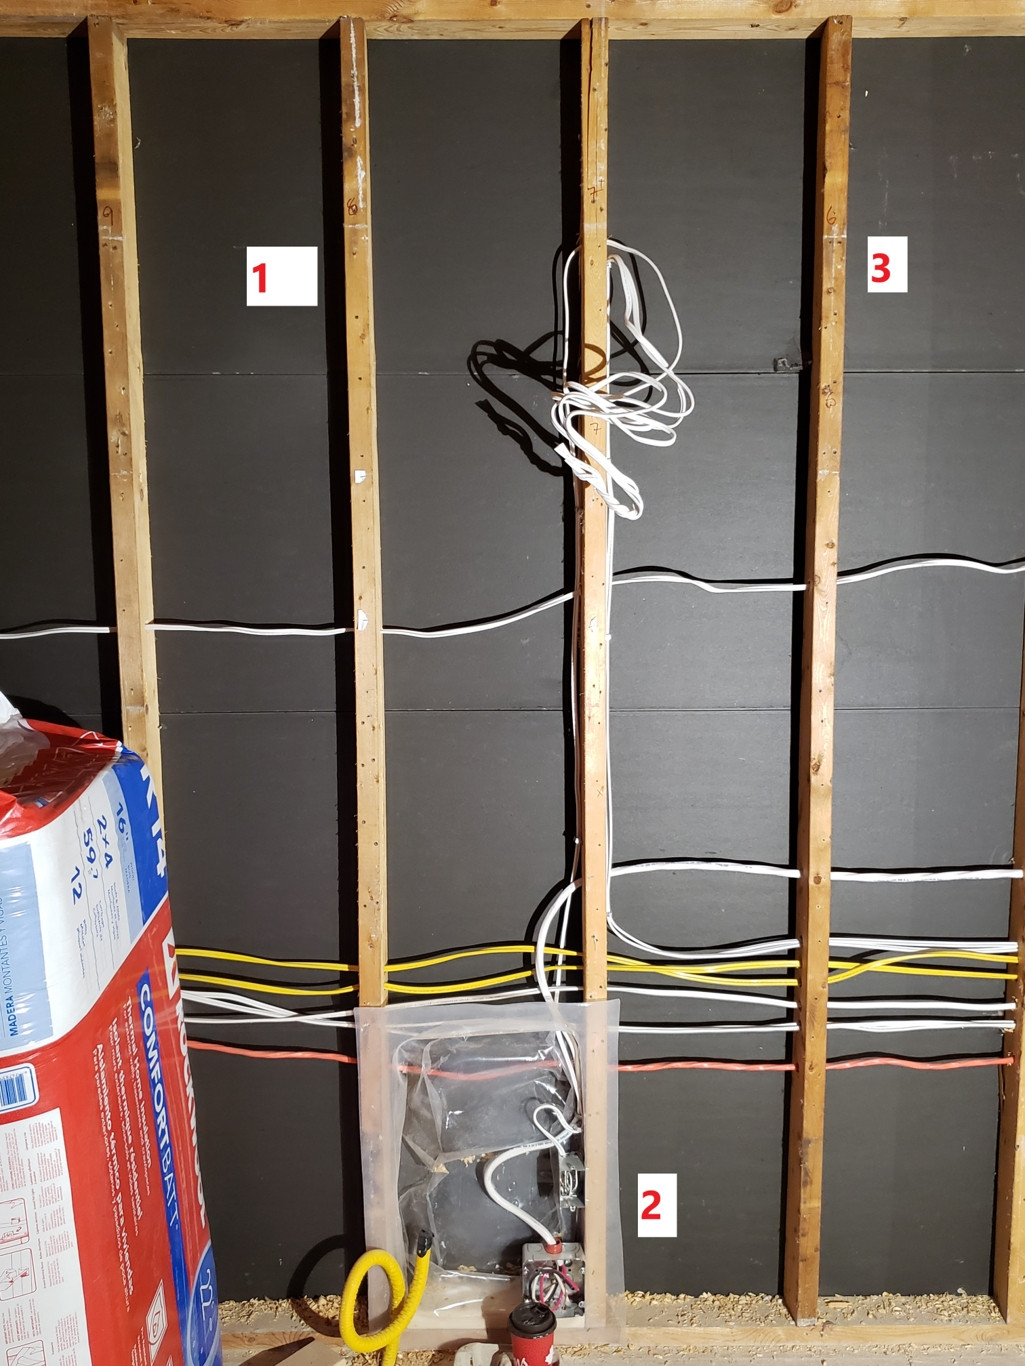
We have centered the cooktop along the kitchen wall but unfortunately that places the center line right in front of a stud (labeled #2 in the pictures) that is holding up an exterior wall. Shifting the cooktop position by 4-5 inches is problematic as it throws the cabinet configurations out of whack. We checked with the manufacturer of the hood and they advised that the vent should be 6" and of rigid material by code for gas cooktops. There is wiring running through the lower portion of these studs which also limits what we can do.

Please refer to the first picture below which shows the stud locations and the wiring.

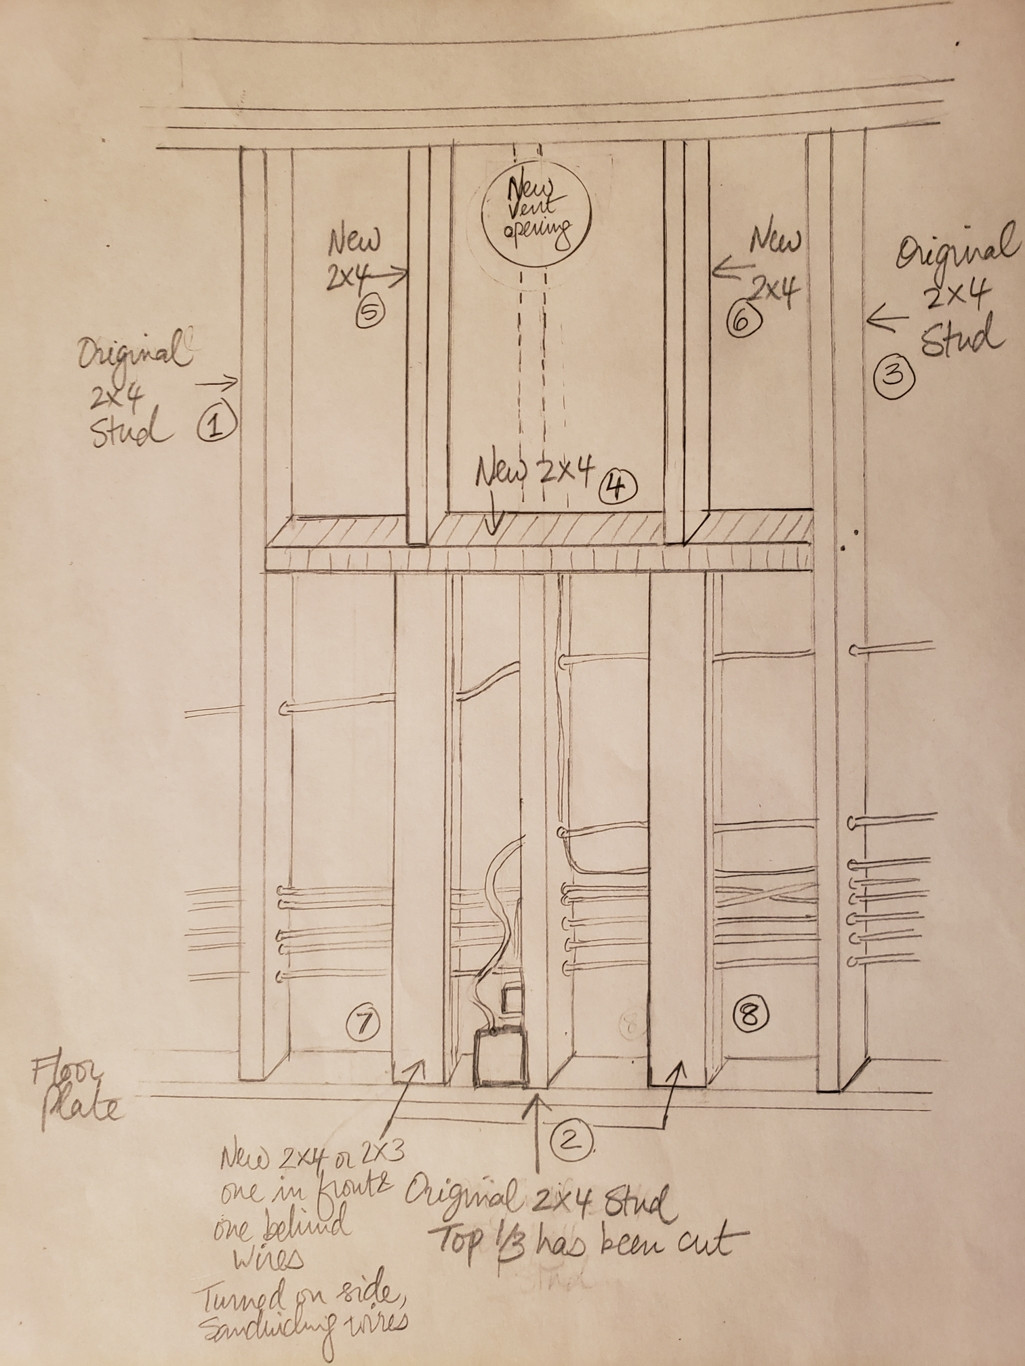
We are considering an option where we cut the top part of the middle stud to allow us to create the vent opening for the hood. We then want to add framing members to provide support. This option is sketched in the second picture and shows the following:

  • cut top portion of the middle stud #2 above the wiring
  • insert 2x4s of same length as remainder of stud #2 but turned on their side behind and in front of wires on either side of stud #2. These are #7 and #8. NOTE: there will be a bit of space between the front and back studs so the studs should not press against the wiring. We can also create a small notch in the stud around the wiring if the space in between the studs is limited
  • install a new 2x4 stud #4 horizontally to sit on top of the turned studs #7, 8 and stud #2 and nailed to stud #1 and stud #3
  • install new 2x4 studs #5, 6 that sit on stud #4 and support the top plate where the top part of stud #2 was cut
  • ideally studs #5, 6 are positioned such that the hood can hang directly off these two studs.

We would like feedback from the forum experts. We are located in Toronto, Canada. Is this an adequate way of providing support once the top portion of the middle stud is cut? If not is there an alternate approach you can suggest?
enter image description here enter image description here

4
  • 1
    Could you just go though the finished ceiling and into an attic or between floors and then vent it where you want? Commented Nov 11, 2019 at 13:56
  • Is the goal to have the vent go horizontal and directly out the exterior wall behind the hood?
    – Michael Karas
    Commented Nov 11, 2019 at 15:06
  • 3
    This needs way more upvotes for that clear picture and awesome drawing. Well done.
    – JPhi1618
    Commented Nov 11, 2019 at 16:49
  • Yes the plan was to have the duct do a 90 degree bend and vent directly behind the wall. There is a bedroom upstairs (not attic) so no option of going through the ceiling. Thanks for the feedback @JPhi1618.. the result was better than I would have ever imagined (not bad for an attempt at 2am with my technical tools - pencil, Benjamin Moore paint swatch for ruler and a nickel!)
    – user105375
    Commented Nov 12, 2019 at 1:11

4 Answers 4

3

Thanks to everyone for the feedback. At the end we had the electrician rewire that section so we could add new studs on either side of the one that would had been cut. Took a couple hours and turned out to be a better and simpler solution. new studs added after rewiring

2

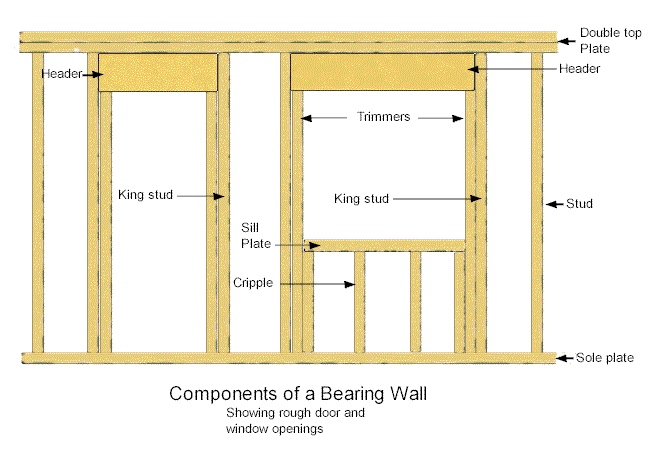
The correct way is to frame the opening with a header, jack studs(aka trimmers) and king studs in the same manner that window and door openings are framed. See image below for reference.

The header is typically made of two pieces of 2x lumber face nailed together, sometimes with a piece of 1/2” plywood between the two to make the depth of the header match the depth of the studs. You can probably use 2x6’s for such a short span.

You can locate the trimmers and king studs to hang the vent hood on, while the cripples below the sill of the opening should be located 16” on center (or whatever the existing stud spacing currently is) in relation to all other studs in the wall.

Of course, all of that wiring makes doing it the correct way difficult... What you are suggesting will work, but it is technically incorrect.

enter image description here

7
  • So, you are saying that the correct thing to do is pull all the wiring out of the wall, re-frame, then rewire all those circuits? Any tips on how to minimize the pain of rewiring?
    – Rob
    Commented Nov 11, 2019 at 18:28
  • Re-doing the wiring and framing will unfortunately not be an option in our case.
    – user105375
    Commented Nov 13, 2019 at 0:25
  • 1
    Rob, I am saying that, but I realize the impracticality of that approach, but it is technically the correct approach anytime a stud is in the way. To the original poster - the weakness in your plan is in interrupting the studs with that horizontal piece - why not just run the double 2x4s turned sideways from floor to ceiling? You could even put 1/2” ply in between these where you don’t need clearance for wires. That would be very strong and dependable.
    – paul
    Commented Nov 13, 2019 at 13:22
  • Thanks for your feedback Paul. The issue is that it will not be possible to insert a full length urned 2x4 stud behind the wires. Are you suggesting we can just use turned 2x4 full length on just the outside?
    – user105375
    Commented Nov 14, 2019 at 13:09
  • Why not? I thought that was your plan based on your drawing? Do you have access to a table saw? Can you make a stud thinner to fit behind the wires? Like 3.5 x 1.25 or 3.5 x 1? I guess I’d say do whatever it takes to build up custom framing members that will give room for the wires and be continuous from floor to ceiling.
    – paul
    Commented Nov 15, 2019 at 4:47
0

The problem you have, is that two 2x4 turned on side (as you propose) will be exactly 4" thick - which is the thickness of the other 2x4 studs - which means there is no space for the wiring. Given that you only need to create room for a 6" exhaust, I think you can go for a much simpler approach:

       |     |
       |  *  |
       | *** |
       |  *  |
       |     |
       =======
         \|/          
          |
          |

|  - vertical stud
*  - cutout for hood exhaust
=  - horizontal beam
\/ - brackets

That is:

  • cut the troublesome stud (after putting in some props of course)
  • attach a horizontal beam (I'd use a couple of 2x4's about 12" long)
  • fix this with brackets (wood or metal)
  • fix a pair of short studs going up to the beam across the top.

This may not be exactly to code, but it seems to me that the load on the two replacement short studs are unlikely to be much more than the load on the original stud, so the remainder of the remaining stud can take it. The biggest concern is if the loads on the two are very uneven, so the horizontal beam tends to turn.

Doing it this way, avoids having to interfere with the mess of wiring below.

3
  • 1
    Wouldn't two 2x4s turned sideways be 3" thick, leaving a 0.5" gap for the wiring? (In my part of the world, at least, 2x4 is 1.5" by 3.5".)
    – Rob
    Commented Nov 11, 2019 at 18:18
  • Yes that was the idea that we would still have ~0.5" gap between the studs to accomodate wiring.
    – user105375
    Commented Nov 11, 2019 at 23:48
  • @Rob - Ooh, yes. You're right. Commented Nov 12, 2019 at 6:11
0

Header. Simpson hangers. Remove section of stud in the way. clean up with a sill plate across top of cut stud. (Next time hire a professional.)

Your Answer

By clicking “Post Your Answer”, you agree to our terms of service and acknowledge you have read our privacy policy.

Not the answer you're looking for? Browse other questions tagged or ask your own question.