17

When I get stuff for DIY projects, I regularly use rope to tie it all down to my trailer.

When I coil up a rope for storage I wind it around my palm and elbow (on the same arm) then use the last approx 1 metre to bind it together. However, when I come to use the rope again I often manage to get it tangled up. I think the large loops might get inside each other? I'm not sure, but there must be a better way.

How can I coil up my rope so that it doesn't get tangled?

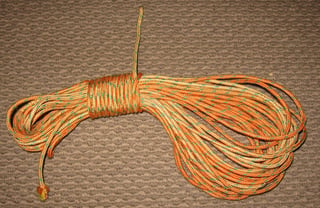
Here's a photo of how I currently do it:

enter image description here

4
  • and if you make the loops smaller (or use more rope for the coil) Commented May 27, 2012 at 11:14
  • 1
    This YouTube video shows a good technique. It's a little extra work while wrapping up the rope/cord, but can save time when unwrapping.
    – Tester101
    Commented May 29, 2012 at 12:46
  • Thats a tidy looking rope you've got there. Commented Jun 2, 2012 at 0:38
  • 3
    @Tester101 - Daisy Chain Stitch like used to sew feed bags shut. Basically double up the cord, create the slip-knot in the end and chain from there. We use it for extension cords and air hoses. One of my contractor friends can sling it so it lays 100 feet of extension cord down in a 50 ft line, undoes the slip knot, goes to the plug end, plugs it into the field box, picks up the socket end and walks it out to the tools and is up and running in about no time at all. Kno Knots, Knever! Commented Sep 7, 2012 at 1:29

8 Answers 8

11

Around the elbow no good, for ropes they get tangled and for cords they get ruined over time.

See my instructions below, but check out this animation for reference.

Keep in mind, I am right handed and this is how I do it:

Start by placing one end of the rope between your left thumb and forefinger, and grab the rope with your right hand about 2 1/2 - 3 feet away both palms down. While holding the rope in your right hand, grab it between your thumb and forefinger. Now bring your right hand to your left hand so the tips of your thumbs meet (and the newly created loop should form towards your left wrist). At the same time, roll the cord that is between your thumb and forefinger on your right hand away from you. Now grab it with your left hand and slide your right hand down the cord 2 1/2 - 3 feet and repeat till done. The last 2 or 3 feet will be used to wrap the cord/rope.

If done correctly, you'll be able to take the end you wrapped around the cord like in your pic, unwrap it, hold one end and throw the cord/rope to unroll.

1
  • My buddy's dad showed me this 30 years ago. This is really key to get good loops with a garden hose. I approach it slightly differently -- when I grab the hose/rope with the right hand, I grab with the thumb down, palm facing right so the twist comes naturally as I hang the loop on the left hand.
    – TomG
    Commented May 28, 2012 at 7:31
6

To get perfect coils:

Don't twist. When you wrap hand-to-elbow, you're introducing a twist with every loop of the coil. You can make figure-8s (great for small stuff, like this) or you can alternate the twist of each loop (as Gunner directed).

If your rope already has a twist, you should take the twist out by overhauling. Start at one end and pass the rope through your hands. You may need to do this a couple times.

The exception is laid line - rope made of 3 smaller strands - which has its own natural twist that you should follow.

Make the ends longer than the coil. There is a potential problem with alternating twists. If a loose end of the rope passes through the loops, it will create a series of overhand knots. Making the ends long enough helps avoid that problem.

Make the loop sizes even. This is not quite as important, and takes a bit more practice, but if all the loops are the same size, they are less likely to pass through each other.

Great coils take practice. I didn't get it until one day I had to coil 14 ropes in a row. Now it's easy.

6

I'm rather late to join in with answers, but this looks like a good reference question and no one has yet mentioned our fool proof method.

There's two issues that need to be addressed to have tangle free rope, wire, cable, etc. One is you must not introduce twists in the material, as kinks will develop. Some variation mentioned already of alternating direction or making figure 8s as it's coiled will prevent twists.

The other issue is the loops getting interlaced as the coil is moved and jostled. The best defense is to keep the loops short and tidy and avoid jostling them. That is often impractical. In high angle rescue, tangled ropes can make the difference between life and death. We also store our ropes in bags to protect them from dirt, grease, etc. We also like open coils we can throw over our heads and easily carry on one shoulder and across the chest. 300' of 1/2" static line can get really heavy in a short distance.

There's only one method we've found that will reliably uncoil without twists or tangles after being tossed around in bags and carried for miles on various shoulders. We call it a bird's nest. It's a circular variation of a daisy chain. It takes a while to do it when breaking down after a rescue, but it's worth it in time saved on the next rescue, and it's not that bad when two people work together, though one person can do it well enough.

You start with three simple, good sized loops of rope at one end. Then you start by tying a half hitch on a bight around the three loops, loosely binding them together.
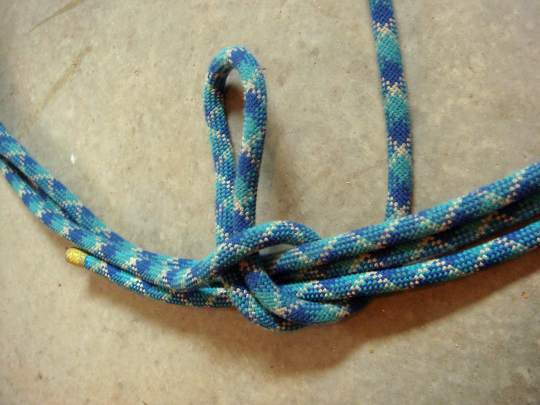
half hitch on a bight

Then in classic daisy chain technique, a bight of rope is passed through the previous loop, except in this case, each bight also wraps around the coil, such that, as the daisy chain progresses, the initial 3 loops will be fully surrounded by interlocking loops.
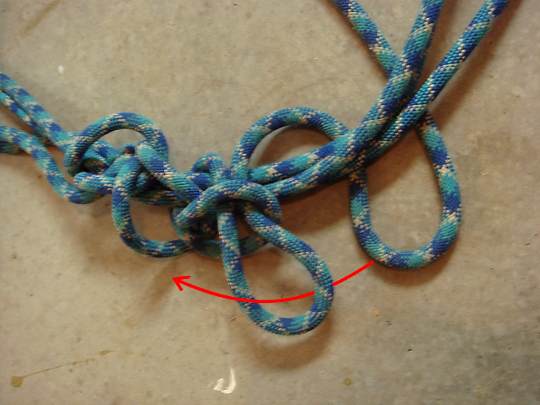
daisy chain

Once the daisy chain goes all the way around, it continues by wrapping the first layer of loops with another layer of loops.
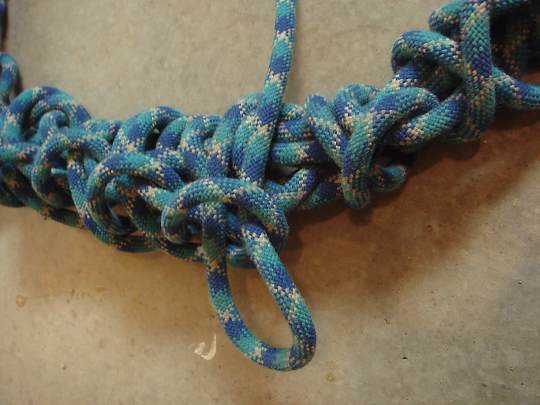
overlap previous loops

Once the layers of loops get fairly fat, the daisy chain work starts going pretty fast, as each loop requires a decent amount of rope to reach around all the material. When the rope's free end is reached, it's finished by pulling the free end through the final loop.
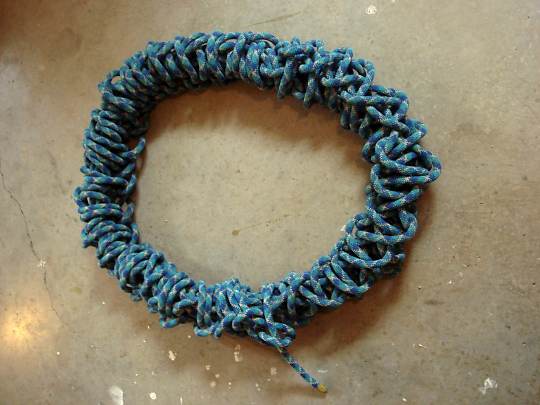
completed bird's nest

For a little extra security, we cinch the free end around the coil with a simple overhand knot (this last bit is not shown in the above image). It looks like a mess, hence the name "Bird's Nest", but it is actually an ordered series of untwisted loops that are impossible to disrupt into a tangle during handling.

When bringing the rope into service, simply undo the overhand and pull the rope through the first loop and the remaining loops will feed out without kinks or tangles. Once one end is secured, we can reliably drop the nested coil over the edge of a cliff and nearly all of it will feed out cleanly without fail. Any daisy chain remaining at the bottom end is quickly shaken out by a rescuer when he/she approaches the end.

3
  • a couple of photographs would help explain this a lot! Commented May 21, 2013 at 2:19
  • Good point Kate! Photos now added along with some minor text edits. Better late than never :)
    – bcworkz
    Commented May 30, 2013 at 18:55
  • Just FYI - we get emails sent to us passing along gratitude and compliments for this answer. They can't comment or vote, so I'm leaving this on their behalf :) Nice answer!
    – Tim Post
    Commented Sep 30, 2014 at 11:22
5

I used to work for a tree service, and I've coiled rope thousands of times, from 1/4" throw line to 1 1/4" bull rope that was usually between 150' and 200' long of several different braid types. I am about as professional at coiling as you can be.

Many ropes (especially larger ones) are designed to be coiled by a right hander. TomG above has the right idea. You hold the rope in your left hand with your palm open. You will loop the rope in coils clockwise and at the same time you will twist the rope clockwise slightly so that the rope lies flat with no pressure. This is why the elbow method does not work, because you can't tell how much to twist the rope to make it lie flat.

Gunner's animation shows in my opinion a great way to finish the rope, but normally we make a hanging loop that can be removed by pulling on the end of the rope similar to how your shoes are tied. This way you can hang a 10" diameter rope coil on a 2" hook.

As I mentioned earlier, most larger ropes are made for right handers and these ropes cannot be coiled counter-clockwise because it is not only impossible to get a good coil, but it loosens the braid.

Also, so long as you have the strength to hold the rope you should do it in your hand to get the perfect amount of twist, but bigger ropes require a herculean effort, so you can either tilt your head down and run the coil on the back of your neck or just lie it flat on the ground.

4

This is really tough to explain, but very simple to do. Coiled rope (and electric cord) should be loose, and a simple toss should be all that's required to unravel entirely - lifeguards and sailors are taught the trick to coiling rope tangle-free, as a tangle can literally be a matter of life or death in their profession.

To coil, consistent loop sizes are essential. Until you get a feel for it, use this old Boy Scout trick: on one knee or sitting down, pull the free rope the distance between your knee and your hand outstretched to your side, letting the line feed through your hand at the knee loosely. Return your hand to your knee, grab the rope from your other hand, and pull the next length in the exact same way, to the exact same position. Return your hand to your knee, grab the rope there, and pull the next loop of your coil in the exact same way, to the exact same position... repeat until the line is coiled completely. Remember, you are moving the coil around, not the uncoiled line! One hand grabs and pulls, the other only guides.

Test your technique by grabbing a loose end with one hand, and heaving the coil across the yard with the other. It should unravel without any tangles or interruptions. Once you "get it", practice. It will be insanely fast compared to coiling it around your arm with even a little bit of practice, and eventually, you won't need the knee trick, you'll make the loops consistent by feel.

If the coil is too large for you to manage, practice making smaller loops (but not too small), or just fold the coil in half once the ends are secured - it will remain tangle free when you unfold it. I use a velcro cable tie to secure the ends to the coil, because I'm lazy.

2

You want to learn to do either the Mountaineer's coil or the Butterfly coil

I use the butterfly coil (not because it's necessarily better, but because I learned it first and it was good enough) and when I was felling a tree-sized herb I could climb up and just drop the coil while holding onto one end to get it to uncoil - no tangles!

2

Coil the rope on floor or ground in a "figure eight". Two traffic cones or something like it makes a great form until you get some practice. Leave the end of the cord free. Now fold both coils together. You can now pull the end of the rope from the center of the coils and it will not tangle.

1

As long as you wrap the rope up in exactly the same way (but reverse) as you will unwrap it, you should not have problems. The issue comes from people trying to use different methods for wrapping (like around the elbow) than for unwrapping. You end up adding a twist which then binds up while unwrapping.

Typically I see people just drop the rope bundle and pull the rope away. So if you wrap up the robe by pulling it back from where it is used, into a bundle on the floor/ground, it should pull back out OK. The catch here is how to make a bundle work that is also practical for storage. Doing so in a circle tends to get twisted up. However a figure 8 does work better by having reverse twist each time. It works well to just pull the rope away. But avoid the temptation to fold the two halves of the figure 8 back onto each other, as this will often be hard to separate again. Maybe wrap the ends or something else around cross point to keep it in the figure 8 form.

I use this technique for my garden hoses and it works well.

Your Answer

By clicking “Post Your Answer”, you agree to our terms of service and acknowledge you have read our privacy policy.

Not the answer you're looking for? Browse other questions tagged or ask your own question.