added 1 character in body
Source Link
Gabriel
  • 321
  • 2
  • 10

To form this strap into the shape below, I did the following:

  1. Fastened a 1" pipe to the workbench using screws (I do not have a vise, so this was my best option).
    • Originally, I was using a 2" diameter pipe because I wanted a 2" diameter curve. A 1.5" pipe would have probably gotten me closer, but the 1" pipe produced a curve with an approximate 13/16 radius (or 1 5/8" diameter).
  2. Wearing sturdy gloves - I slowly bent the metal over the pipe. I bent the middle fistfirst then working side to side, towards the ends, an inch or less on each side of the center.
    • This steel is very resilient, so I would occasionally twist the metal around the pipe (think of a lower case cursive 'i') to smooth out the bends made over the pipe as I went.
  3. After forming the desired curve, I bent the sides out to form tabs using the 2x4 in the picture.
  4. (Not shown) Using aviation snips, I trimmed the excess from each end (intentional waste to facilitate working the metal) and drilled holes for mounting screws.
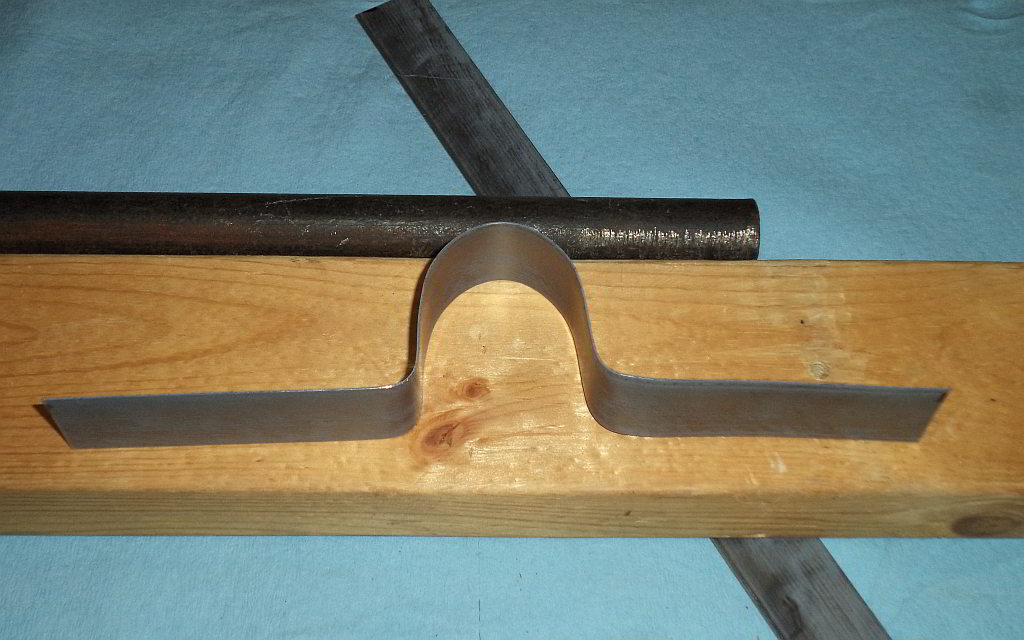
smaller pipe worked!

To form this strap into the shape below, I did the following:

  1. Fastened a 1" pipe to the workbench using screws (I do not have a vise, so this was my best option).
    • Originally, I was using a 2" diameter pipe because I wanted a 2" diameter curve. A 1.5" pipe would have probably gotten me closer, but the 1" pipe produced a curve with an approximate 13/16 radius (or 1 5/8" diameter).
  2. Wearing sturdy gloves - I slowly bent the metal over the pipe. I bent the middle fist then working side to side, towards the ends, an inch or less on each side of the center.
    • This steel is very resilient, so I would occasionally twist the metal around the pipe (think of a lower case cursive 'i') to smooth out the bends made over the pipe as I went.
  3. After forming the desired curve, I bent the sides out to form tabs using the 2x4 in the picture.
  4. (Not shown) Using aviation snips, I trimmed the excess from each end (intentional waste to facilitate working the metal) and drilled holes for mounting screws.

smaller pipe worked!

To form this strap into the shape below, I did the following:

  1. Fastened a 1" pipe to the workbench using screws (I do not have a vise, so this was my best option).
    • Originally, I was using a 2" diameter pipe because I wanted a 2" diameter curve. A 1.5" pipe would have probably gotten me closer, but the 1" pipe produced a curve with an approximate 13/16 radius (or 1 5/8" diameter).
  2. Wearing sturdy gloves - I slowly bent the metal over the pipe. I bent the middle first then working side to side, towards the ends, an inch or less on each side of the center.
    • This steel is very resilient, so I would occasionally twist the metal around the pipe (think of a lower case cursive 'i') to smooth out the bends made over the pipe as I went.
  3. After forming the desired curve, I bent the sides out to form tabs using the 2x4 in the picture.
  4. (Not shown) Using aviation snips, I trimmed the excess from each end (intentional waste to facilitate working the metal) and drilled holes for mounting screws.

smaller pipe worked!

Added summary of process which worked this metal into the desired form
Source Link
Gabriel
  • 321
  • 2
  • 10

Use a smaller pipe!To form this strap into the shape below, I did the following:

1" pipe produced an approximate 13/16 radius turn.

  1. Fastened a 1" pipe to the workbench using screws (I do not have a vise, so this was my best option).
    • Originally, I was using a 2" diameter pipe because I wanted a 2" diameter curve. A 1.5" pipe would have probably gotten me closer, but the 1" pipe produced a curve with an approximate 13/16 radius (or 1 5/8" diameter).
  2. Wearing sturdy gloves - I slowly bent the metal over the pipe. I bent the middle fist then working side to side, towards the ends, an inch or less on each side of the center.
    • This steel is very resilient, so I would occasionally twist the metal around the pipe (think of a lower case cursive 'i') to smooth out the bends made over the pipe as I went.
  3. After forming the desired curve, I bent the sides out to form tabs using the 2x4 in the picture.
  4. (Not shown) Using aviation snips, I trimmed the excess from each end (intentional waste to facilitate working the metal) and drilled holes for mounting screws.

smaller pipe worked!

Good enough!

Use a smaller pipe!

1" pipe produced an approximate 13/16 radius turn.

smaller pipe worked!

Good enough!

To form this strap into the shape below, I did the following:

  1. Fastened a 1" pipe to the workbench using screws (I do not have a vise, so this was my best option).
    • Originally, I was using a 2" diameter pipe because I wanted a 2" diameter curve. A 1.5" pipe would have probably gotten me closer, but the 1" pipe produced a curve with an approximate 13/16 radius (or 1 5/8" diameter).
  2. Wearing sturdy gloves - I slowly bent the metal over the pipe. I bent the middle fist then working side to side, towards the ends, an inch or less on each side of the center.
    • This steel is very resilient, so I would occasionally twist the metal around the pipe (think of a lower case cursive 'i') to smooth out the bends made over the pipe as I went.
  3. After forming the desired curve, I bent the sides out to form tabs using the 2x4 in the picture.
  4. (Not shown) Using aviation snips, I trimmed the excess from each end (intentional waste to facilitate working the metal) and drilled holes for mounting screws.

smaller pipe worked!

Source Link
Gabriel
  • 321
  • 2
  • 10

Use a smaller pipe!

1" pipe produced an approximate 13/16 radius turn.

smaller pipe worked!

Good enough!