added 76 characters in body
Source Link
A. I. Breveleri
  • 14.9k
  • 1
  • 27
  • 47

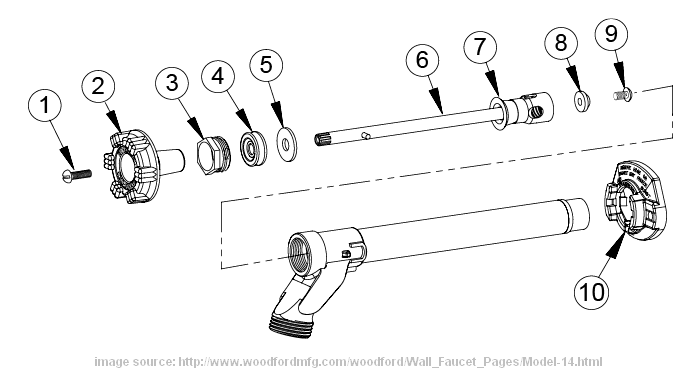
UseWoodford freezelessUse a proper size box wrench to remove or tighten part #3 (the packing nut). Grip the body at the spout with a medium size pipe wrench and apply force opposite the force of the box wrench so there is no net torque on part #10 (the adjustable flange). This will allow you to exert maximum force on the packing nut without the danger of ripping the flange out of your house.

The packing nut holds part #4 (the packing) in place and also compresses it to a watertight fit around part #6 (the shaft). Since you don't know the age or condition of the packing, you should replace it.

Also, while you have the faucet taken apart, clean and polish the part of the shaft that will be gripped by the packing. A rough surface here will quickly destroy the new packing.

You may be able to stop the leak by just tightening the packing nut. My experience is that unless the packing is fairly new, this fix will be only temporary.

Use a proper size box wrench to remove or tighten part #3 (the packing nut). Grip the body at the spout with a medium size pipe wrench and apply force opposite the force of the box wrench so there is no net torque on part #10 (the adjustable flange). This will allow you to exert maximum force on the packing nut without the danger of ripping the flange out of your house.

The packing nut holds part #4 (the packing) in place and also compresses it to a watertight fit around part #6 (the shaft). Since you don't know the age or condition of the packing, you should replace it.

Also, while you have the faucet taken apart, clean and polish the part of the shaft that will be gripped by the packing. A rough surface here will quickly destroy the new packing.

You may be able to stop the leak by just tightening the packing nut. My experience is that unless the packing is fairly new, this fix will be only temporary.

Woodford freezelessUse a proper size box wrench to remove or tighten part #3 (the packing nut). Grip the body at the spout with a medium size pipe wrench and apply force opposite the force of the box wrench so there is no net torque on part #10 (the adjustable flange). This will allow you to exert maximum force on the packing nut without the danger of ripping the flange out of your house.

The packing nut holds part #4 (the packing) in place and also compresses it to a watertight fit around part #6 (the shaft). Since you don't know the age or condition of the packing, you should replace it.

Also, while you have the faucet taken apart, clean and polish the part of the shaft that will be gripped by the packing. A rough surface here will quickly destroy the new packing.

You may be able to stop the leak by just tightening the packing nut. My experience is that unless the packing is fairly new, this fix will be only temporary.

Source Link
A. I. Breveleri
  • 14.9k
  • 1
  • 27
  • 47

Use a proper size box wrench to remove or tighten part #3 (the packing nut). Grip the body at the spout with a medium size pipe wrench and apply force opposite the force of the box wrench so there is no net torque on part #10 (the adjustable flange). This will allow you to exert maximum force on the packing nut without the danger of ripping the flange out of your house.

The packing nut holds part #4 (the packing) in place and also compresses it to a watertight fit around part #6 (the shaft). Since you don't know the age or condition of the packing, you should replace it.

Also, while you have the faucet taken apart, clean and polish the part of the shaft that will be gripped by the packing. A rough surface here will quickly destroy the new packing.

You may be able to stop the leak by just tightening the packing nut. My experience is that unless the packing is fairly new, this fix will be only temporary.